Photos can be taken not only with the camera, but also with a laptop or computer webcam. Windows XP, for example, provides the user with the ability to shoot even without using special programs. For seven you will have to install third-party software. Let's look at how to take a photo from a webcam, in more detail.
How to take a picture using Windows
In Windows XP, you must go to My Computer. In the window that opens, you can see the webcam icon. Usually it is at the very bottom. In order to open the camera window, you just need to double-click on the icon. In the left column you will see the line “Take a new picture”. Click on it and the photo will be ready.
Take a picture with Cyberlink YouCam
Now let's see how to take a photo from a webcam using the Cyberlink YouCam program. In this case, you can add various kinds of effects to the picture. Immediately after starting, the editor starts showing the picture taken by the webcam. Below, under the demo window, there are two icons. One of them is responsible for photographing, the second for video. Take a picture by pressing the first button. Subsequently, it will be possible to view the photo by clicking on its preview in the field under the demo window.
In order to apply any effects to the image, click on the blue arrow to the right of the demonstration window. The set of designs provided by this program is quite wide. To select the desired effect, simply click on the appropriate window.
Photos using LiveWebCam
As you can see, this is not at all difficult - a photo from a webcam. LiveWebCam also allows you to do this in a couple of clicks. At startup, it immediately begins to demonstrate what the camera is shooting. In order to take a photo, you just need to click on “Take a picture”. The program saves all received images in the archive, so that you can always view them if you wish.
How to take pictures on Skype
The Skype program, which you probably already installed a long time ago, also has a function for fixing captured frames. Of course, you can take a photo only with the camera running. To start shooting and demonstrating the video, in “Skype” you need to go to “Tools” (in the panel at the top) and go to the “Settings” line. Check the box next to the “Enable video” option. You can take a photo by going along the line “Video Settings” and selecting “Freeze Frame”. Then click on “Save still image”.
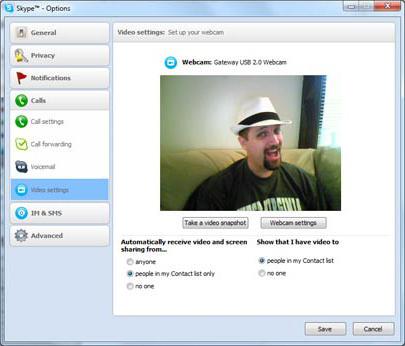
Thus, we figured out how to take a photo from a webcam using Skype. In some versions of the program, the picture is taken a little differently. In the "Video Settings" menu, under the demo window, click on the "Change Avatar" button. As a result, a window with a button “Take a picture” will open below. After the photo is received, you need to click on "Use this image." If the frame fails, you should try again. To do this, the "Try again" button is provided. All photos taken will be displayed in a special field at the bottom left of the window.
How to make a photo of the interlocutor in Skype
In order to take a picture of your interlocutor in Skype, you need to click RMB on his image during a conversation. After that, a menu will be displayed in which you will need to select the “Freeze frame” line. Then the photo can be saved to any folder on the computer.
View photos taken in Skype
Thus, in Skype you can take any photo through a webcam. In order to view the pictures taken using Skype, you need to go to the line “Personal data” in the Skype menu. After that, another menu will be displayed, in which you should select "Change my avatar". Images made in Skype are saved automatically in Png format, usually in the Skype / your nickname / Pictures folder.
Photo online from a webcam
There is another way to take pictures using a webcam. There are services on the network that are specifically designed for this purpose. You can find such a site using any search engine. We select the service you like from the list and go to it. First of all, you will be asked to allow the use of your webcam. We click on the corresponding button in the menu that appears and we see ourselves in the window that opens.
We direct the webcam to the object that needs to be photographed, and click on the "Take a picture" button. Next, select "Save Image." The resulting snapshot will appear in the box at the bottom of the page. To save the photo to your hard drive, click on the preview. After that, the photo will be displayed in the demonstration window. Next, you need to right-click on it and select the “Save Image” line. In the menu that opens, look for the desired folder and click "Save." Also, photo online services usually give a link to a snapshot, which can be inserted on forums or used in social networks.
On the Internet, among other things, there are resources that provide the user with the opportunity to take very original photos. A webcam with effects, or rather, design features built into the service program, allows you to create such pictures without difficulty. Of course, a photo taken on a webcam is rarely very high quality. You can correct the situation using one of the graphic editors. For example, the same "Photoshop."
How to improve the quality of the photo taken
So, we figured out how to take a photo from a webcam. Now let's see how to improve its quality. Usually you have to adjust the contrast of the image, that is, the ratio of the number of white and black dots. To do this, you can simply pull up the levels.

Open the Photoshop editor and go to the Image menu. Next, select the Adjustments line and go to Levels. A histogram window will open. If there are not enough white dots in the photo, it will not reach the right edge. To correct the situation, you need to drag the right slider to the beginning of the histogram. The same thing needs to be done with black dots. Only in this case do you need to tighten the left slider. It is best to work with levels in the Lab Color mode, as this allows you to leave the photo colors unchanged when the contrast is changed. In RGB mode, after adjusting the levels, images sometimes acquire an “acidic” tint. To change it, go to the Image menu and select the first line of Mode. In the window that opens, click on Lab Color.