Cisco is a much simpler network device (compared to other brands), but many people have difficulty setting it up. This is mainly due to the fact that, unlike other routers of this class, it needs some initial basic configuration in order to provide management, security and other important functions. Cisco teams help him with all this.
Configuring a router in iOS
The Cisco Internetwork (IOS) operating system manages routers and has a user interface for configuring Cisco devices. After entering the router, the adjuster enters user mode and receives a hint [Router Name]>, which provides statistical information. To change the router settings, you must enter privileged mode by entering the Cisco “enable” command and perform the following steps in sequence:
- RouterA>.
- RouterA> enable.
- RouterA #.
In order to be able to make large-scale changes in the settings of the router, the user goes into global mode, after which he gets access to any possible configuration mode:
- RouterA # configure terminal or config t for short.
- RouterA (config) #.
The user now has device control. If he needs to change the configuration of the router, he enters the appropriate mode. For example, if you need to make changes to the Fastethernet 0/0 interface, enter Cisco commands in the interface configuration mode and make changes:
- RouterA (config) # interface fastethernet 0/0.
- RouterA (config-if) #.
- Prompt RouterA (config-if) #.
You can insert a question mark at any time. Then the router will automatically display all the possible commands or parameters that apply:
Command Line (CLI)
It has 3 modes, each with different sets of iOS commands:
- Copyrighted EXEC (initial). The user has access to it after entering the router. It is identified by the> prompt following the name of the router. This mode can be determined by issuing the Cisco command: Router>.
- Privileged, Privileged EXEC. Designed to view system settings, reboot and enter a new router mode. It also allows you to use user mode commands by applying the "#" prompt after the name of the router. In it, the user works with saving passwords or adding a secret that restricts access to the installed setting. The included secret password creates stronger encryption when it is stored in the configuration file. In this case, it is safer. Privileged mode can be written: Router #.
- Global (Cisco cli teams). Changes the current system configuration. From the Privileged state, the tuner can switch to this mode by executing the “configure terminal” command. To exit the setup mode, the user can press Ctrl-Z. The global configuration is written as shown below: Router (config) #.
The various submodes can be identified at the prompt: (config) # after the router name. The following are important global configurations.
Initial setting
Cisco devices support a similar modal operating system and similar commands. In addition, routers and switches have the same initial configuration steps.
During initial setup, you must run the following Cisco switch commands:
- Come up with a device name. This changes the invitation of the router and helps to distinguish the device from others.
- Establish access to management. In particular, they provide privileged EXEC access for EXEC and Telnet users.
- Encrypt passwords with a high level of security.
- Set up a welcome banner. Although not required, many experienced users recommend this step to provide legal notice to anyone who wants to access the device.
- Save configuration.
Example commands that configure basic settings.
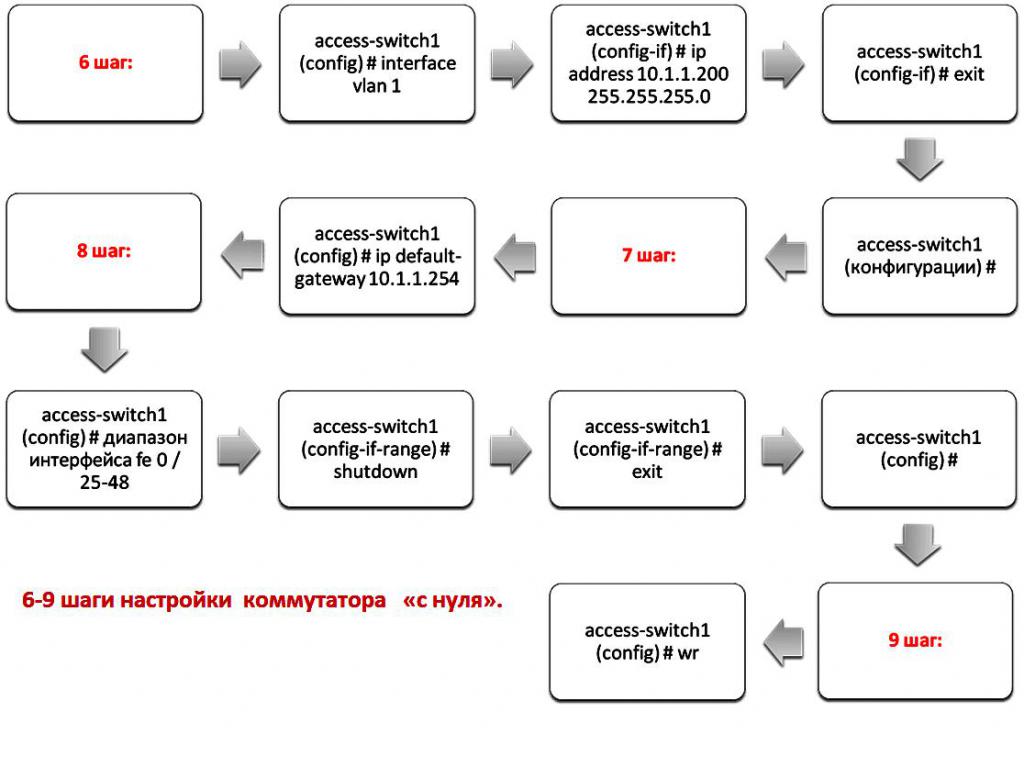
Switch Setup from scratch
Cisco switches are the best on the market. A versatile, reliable, flexible and powerful product line: Cisco 2960, 3560, 3750, 4500, 6500. All of them offer unrivaled performance and features.
The basic steps will help you configure from scratch by running the Cisco switch commands:
- Connect to the device through the console.
- Using terminal emulation software (such as PuTTY), they connect to the switch console.
- Get the initial command line "Switch>".
- Enter “Enable” and confirm.
- Go to the privileged mode "Switch #".
- Switch to global configuration mode (1 step).
- Enter the Cisco command to configure the host name of the specific switch to distinguish it on the network (2 step).
- Register an administrator password, including a secret password (3 step).
- Configure a password to access Telnet (step 4).
- Determine which IP addresses are allowed to access the switch through Telnet (step 5).
- Assign an IP address to the switch, Vlan 1 is assigned to manage the IP address (step 6).
- Assign a default gateway to the switch (step 7).
- Disable unnecessary ports on the switch. This step can be omitted, but it increases safety. Suppose we have a 48-port switch, but we do not need ports 25 through 48, step 8.
- Save configuration for basic switch configuration. You can configure more features, for example, SNMP servers, NTP, AAA, but they depend on the requirements of each specific network, step 9.
Interface configuration
The following is a list of some configuration modes, as well as a list of Cisco commands listed in the mini-reference.
To set the name of the router and adjust the clock, use the hostname command. Banner messages perform an important task in the operation of the router.
It is recommended that you set up security notifications that will be displayed every time someone accesses the router. They are considered valid legal notices. The most useful banner in this environment is Message Of The Day (MOTD). It is shown to each user connecting to the router, the console or auxiliary port.
Password Security
The first thing that needs to be installed on the router before its configuration is changed is the secret password, which is used to provide access to the router with privileged mode. This password uses strong encryption algorithms, which makes breaking impossible. In fact, this action should be number one priority. To make sure that this password is set, the secret enable settings are used, and you can apply them to the router after rebooting the Cisco command: RouterA (config) # enable secret TEST.
For added security, you can use customization passwords. When users access the router (remotely via telnet or through the console terminal), this type of password requests them for authentication. To set this password to access the router remotely via telnet, use the string vty [first line number] [last line number]. By default, Cisco IOS includes 5 virtual terminal lines — 0 through 4.
Manage Router Interfaces
In interface configuration mode, you can apply the IP address and subnet mask using the ip address command. You can also disable or activate the interface using the enable or disable commands. They are very simple. The user will definitely launch them many times throughout the entire operation of the router. The following is an example of a basic Cisco command.
There is a privileged mode command that programmers can use widely. It looks like this: "show". This command has wide application:
- View the configuration of routers.
- Verify interface configuration.
- View the status of interfaces.
When connecting a serial cable to the router interface, synchronization is provided by an external device (CSU / DSU). This is a digital interface device used to connect the router to a digital circuit.
The router is DTE (Data Terminal Equipment), and the external device is DCE (Data Communication Equipment). It provides synchronization. Sometimes you can connect two routers to each other using serial interfaces. Initially, in default mode, each router operates in DTE mode.
Switch Command Syntax
To become experts, network engineers need to be well aware of the wide range of teams used by network technologies. At the Cisco Certified Network Associate (CCNA) level, there are a number of commands that should initially be known when using Cisco network switches.
The syntax is hostname. One of the basic Cisco network configuration commands is the host name assignment used for the device. This host name identifies the device for protocols for other locally connected devices, such as Cisco Discovery Protocol (CDP), which helps identify devices connected directly to the network. Although this is not case sensitive, the host name must follow certain rules: it must begin with a letter and end with a letter or number, and internal characters must be letters, numbers or hyphens (-).
Syntax ip default-gateway. The command configures the default gateway for the switch when IP routing is not enabled, for example, with the global IP routing configuration command, which is typical when configuring the lower level switches 2. The easiest way to determine if IP routing is enabled is to run the show ip route command. If IP routing is not enabled, the result will look something like this:
- SW1 # show ip route.
- The default gateway is 10.10.10.1.
- Host gateway
- Last use.
- General use interface.
- ICMP redirect key is empty SW1 #.
Username syntax. The command configures the username and associates a password with it. Using a password or a secret version of this command is a security issue. Password version of this command:
- Put the password in plain text in the configuration (if the service password encryption command is not enabled).
- Put the password through Cisco’s proprietary encryption algorithm before placing it in the configuration. The secret version of this command will create a MD5 hash of a configured password.
- This username / password is used for several different functions, including Telnet and SSH.
The syntax is enable. Configures a password that will be used to access privileged configuration mode. Because the entire configuration of the Cisco IOS switch requires privileged mode, maintaining this password is very important. This command has two options: password and secret. When you enable the secret team option, it will be used in all production environments.
CLI List for Packet Tracer
A packet tracer is a network emulator used to configure and create virtual devices on a Cisco network. There is also other similar software, but its output will be the same on all emulators using Cisco packet tracer commands. To configure a device in a packet tracer, you must open or access its CLI.
You can do this by clicking on the device and then going to the CLI tab. When the user is in the CLI, you can run all Cisco commands to switch from one mode to another. IOS commands are case insensitive. This means that you can use them in uppercase, lowercase, or mixed versions, but passwords are case sensitive. Therefore, users must ensure that they are printed correctly. In any mode, you can get a list of the Cisco packet tracer commands available in it by entering the question mark "?".
The algorithm for changing the router name and setting a password to protect the enable mode:
- Set telnet password.
- Setting the IP address for the interface.
- Check the IP address of all interfaces.
- Saving the configuration.
- Configure an access list.
- Define the network to advertise in RIP.
Show examples for Router
The main Cisco show commands are: show ip route, show ip interfaces brief, show version, show flash, show running-config, show startup-config, show controller. The show command uses the packet tracer network simulator software to operate. You can use any software for a network simulator or a real Cisco router to follow the instructions. There is no difference in the result if the selected software contains standard commands.
To do this, it is recommended to create a practical laboratory and load it into a packet tracer:
- Use the enable command to enter privilege execution mode. Cisco IOS supports unique context-sensitive help features.
- You can use these functions to list all the available commands and options associated with a show.
- Enter the show command with a question mark to view all available commands.
If the prompt is returned with exclusive parameters, this means that more parameters are required to execute this command. If the invitation is returned as an option, this means that the router does not need any additional parameters to complete this command, and the user can execute this command in its current form:
Router # show interface.
This command shows the status and configuration of the interfaces. By default, it will display all the interfaces, but you can select one. To view the details, use the command:
Router # show interface [type slot_ # port_ #].
The output of this line provides several information about the interface, including its status, encapsulation, its type, MTU, last input and output packets. The first line displays the state of the interface. The first upper one indicates the state of the physical layer, the next one refers to the status of the data link layer.
VLAN Configuration Basics
Since the 1990s, Cisco has been operating with proprietary protocols to help configure the same VLAN for multiple switches. Initially, it supported one trunking protocol: Cisco Inter-Switch Link (ISL).
Initially, ISL only supported the first VTP systems that functioned with the same VLANs. When using version 1 or 2 of this standard range, only supported VLANs were used. This provides added flexibility for network engineers. VTP still does not support VLANs from this extended range, including version 3, which was released before 2009.
A virtual local area network (VLAN) is a broadcast domain created by switches. VLAN is a convenient way to connect ports from different switches and different designs to the same network and broadcast domain, which eliminates the need for a complex system of subnets.
Since VTP operates in server mode by default, it is configured for many devices with switch functions. VLAN expansion will not be performed until the user logs out until the Cisco vlan command is accepted (for example, for switch mode).
Advanced Ping Features
The basic ping command is very often used as a way to troubleshoot device availability issues. It acts by sending two ICMP echo request ICMP echo ICMP echo request messages to determine if the host being deleted is active. The ping function also determines the time taken to get the response.
The ping signal sends a request and then waits for a response. Ping will succeed if the request reaches the destination, and the recipient can receive a response back to the signal source.
If you use the extension in the Cisco ping command, the IP address will be changed to any on the router. Hosts 1 and 2 cannot ping each other. You can fix this failure on routers to find out if there is a problem when one of the two hosts configured the gateway incorrectly.
Directory
There is a directory of Cisco commands. It will help a lot for those who are not very well oriented in this matter. However, experienced users often drop by it. This handbook is a database for Cisco router commands.
It is used by programmers working with the settings of the Internet. Example basic commands:
- Show file running C> show running-config.
- Show startup configuration file (NVRAM)> show startup-config.
- Show flash information> show flash.
- Show Cisco Router Command History> show history.
- Copy changes from running Config to Startup Config # copy running-config startup-config.
- Show version (platform version / OS version / last boot / memory / interfaces / Registration)> show version.
- Show device clock (time / date)> show clock.
- Show users connected to device> show users.
- Cisco.
- exec & non-exec (console / aux / telnet)>enable#configure terminal#enable password Enable Pass1.
- #line console 0#login#password ConsolePass 1#exit.
- #line aux 0##password AuxPass1#exit.
- #line vty 0 4#login#password TelnetPass1#exit.
- ( )>enable#configure terminal#enable secret EnableSecret 1#exit.
:
- >enable#configure terminal#banner motd &#banner line 1#banner line2 &#exit.
- >enable#configure terminal#hostname router1#prompt route r 01#exit.
Cisco:
- Config : Config#copy running-configuration startup-configuration.
- Config : TFTP#copy running-configuration tftp.
- TFTP Running: Config#copy tftp running-configuration.
- NVRAM:#erase NVRAM.
:
- >show ip interface brief.
- rmation >show interfaces.
- Single Interface>show interfaces serial 0.
- >show ip interface serial 0.
- 3- >show protocols.
- IP->show ip protocols.
- IP (, )>show ip route.
- >show hosts.
- >enable#configure terminal#interface serial 0#description this is the serial0 link to router2#exit.
- IP configuration for interface # configure terminal # interface Ethernet 0 # ip address 10.1.1.251 255.255.255.0 # exit.
- Enable interface # configure terminal # interface Ethernet 0 # no shutdown # exit.
- Disable interface (administratively down) #configure terminal # interface Serial 1 # shutdown # exit.
Serial Interfaces:
- Set the clock frequency of the serial interface (DCE cable - data transmission equipment) R1 #configure terminalR1 #interface serial 0R1 #clock rate 56000R1 # no shut.
- R2 # configure terminalR2 # interface serial 0R2 # no shut.
- Set serial interface bandwidth and clock frequency # configure terminal # interface serial 0 # bandwidth 64 # clock rate 64000 # exit.
Lopfey interfaces:
- Create a Loopback interface and set the IP address and mask: #configure terminalR1 # interface loopback 0R1 # ip address 10.1.100.1 255.255.255.0R1 # no shut.
- CDP (Cisco Discovery Protocol).
- Show CDP General Information> show cdp.
- Show CDP interface information> show cdp interface.
- Show neighbors CDP> show cdp neighbors.
- Show neighbors detail CDP> show cdp neighbors detail.
- Show specific CDP trainee, more> show cdp entry R4.
- Setting / setting the time between CDP updates: #configure terminal (config) #cdp timer 45.
- Set / adjust CDP information hold time: #configure terminal (config) #cdp holdtime 60.
- Disable CDP on the entire router: #configure terminal (config) #no cdp run.
- CDP capability on the entire router: #configure terminal (config) #cdp run.
- Disable CDP on the interface: #configure terminal (config) #interface Ethernet 0 (config-if) #no cdp run.
- Enabling CDP in the interface: #configure terminal (config) #interface Ethernet 0 (config-if) #cdp run.
The basic functions of the router are important and necessary because they control the processes of connecting and configuring the device.