The smoke effect on photographs is usually created with the help of special checkers, but you can do without them if you process the image in a graphic editor. Most often, the Photoshop program is used for this purpose. A smoke effect is created using special brushes, pictures with a transparent substrate, if the person is not photographed in very close-ups. How to make smoke in Photoshop so that it looks realistic if the subject is close? Let's consider further.
Source Search
You can find many images with smoke bombs, but often the background on them is heterogeneous and they are not suitable for creating a high-quality smoke effect. If you managed to find a successful photo, you still have to deform it, which does not always allow you to achieve the desired effect. Therefore, before making the smoke effect in Photoshop, it is advisable to choose an image whose shape will ideally match the objects in the photo being processed.
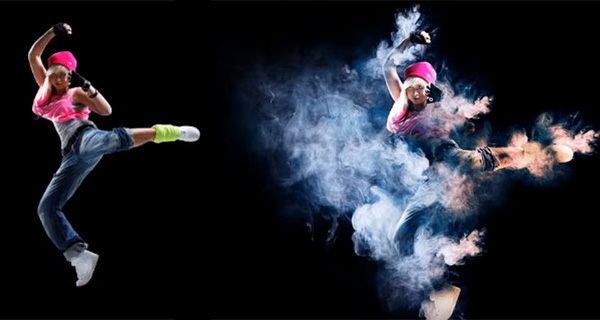
Let's start with a simple option. Let's try to create smoke using the source with a transparent background. First, open the image that we will process in the graphics editor, and then create a duplicate layer using the keyboard shortcut Ctrl + J. We carry out the correction of the photo, removing unnecessary details that violate the composition. Then open the source with smoke and drag it over the processed image. You can do this using the Move tool. We select the “Selection” tool and, left-clicking on the image, select “Free Transformation” from the menu that appears. Changing the proportions of the smoke, we adjust its size and location under the photo.
Proper lighting
When turning the source, it is important to pay attention to how light falls on the main image. In case of an error, the effect will look unnatural. The source can be flipped or flipped, but if the lighting cannot be combined, it is better to look for another option how to make smoke in Photoshop. When the correct location is found, the source layer can be duplicated by selecting it in the layers palette and pressing Ctrl + J, and then positioning it in some other place, increasing or decreasing it.
The correct brush settings
Now back to the first layer with smoke. Add a mask to it and process the edges of the image a little so that they do not stand out too much. To do this, it is best to use special brushes for Photoshop - “Smoke”. They need to be downloaded and installed in advance in the program, since they are not included in the standard sets.
We choose the most suitable one and with its help we adjust the necessary places along the edges so that they are not too clear. To work with the mask on the panel with color, select black, set the opacity of the brush to about 80%, and the pressure to 50%. In addition, you need to set such parameters by opening the brush settings window: check the box for the dynamics of the shape with a size fluctuation of 27% and an angle fluctuation of 19%. We set the minimum diameter to 14, and the shape fluctuation to 9%. Additionally, check the box “Smoothing”. Now, in the process of drawing, the brush will change shape and flip.
How to make the image natural
Next, we work on the mask, selecting it in the Layers panel. We also do with a duplicate layer. For greater realism, you can create a new empty layer, take a sample of the color of smoke with the Eyedropper tool, holding down the Alt key, paint parts in the right places. Photoshop brushes with smoke in this case become a good help for the photographer. Optionally, you can add a blur effect to the image if you go to the "Filter" menu and select "Blur" there, and then in the drop-down menu - "Blur on Gaus". For a blur radius, a value of 5 pixels is sufficient. We unite all the layers into a group, selecting them with the Shift key held down and pressing the keyboard shortcut Ctrl + G. Now we know one of the ways how to make smoke in Photoshop.
Add color
Now you can change the shade of smoke or completely repaint it. To do this, we will use the palette of layers. Add a new adjustment layer “Hue / Saturation”. Bind it to a layer whose color we will change. To do this, click on the "Clipping Mask" icon. Before making colored smoke in Photoshop, double-click on the layer thumbnail to open the settings window. In the parameters we tick off the item “Toning” and, moving the sliders, select the appropriate color. This is a fairly quick color change option that works well for images where the subject is in the background.
Work with the near plan
For close-up photos, you can use another option: cut the smoke from the finished work. This is usually done using the Quick Selection tool or the Magnetic Lasso tool. To remove excess in the selected area, hold down the Alt key, and to add - Shift. In the upper panel, click "Refine Edge" or "Select / Mask." Now, before making smoke in Photoshop CS6 or in another version, we correct the edges of the cut image, getting rid of dark transitions. Then, using the Move tool, drag to a new layer. To place the smoke in front of the figure, cut it out and copy it, and then paste it into its original place. Drag the smoke layer so that it is between the photon and the cut out object. Then we begin to work with a brush on the layer mask (as in the previous case), giving the image more natural contours. It remains only to combine the layers and save the photo. Now we know two ways how to make smoke in Photoshop.