Reduce noise in any photo or image is now real with the version of Photoshop CS2. This program has a function called “Reduce Noise”. You will not be able to completely remove it without hooking on important details of the image object, but there is a real opportunity to significantly improve the sharpness of the photo. This article will cover the basic ways to remove noise in Photoshop: color, brightness, and other artifacts of JPEG images .
Why do artifacts appear in photos? The fact is that not every camera is capable of accurately capturing an object in gloomy time. Even if the building has poor lighting, the photo created by a poor-quality camera is obtained with noises that must be removed. This is exactly what makes noise reduction for Photoshop without damaging the photo.
The main types of noise in the photo
As mentioned above, there are three main types of noise in the image. This is the brightness noise , color, and other defects in JPEG image resolution. Closing a captured object in some photos, you can see blue, green and red pixels along its contours. Such an artifact is color noise, which can be reduced using the Photoshop filter specially designed for this. Let's see how it works. In the menu, look for the “Filter” item, clicking on it, select “Noise” -> “Reduce noise ...” from the drop-down list and proceed to the photo editing settings.
The filter is not a program for photoshop photos, but the usual additional built-in function. You need to consider in more detail the dialog box that you will encounter while editing the picture.
Settings window
The noise reduction filter contains a rather large preview area on the left side and several sections with settings for various noise levels on the right. As in the Photoshop workspace, in the settings window you can immediately see the changes made to the image.
Settings contain four main scales:
- intensity
- noise reduction colors;
- sharpness;
- storage level of the part outline.
Most settings are edited in percentage terms using the slider, and the intensity is on a ten-point scale. Thanks to such easy setups and an intuitive editing window, you can easily figure out how to remove noise in Photoshop. In order to get the best quality result in reducing noise, you must first set all the sliders to zero and check whether the check mark is next to the removal of JPEG artifacts. After that, you can begin to adjust various noise effects to the optimal level of photography.
The viewing area can be zoomed in and out, increasing and decreasing the objects in the photo. So the changes made to the image are noticeable much better.
Color noise editing
Let's start editing photos by reducing color noise. What is he like? These are blue, green, and red pixels around the outline of the object. We will try to remove them, using only a noise reduction filter. So let's get started.
- After we uploaded the photo and selected the “Reduce noise” option, a window appears in Photoshop where we need to enlarge the photo so that red, green and blue dots are visible.
- Next, we proceed to their removal by dragging the slider on the ruler with the name reducing color noise. During editing, we immediately look at the result in the preview area. As soon as the multi-colored dots disappear, you can immediately stop the slider at the required level and proceed to edit the next type of noise. It is impossible to say exactly what percentage to choose, because each photo is unique and differs in its artifacts.
How to reduce picture noise noise in Photoshop
After removing the color defect, you are still not happy with the result and are still wondering how to remove noise from the photo in Photoshop. The next step is to reduce the brightness noise. Unlike the previous defect, black, gray and white dots appear on the photo. This is the noise of brightness. To get rid of it, you need to do two-stage adjustment of the settings. First of all, you need to set the intensity slider to zero and then start the settings. It is important to remember that the photo should remain as realistic as possible. To achieve this result, you need to look at the preview window and compare with the original image. Along with the intensity settings, it’s important to keep the details. Therefore, we monitor not only the disappearance of noise, but also the safety of the object.
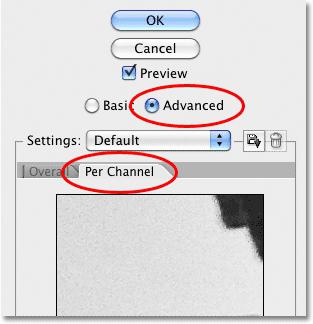
Advanced Filter Settings
If no photo editors on your computer are able to remove noise without significant loss of image details, then the advanced settings of the noise reduction filter will help. They are in the same window as the usual settings, the only difference is that you need to move the checkmark from the "Basic" to the "Advanced" item. New settings will appear to the right of the editing window. You must click on the tab with the name "To Channel". How to remove noise in Photoshop with this little add-on? The bottom line is that here you can get rid of defects separately for each channel. So, for example, there is one line to reduce the blue pixels, another to remove green and separate for red dots. For each of them, you can edit the intensity of the brightness noise and save the details on each of the channels.
Why are these three channels necessary to be edited? The fact is that most of the images are based on blue, red and green. It can be assumed that on one particular channel there will be much more noise than on the other. That is why it is effective to suppress them individually. This leads to the fact that the details of objects in the image will be much better preserved.
We've figured out how to remove noise in Photoshop using a noise canceling filter, now it’s worth paying a little attention to JPEG artifacts while saving a photo.
JPEG artifacts
What is this defect and why does it appear? Regardless of which image is used: fresher, just made with a high-quality camera, or already saved in the Photoshop graphics program with the .jpeg extension - noise appears on the image during compression. It doesn’t even matter which photo editors you use on your computer, the JPEG image will always be less quality, it may even look like individual pixels. To get rid of such defects, you need to check the box next to the item to remove JPEG artifacts in the noise reduction filter settings window. Such actions will lead to the solution of the question: "How to improve photography in Photoshop?"
Useful noise removal tips
- Set the initial parameters of the noise reduction filter to the zero position by dragging all the sliders to the left side. Then adjust, starting with color noise.
- Observe the result immediately in the preview window. Zoom in and out the image in it for the highest quality effect.
- If you cannot clear the photo from noise, go to the advanced filter settings and get rid of the green, red and blue dots around the object channel by channel.
Other image editing software for computer image enhancement
Today there are many different programs to remove artifacts of photography, ripples and noise. And all so that your pictures are as high quality and beautiful. You do not have to use Photoshop to remove the noise of brightness and color from your photo. You can download a specially created program for these purposes, for example, such as Color Reconstructor. Or, optionally install the Adobe Photoshop Camera Raw plugin - this is a special program for Photoshop. A lot of photos can be processed in it, with any known graphic extension and type of compression. But in order for your picture to look as high-quality and beautiful as possible, you need not only to be able to correctly process images, but also to choose a high-quality camera.