A one-piece kitchen worktop is a perfectly smooth plane without joints that can serve a fairly long period of time. But in L-shaped kitchens such a countertop cannot be installed. Therefore, it is made of two parts that are adjacent to each other at a right angle. Also, a straight countertop is sometimes docked (if it is too large and cannot be carried into the apartment). Countertop connection technology may vary. But the main goal of these works is to obtain the illusion of a single surface.
Countertop Connection Methods
There are currently three connection methods:
- With the use of euro-saw (joint to joint).
- Without euro-saw, joint to joint.
- Using a T-shaped aluminum profile.
Next, consider each type of connection between countertops.
Euro-saw: features
This is a method of processing the ends of the countertops on the patterns. On the milling machine, the ends are cut. But some companies use a format-cutting machine for this purpose in order to reduce production costs. However, the result is uneven end face planes (with an allowance of more than a millimeter). Parts of the countertop fit unevenly. Typically, small firms resort to such technology. Well-known manufacturers have specialized machines on which you can get a quality cut of the ends.
The ends machined on the milling machine also have a gap, but it is insignificant. It is not visible to the naked eye, and visually such a surface seems solid. To achieve this result, the patterns should not be worn out, and the machine should be level. By the way, on dark countertops, the connection at an angle of 90 degrees is almost invisible. The surface seems completely solid.
But this type of connection has a couple of minuses. Since the euro-saw is a castle connection, it is impossible to expand the plane relative to each other. Otherwise, the integrity of the structure will be interrupted. If the corner in the kitchen is uneven, when you install the headset in the corner of the room there will be a gap (between the countertop and the wall). And if you move the plane in order to close the gap, a new gap will appear between the parts of the countertop. A more rational option is the use of a plinth.
When ordering a U-shaped headset, it will not be possible to solve the problem with slots with the baseboard, so it is better to install it exactly on the walls. And the gaps between the parts of the countertop can be closed with a T-shaped bar.
Eurostyk
This design looks more neat. Visually it will be a surface without protruding parts. The end is machined on one side, and the longitudinal edge on the other. The complexity of the technology is that the slice goes straight along the entire length, and then smoothly goes to the corner. The saw cuts are treated on both sides with a sealant. Experts do not recommend purchasing a countertop with a textured pattern. The joints will be visible on it.
T-profile connection
This connection is made without a Eurokest. Here the connection is closed by the profile bar (above). But this design has special requirements for tightness. Therefore, the ends and the rack bar are treated with sealant.
Why is aluminum profile relevant? This type of connection has an important advantage over euro-saw. Typically, the parts of the countertop are joined in the area of the sink, which is located in the corner (as communications are being made there). The euro-saw does not have moisture protection. Therefore, at the junction, the material can swell under the influence of moisture. Since the aluminum profile is treated with a sealant, water does not enter the material. But in the case of dismantling, disconnecting such a connection is not so simple. It can only be torn.
Pros and Cons of T-Profile
Among the positive points worth noting:
- Simplicity of installation (it is quite possible to cope with the work yourself).
- Possibility of use near the sink and gas stove.
- The ability to install structures with uneven walls.
- Overlapping slots with imperfect docking.
- Minimum financial investment.
Moreover, the profile does not rust, does not oxidize and is easy to clean. As for the disadvantages of such a connection, there are several of them:
- A profile will protrude above the surface of the countertop.
- A small variety of colors. Shades of aluminum profiles are few, so picking up something to match is very difficult.
Double connection with trapezoidal part
This is a fairly convenient option for placing parts of the countertop. The connection is at an angle of 135 degrees. This design has two joints. They can be connected with an euro saw. You can also use a profile to connect countertops. But it is difficult to make a trapeze with your own hands. And ready-made factory options are very expensive. To get a comfortable work surface, you can connect the countertop to the insert.
Right angle connection
The right angle connection technology is a complex operation, so you need to prepare:
- Screwdriver.
- Drill.
- Drills with a diameter of 5 and 8 millimeters.
- Milling cutter.
- End mill with a diameter of 8 millimeters.
- Spanner 10.
- Pliers.
- Hacksaw for metal.
As for materials, for the angular connection of the countertops you need to prepare:
- Colorless silicone sealant.
- Ties for countertops (clamps).
- Aluminum profile.
So, at the first stage, you should mark the installation locations of the mounts. They are selected so that subsequently fasteners do not interfere with the installation of built-in appliances or a sink. You also need to understand that a solid countertop will always be stronger than a multi-part countertop. Therefore, we need to provide for the installation of additional side walls. The edges of the parts of the countertop will rest on them. Clamps alone will not be enough. They withstand the tensile load, but easily bend. To push the edges, just put a pot of water on a hanging joint.
Dimensions for clamps will depend on the parameters of the fastener. Screeds are available in different lengths and diameters. The most popular and convenient to use are screed diameters of 6 millimeters. The length is 100 millimeters.
How to join the surface with such screeds? First, marking is done on the back of the surface of the products under the washers of clamps and grooves. The distance from the washers to the edges of the countertop is 55 millimeters. The same distance is maintained when using a T-shaped profile with a thickness of one and a half millimeters.
If a sink or household appliances will be installed at the joints, the distance from the edge of the countertop to the wall should be from 7 to 15 centimeters. Usually two couplers are mounted. If one is installed, then it is located closer to the middle.
If a T-bar is used to join the two parts of the countertop, holes are drilled in it, which exactly corresponds to the location of the clamps. Thus, the profile is clamped with ties that pass through the vertical bar. The profile is applied at the installation site. Marks are made on the element through the done grooves. For this, 8 mm drills are used. It is not necessary to drill metal. You can make slots in it. To do this, use two vertical slots. Further, part of the profile comes off using pliers. Using a hammer, the bent edge is leveled. As a result, we get an opening that is located exactly at the place of installation of the clamps. Our T-profile must be mounted to one of the parts of the countertop. Therefore, in three places holes are made for self-tapping screws. But you need to consider that the caps of the screws do not interfere with the docking.
It is important that the fasteners fit flush into the profile. To do this, you need to trim the profile. The length of the profile should advise the width of the countertops (usually 60 centimeters).
We prepare seats for clamps
To do this, take Forstner drills. Their diameter should be 35 millimeters. Using them, we make holes for the C-shaped washer. The depth of the hole should correspond to the thickness of the plate under the countertop. The clamp is placed so that it is located in the middle of the plate in thickness. Then drill four blind holes for two couplers.
Then, with a drill of diameters of 8 millimeters, holes are made in the ends. This hole will connect the blind grooves under the C-shaped washers and ends. To make the hole accurate, it is recommended that you first drill the product with a five-millimeter drill.
Then proceed to milling. You need to make grooves with a width of 8 millimeters. For this, a drill and a grooving cutter are used. It is necessary to walk with a milling cutter from a blind groove to the ends. So we will remove the outer layer of material from which the countertop is made.
Connection parts
So, we have ready seats for tightening products. Next we mount a T-shaped profile. We attach it to the end and fasten it with screws.
We screw until the caps are recessed into the body of the metal. Previously, experts recommend lubricating part of the surface of the countertop and the end face with silicone sealant. After installing the strip, the surface is also treated with sealant. It is important to cover blind holes and grooves. The better the insulation is made, the lower the risk of moisture ingress.
What next?
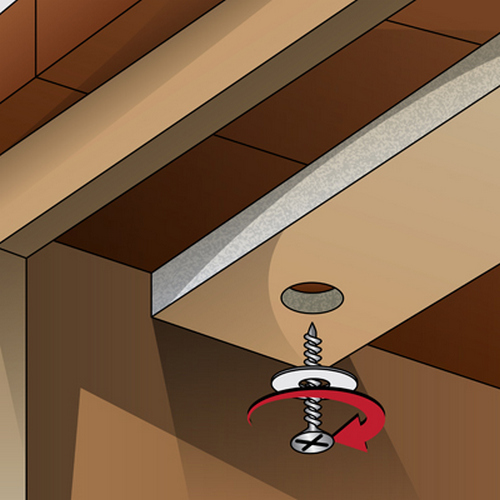
After that, the two parts of the countertop must be connected to each other. Clamps fit into the grooves. A tightening head will be placed in the blind hole, which is in the opposite place from the nut. Washers fit under it. Then we tighten the nuts with a key and draw two parts of the tabletop to each other. Clamps are pulled together crosswise, alternately. Immediately tightening the nuts is not recommended. The whole process is carried out gradually.
How to join a countertop without an aluminum strip?
This operation is the same, except that the ends are glued with sealant. Excesses after pressing two planes are removed with a sponge or a clean cloth. But many refuse to use this type of worktop connection. The seam between the surfaces will not be protected. The connection of a countertop without a bar with a sealant is only a temporary and unreliable protection. Over time, such a sealant will depart due to frequent and constant mechanical stresses.
To summarize
So, we found out how to connect a wooden countertop. As you can see, you can perform this operation yourself. However, whichever worktop connection is used (with or without a plank), it is important to take waterproofing measures. Moisture cannot penetrate between the ends. Otherwise, the life of this design will be short. Performing the connection of the tabletop with screeds according to the rules, you can get a strong and wear-resistant design. The service life can be more than ten years. When connecting the countertops with a strap one and a half millimeters thick, the aesthetic design indicators slightly deteriorate. But thanks to this bar, the gap closes, and the structure itself does not bend.