The BIOS primary input / output system or its improved newer UEFI modifications is an integral part of any stationary personal computer or laptop and is very often used to set some important parameters that cannot be changed in other ways. In addition, it is this chip and the “shell” embedded in it that are responsible for storing data about all the “iron” equipment and testing the main components when the computer device is turned on. But it also happens that the BIOS does not start on the laptop, and it becomes impossible to use the change in the settings the user needs. What is the reason for this phenomenon, and how to independently fix possible malfunctions and failures, then we will try to figure it out.
Why BIOS does not start on a laptop: the main reasons
There may be quite a few situations in which access to the primary system is denied. As for the main causes of this phenomenon, most experts distinguish the following:
- access using the wrong keyboard shortcut;
- Inoperative or conflict-causing equipment
- physical damage to the chip, motherboard or excessive overheating;
- incorrectly set settings of the primary system itself;
- outdated or damaged software firmware.
Based on the items presented in the list above, we will try to understand each situation and try to find out in what ways you can solve problems without contacting a service center.
The nuances of access to BIOS on laptops
First of all, let's look at a situation where BIOS does not start on an ASUS laptop or laptop of any other manufacturer. Each user should clearly understand that, unlike stationary computer terminals, where a single Del key is used to enter the primary system (moreover, on an external keyboard), for laptops their manufacturers themselves install completely different combinations. Most often, there is either the use of a single function key, or the button for invoking a special start menu placed on the main keyboard panel, or combinations with the Fn, Alt, etc. keys.
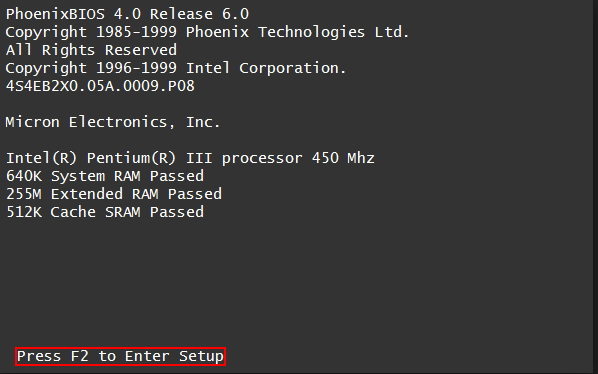
If you see that BIOS does not start from the keyboard on an HP laptop or laptop of any other manufacturer (entering the primary system settings with a standard combination is impossible), pay attention to the start window that appears when you turn on the device, which will show the item describing the combination entrance. True, one should be very careful here, since it appears for a very short period of time, and the user does not always have time to notice the necessary information on the screen. In extreme cases, you can refer to the manufacturer’s official Internet resource and find the necessary data there or see the technical documentation for the laptop, if any.
Can I get to BIOS without a keyboard?
Part of the problem that BIOS does not start on an Acer laptop (or on any other model) may be due to a keyboard failure. In this case, it is strongly recommended to check for operability. Who knows, maybe the right button just doesn't work? The same goes for using wired or wireless keyboards. But the situation may be complicated by the fact that the USB port or wireless adapter does not work. As already understood, they will also have to be checked, for which it will be necessary, if possible, to fully load the operating system and use at least the “Device Manager” to check the status of the device itself and its installed driver.
As for access to the primary system without using any keyboard whatsoever, it is believed that there are several ways, but they are so time-consuming that the average user will not understand them. And that is why they are not considered. In 95% of cases, it is not possible to get BIOS settings without a keyboard.
But on non-standard models, special attention should be paid to special buttons located on the main panel and designed to call up special menus, through which you can often get to the parameters of the primary system. But such buttons are not on all laptops.
Problems connecting an additional monitor
You can often find situations where BIOS does not start on a Lenovo laptop or a model from a different manufacturer, where some function keys, when used together with Fn, have the function of duplicating a screen or projecting an image on a second connected monitor.
Here the situation is solvable quite simply, and you do not need to have any special knowledge to perform further actions. If the BIOS does not start on the laptop (the black screen appears on the laptop), it is possible that the projection is still active, and the second monitor is not connected at the moment. As already clear, the output will be the deactivation of this function (Fn + F5, Fn + F8, etc.). If the user still needs a second monitor to work, you just need to turn it on and check if there is an image on it.
Resetting the primary system to factory settings
Quite often, it can be observed that BIOS on a laptop does not start under any pretext due to incorrectly set parameters in the primary system itself. The situation is quite serious, because some “too active” users sometimes set such options that the primary system simply “flies”. The same goes for the firmware process when the power suddenly turns off. But this mainly applies to situations where the laptop’s battery life is not provided at all, or it is almost completely discharged (we’ll dwell on the firmware separately).
In this case, it makes sense to perform a complete reset of all parameters to the factory settings.
Since the BIOS does not start on the laptop, the laptop will have to be disassembled and the CMOS battery removed from the socket on the motherboard for 10-15 minutes. In this case, all parameters will be reset automatically and without the necessary user access to the software shell of the primary system.
BIOS does not start on a laptop (black screen): how to update firmware?
Now a few words about updating the firmware. As mentioned above, its obsolescence can lead to the fact that the BIOS on the laptop does not start. Unfortunately, it is not always possible to update the software shell of the primary system directly in the Windows environment, although there are no problems with UEFI. However, you can download the update and write to removable media. For example, if the BIOS does not start on the ASUS N53 laptop or another model of the same serial line, you first need to download the firmware from the official website, change its extension to BIN or ROM (depending on the flasher used) and copy it to removable media.
Now the most important thing! As a removable device, you must use either ordinary flash drives or SD memory cards with a capacity of not more than 2 GB, previously formatted exclusively in FAT16! If this is not done, the device by the primary system simply will not be recognized. After that, you must completely turn off the laptop, remove the battery, insert the media into the desired port, hold down the Ctrl + Home keys and, while holding them, first plug the power supply into the power outlet, and then press the power button directly on the laptop. After the indicator on the flash drive lights up, you should release the pressed keys.
After a couple of seconds, a reboot should follow, followed by the start of the proprietary built-in Easy Flash applet. Here you just need to wait for the firmware process to complete. When the laptop restarts again, turn it off, insert the battery back and turn it on again.
Note: sometimes the device may not be recognized the first time. In this case, you will have to search for a suitable port on your own, and actions on laptops from different manufacturers can vary quite a lot.
Conflict Device Definition
Now suppose that everything is in order with the software environment, but BIOS does not start on the laptop even after a flashing. What could be here? Apparently, in the laptop there is some kind of device that causes conflicts.
Disconnect all external devices, and then disconnect the hard drive, optical drive, wireless adapter, discrete graphics card, etc. (everything that can be removed from the motherboard). After that, turn on the laptop again. If entry into the primary system becomes possible, turn off the laptop and install the removed devices in their places in turn. When the problematic device is found, it will have to be replaced.
Broken Graphics Cards
You can often find situations where BIOS on a laptop does not start due to a non-working video card. Unfortunately, such problems are seen with NVIDIA GeForce 8 Series graphics chips and outdated AMD cards that are installed on Acer laptops. In this case, the easiest way is to remove the problem adapter immediately and try to enter the BIOS. If the firmware is not damaged, the card will have to be changed. In the event of failures, you can try to reflash the software environment of the primary system. Again, you need to see the installation instructions for the updated software in advance.
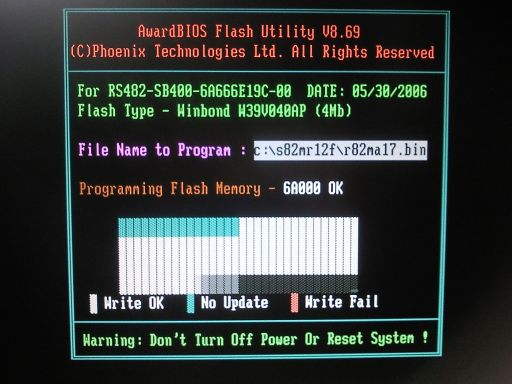
Some experts recommend using special flashers such as Flash Utility for DOS, but you need to use only those versions that are suitable for the BIOS of a particular developer (Phonix, InsyderH2O, etc.). The process is quite complicated and can be started, as the name implies, exclusively from the command console, but first it is recommended to create a special Crisis Disk media with a flasher and firmware file written on it.
Overheating chips
This is perhaps the simplest situation, but overheating can apply both to the graphics adapter and to the BIOS chip itself. In this case, it is best to give the laptop a “rest” for a while, completely de-energizing it and removing the battery to get rid of residual currents. Only after that it can be turned on again, after which one of the above actions can be taken. In particular, it helps Acer Aspire laptops of the 7220, 7520, 5220, 5520, 4220 and 4520 lines with NVIDIA MCP67 graphics cards. But it should be noted that such resuscitation is only temporary.
Manual BIOS recovery
Finally, you can try your hand at self-restoration of the primary system. Again, the process is quite complicated, and for its implementation it is necessary to use the special Crisis Recovery Mode. In case of damage to the BIOS boot block (BIOS BootBlock), the procedure becomes even more complicated, so it’s better not to experiment with such things. In addition, when the chip dies, a special programmer may be required.
What if nothing helps?
Finally, if none of the above helps, or some operations could not be completed on your own, it is easiest to contact the nearest service center or a qualified technician who can even replace the chip soldered into the motherboard. It will cost, of course, not cheap, but still better than buying a new "motherboard", which is comparable in price to almost buying a new laptop.