In the era of digital photographs, processing aids was required. The place of the best image editor is rightfully occupied by Photoshop. Its possibilities, if not unlimited, then certainly very significant. But most users absolutely incorrectly use some of the "Photoshop" settings or are not even aware of their existence. To use the full power of the program, you must properly configure it.
What are the options?
Many, having first opened the program, find themselves face to face with dozens of buttons, sliders and parameters. A logical question immediately arises: “Where are the settings in Photoshop?” Editor options can be divided into several conditional categories:
- Hardware settings of the program itself.
- Colors.
- Brush and interface options.
- Separate parameters for each tool.
It’s almost impossible to set up Photoshop correctly for the first time. It takes time to get used to the program. This can take several hours, a week, a month - it all depends on the frequency of work.
Differences between Photoshop CC and CS
The debate over which version of the popular editor is better has been going on for several years.
Photoshop CC has built-in advanced features for teamwork on the project, improved capabilities and productivity of 3D-designing and 3D-printing, expanded the standard set of brushes and some tools. In addition, the program runs on a new engine, which means it has become a little more productive.
Differences of the CC version from CS will be subtle or invisible to a novice user at all. Setting up Photoshop SS is almost identical to setting up any other Photoshop, therefore, following the general recommendations of this article, you can adjust this editor as you like.
main parameters
You can go to the main settings window with the key combination Ctrl + K. There are quite a few parameters here, and if you describe each of them separately, you get the whole documentation for Photoshop, so we’ll dwell only on important points in detail.
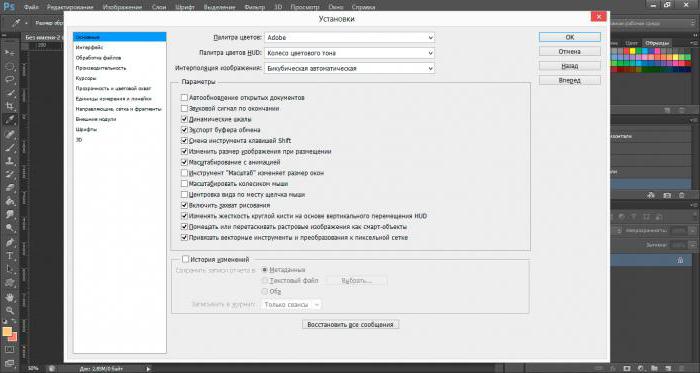
- So, the first tab is General (basic settings). Here you can choose to display a dynamic palette, a color system, and an image interpolation method. Below is a list of useful items. By default, they are quite acceptable, if you are not sure of the correctness of the actions, you do not need to touch them.
- The following is the Interface tab. Here you can choose the background color and the window itself, the program language and font size. Everything you need to set up Photoshop for yourself.
- File Handling Menu Menu for saving and opening documents. Here you can also leave everything as default.
- Performance tab. More details are described below.
- Next come the various interface settings. You can select the display mode of the rulers or their values, cursors in different situations, guides and grids, the plug-ins and typography settings window.
Performance settings
In the Performance tab, you can select the settings for Photoshop CS6, in which it will be more comfortable to work even on slower machines. The first section is memory. Using the slider, you can set any value. The system automatically calculates the available number of bytes of memory and the most favorable range of values, in case you find it difficult to decide for yourself.
Cache and history. History is needed to preserve actions and their possible cancellation. The choice of the number of recorded steps is up to you. 20-30 points is a perfectly acceptable value. A cache is needed to save the current image at different scales in memory. So, it is easier for the program to reproduce the saved image than to scale it each time.
Graphics and discs
In the disk settings section, you can select a local partition that will be used to store temporary files, and also act as a memory swap partition if necessary. By default, this is a system partition, but you can use a disk with a lot of free space. Ideally, for Photoshop, you should reserve a separate section, and specify it in this window. So the program will be slightly accelerated.
The final window is the use of the GPU. Definitely worth checking the box if you have an additional video card. To render large images, Photoshop needs as much processing power as possible. In the additional menu of this item, you can select the mode of use of the GPU.
Color adjustment
"Photoshop" supports many working color profiles. You can go to the color settings menu of "Photoshop" using the key combination Shift + Ctrl + K. Here are few points, but many parameters inside each drop-down list.

- The first Settings section is a list of settings. It offers a choice of several predefined macros. In most cases, you can use one of them.
- Next are the settings for the working color profile. For most shots from professional cameras and other images, classic Adobe RGB (1998) is suitable. Having the largest color gamut allows you to display and adjust colors in Photoshop on a monitor or print.
- The last point is the choice of an action policy. For each color space, there are three identical parameters for working with the color profile. Off - disables color management for images whose profile is different from the working one. Preserve Embedded Profiles is the best option. Allows you to save the built-in profile and restore it in case of incorrect conversion to working. Convert to Working - simply converts the original profile into a working one.
In order to fully control the color parameters of incoming images, set all three bottom checkmarks in the Color Management Policies section. In this case, the program will each time offer a choice of several actions if the color profile of the incoming file does not match the built-in work profile.
Interface customization
In "Photoshop" presents a fairly wide range of interface settings. It is possible to change the position of almost all the tools, tabs, add or remove any of them with a simple drag and drop.
There are also saved factory workspace macros for various tasks. You can select them in the tab "Main work environment" in the upper right corner, immediately above the entire work area. In the drop-down list, you can select ready-made samples, reset the settings or delete the workspace macro.
By the way, the choice of the type of workspace is a purely individual matter. For artists it will be useful to constantly display a navigator or palette, for photographers a histogram, for designers coordinates.
In the settings of "Photoshop" it is possible to control the parameters of the main menu. By default, the window is opened using the combination Shift + Alt + Ctrl + M and contains only two tabs and one list of current settings. It makes sense to disable rarely used tools in order to save space on the screen, but only if it is really necessary, because you never know what pitfalls the processed photo hides.
In the same window, it is possible to customize keyboard shortcuts based on your needs. You can connect any combination for any item. The menu is intuitive, there are no complicated settings in it, which means we will not dwell on this in more detail.
Tool settings
In addition to adjusting the usability of the program, there is the possibility of fine-tuning brushes and other tools. Each has a "flash menu" that opens directly above the workspace at the time of activation. For example, for brushes, the type, size, blending mode, pressing force and several settings for tablets are selected. There is also a button for switching to the full menu for setting and managing brushes.
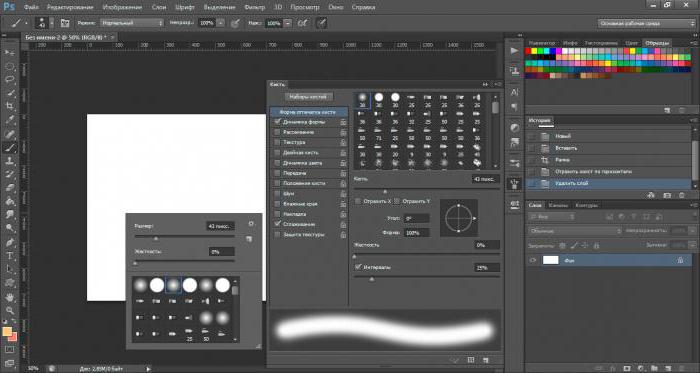
There are a lot of brush functions in Photoshop, but they are all useful. The menu with brush presets is opened by clicking RMB in any part of the workspace, but the global settings menu is opened by clicking LMB on the icon with brushes in the side menu on the right or on the icon in the flash menu. Here you can select any contour effects, add texture, blur, rotate, refine and stylize only the contour or the entire print. More flexible brush settings in Photoshop can be done with a graphics tablet. Immediately, the effect of pressure will be noticeable, while the texture quality of a particular brush at the edges of the line. This is more true for brushes of complex shapes.
Tool Settings Manager
From the same menu, you can go to another settings block by clicking on the icon in the lower right corner. In this window, you can add or remove brushes, create your own, sort and create toolboxes. You can load not only brushes, but also any other elements from the drop-down list. They can be downloaded ready-made or made yourself.
Unfortunately, it is impossible to recommend any generalized settings for this menu. It all depends on your preferences and type of activity. Just try moving the sliders and see what happens. A brush of the desired shape and texture is sure to be found.
Print
"Photoshop" can be used not only for drawing or processing photos, but also for high-quality photo printing.
All print settings in Photoshop are located at File / Print or Ctrl + P. There are several ways to print, depending on which images you want to receive on paper:
- Print low resolution, vector drawings, text, monotonous abstractions and low resolution photos.
- Print photos and pictures of high resolution and geometry with a complex pattern.
In the first case, you can simply go to the print menu by pressing Ctrl + P. All you need to set in this window is the Printer Manages Colors item (the printer controls the color). Optionally, in the upper section of Printer Setup, you can select the paper orientation or make adjustments to the advanced settings of the printer itself.
As in the first case, go to the print section Ctrl + P. In the color management menu, select Photoshop Manages Colors (the color is controlled by Photoshop). Next, select a color profile. It usually ships with printer drivers, but can also be downloaded manually from the printer manufacturer’s website. The color profile should describe the operation of the printer as accurately as possible. Optionally, you can set the rendering method and black point compensation and other parameters. This method will allow you to accurately reproduce colors during printing.
There is no need to change the standard RGB color scheme . All modern printers perform automatic profile conversion.
What if you configured too much?
After visiting all the settings sections, dragging various sliders and hiding a couple of important windows, you may find that the program has become noticeably worse. There is nothing to worry about; you do not have to reinstall the program. You can return to the default settings of "Photoshop" in a few steps and get the product "out of the box."
- To do this, at the time of starting the program, hold and hold the combination Shift + Ctrl + Alt. A confirmation window will appear. After agreement, the program will restart with the factory settings.
- But you can also click on the "Cancel" button in the main settings window, with the Alt key previously pressed.
After the actions done, set the necessary "Photoshop" settings and restart the program.