Despite the fact that such versions of Windows as the eighth or tenth have been released for quite some time, XP is still popular with many users. Unfortunately, Microsoft stopped supporting it, but maybe someone is not already using the latest version of the OS.
This article will explain how to upgrade Windows XP SP2 to SP3. This procedure is not at all complicated, and with our instructions it will take a little time at all. Also, at the end of the article, we'll talk about how to upgrade XP to Windows 7.
Preparatory Activities
Before you upgrade Windows XP SP2 to SP3, you should prepare your computer and configure yourself. To get started, download the service pack itself. Unfortunately, it will not be possible to find it on the official website of the company, but there is a corresponding archive on Yandex.Disk.
After downloading the package, it’s too early to upgrade to Windows XP to SP3, you still need to prepare the system.
- You need to check your computer for the lack of updates "Sharing Toolkit" and "Multilingual Interface Pack" and, if any, remove it. To do this, in the "Control Panel" open the "Add or Remove Programs" application, select the "Show updates" checkbox, look at the list of previously mentioned updates in the list and delete them if it is found.
- Also check the status of antiviruses - they must be disabled, otherwise problems may arise when updating the XP version.
- It does not hurt to create a recovery point. If you do this, then in the event of a malfunction in the new version of the OS, you can "roll back" to stable SP2.
Having prepared the system, you can go directly to the story of how to upgrade Windows XP SP2 to SP3.
Installation inside the operating system
As stated at the beginning of the article, there are two ways to update. The first involves installation inside the operating system, it will be discussed now, the second requires the installer to be launched via BIOS, it will be discussed a bit later.
Before upgrading Windows XP SP2 to SP3, I want to say that this process is similar to installing any other software, so that for most users it will be understandable, but for the rest, detailed instructions are provided below:
- Run the update installer file downloaded from Yandex.Disk.
- Unpacking the installer files to a temporary folder will begin. Wait for the end of this process.
- In the welcome window, which after that opens, you need to click "Next".
- The text of the license agreement appears. To continue installing the update, you need to read it and accept it. To do this, check the box next to "I accept" and click "Next".
- The installation process of all update files on the computer will start. By the way, this process does not last long.
- After its completion, the last installer window will appear. It will tell you that to complete the installation, you must restart the computer. You can do this right now by clicking the "Finish" button. Otherwise, check the box "Postpone reboot" and click "Finish" - the installer window will be closed and you can finish all the work on the computer.
- But you still need to restart the computer. After that, the message "Please wait" will appear on the boot process of the operating system - at this time the process of installing the update is completed.
- As a result, a window for subscribing to automatic updates will appear. Select the answer you want and click Next.
This is the first way to upgrade Windows XP SP2 to SP3, now let's move on to the second.
Installation via BIOS
Installing the update via BIOS means using the nLite program, so download and install it on your computer first, and then proceed to the instructions.
- Insert the Windows XP disk into the drive and move all the files that are stored on it to any folder convenient for you, but make sure that there are no Russian letters on the path to it.
- Open the nLite application and in the first window select Russian from the list and click "Next".
- Click "Browse" and in the window that appears, select the folder into which the files from the disk were copied.
- Click "Next."
- In the next window, also click "Next."
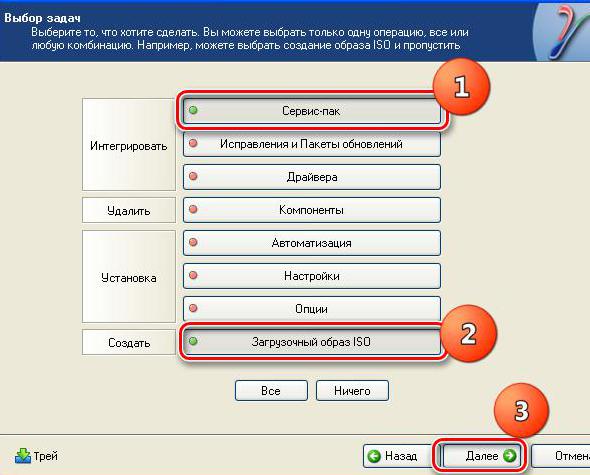
- From the list of tasks, select "Service Pack" and "Bootable ISO Image", then click "Next".
- At this point, click "Select", and in the window that appears, "Yes."
- Click "OK" in another window.
- In the window that appears, specify the file downloaded from Yandex.Disk.
- After waiting for the completion of adding this file, click "OK", and then "Next".
- Click Create ISO and select the folder in which the image will be placed.
- Wait until the image creation process is completed and close the application.
The image of Windows XP SP3 is created, all you have to do is write it to a USB flash drive and boot the computer from it, and then install the OS.
Upgrading to later versions of Windows
Many users, when they think about upgrading Windows XP to a newer version, want to install the seventh or eighth. Unfortunately, this will not succeed, since the submitted editions must be downloaded separately. Therefore, you can upgrade Windows XP to Windows 8 only by buying a disk from this OS or by downloading an image from the site.
Conclusion
As a result, you know two ways to upgrade Windows XP SP2 to SP3, each of them has distinctive features, but all of them equally allow you to achieve the desired result.