The program "Lightroom" from the well-known company Adobe is designed to quickly sort photos, create slide shows and albums. In addition, the editor allows you to retouch and adjust images in various ways. We will talk about how to edit and how to save a photo in Lightroom in this article. We will consider the work of the editor on the example of the fifth version.
Saving photos in Lightroom
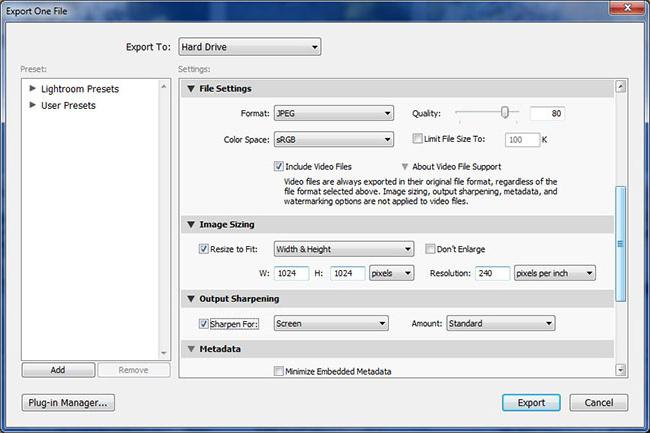
There is no ordinary “Save” button in the Lightroom program. Most often in this editor, photos in RAW format are adjusted. You can save the changed image only by export. Select the desired photo in the Library module, which will be described below. Several images can be selected at once using the Ctrl or Shift keys. Next, click on the Export button located in the left part of the program window at the bottom (you will see it only if you are in the Library module). You can also just right-click on the photo and go to the line of the same name in the context menu that appears. Export is also done through the File menu. After clicking on the Export button, a window will appear in which you can edit the save settings.
Save settings
So how to save a photo in Lightroom? In the Export To section, select the location to save the files. Usually this is Hard Drive. Further, you can select the same folder as the save location where the original files or any other one are. The second option (Specific folder) is usually more convenient. Similarly, when exporting multiple photos at once, they can be placed in the same folder and not later searched for in different. Below you can give the files names, as well as choose the format (usually Jpeg), quality (slider) and color space (most often RGB) in which they will be saved. Next is the Image Sizing tab, in which you can resize the image. If necessary, a limit to the width and length of the saved photo is set here. In the Output Sharpening tab, adjust the sharpness of the saved image.
Below that is a line designed to set up a watermark. In the Watermarking drop-down menu, select Edit Watermarkis. Then, in the window that opens, you can enter the necessary text for the watermark. A fairly large number of fonts are available here. If desired, a pre-drawn picture can also be used as a watermark. The transparency of the inscription is adjustable. In addition, it can be changed in other ways: shift, rotate, select the size, make shadows, shade.
The most recent command determines what the program will do after exporting the photo. The editor can open saved images in Photoshop, open the folder in which they are saved, etc.
As you can see, exporting files in the Lightroom program is not such a complicated procedure as it might seem at first glance. Next, we will make a short review of this program.
Open photo
Let's see how to open a photo in Lightrum. Files in this editor do not open, but are imported. In order to select photos requiring processing, go to the main menu File - Import Photos from Disk ... On the left side, after clicking on the import photo button and the File menu, the folder tree is displayed. After switching to the desired one, the pictures contained in it appear in the working window. You can select the necessary ones by ticking them. Next, at the bottom of the window, click on the Import button.
Library module
After the photos are imported, a few buttons will appear at the top of the editor window. These are the main sections in which you can work. To a large extent, photo processing in Lightroom is performed in the Library (library) and Develop (development) modules. In the Library, you can view images, apply quick settings to them, and move images between folders. The latter are shown on the left in the Folders menu. You can work only with those folders, photos from which have already been imported. On the right under the histogram is a list of presets (Saved Preset) that can be applied to the photo. The Quick Develop menu performs quick surface treatments in Lightroom. If you wish, it’s easy to change the tone, brightness, contrast, photo exposure, etc. There is also a Keyword Tags menu at the bottom right. Here you can leave any comments on the images.
Develop Module
How to save a photo in "Lightroom", how to open it and how to perform basic editing, we have examined. Now let's figure out what means of serious adjustment exist in Lightroom. In the Library section, only small, quick changes are made. The main work on image correction is carried out in the Develop module.
On the left, in the "Presets" window, there are various presets for photos, created independently or already built into the editor. In the Snapshots section, you can take pictures when working with images. This is a temporary copy of the state of the photo at the moment. Such a picture remains relevant only in the process of working with the current image. If desired, you can make several such copies of the photo at different stages of its processing. This is useful if there is a need to compare the state of the picture before making changes and after. In addition, all stages of photo processing are stored in the History section, which is located below Snapshots. All the basic editing tools in the Develop module are located on the right. Let's consider the editor’s capabilities in this regard in more detail.
Editor’s Tools
So how to process a photo in Lightroom? The first tool that can be seen under the histogram in the panel on the right, in the Develop module, is Croop (cropping, cropping). It is intended for cropping pictures to the desired size. Using this tool, you can, among other things, align the photo with the littered horizon, rotating it. In this case, you do not need to manually perform scaling, as in Photoshop.
The next panel contains the cloning tool (analogue of the stamp in the Photoshop editor). Next is the red-eye correction tool. The last tool "Gradient" you can select a separate part of the photo (create a mask) and adjust this area by any means of the program. On the same panel there is another tool for selecting the “Radial Gradient” (only in Lightroom 5), as well as a regular brush for creating masks.
Basik Bookmark
All fixed assets intended specifically for adjusting the photo are below - in the Basik tab. The first - Temp - is designed to change the color temperature of the picture. With Tint, you can simultaneously change the hue. It is also possible to automatically select a temperature using a pipette. Below are tools for changing exposure, brightness, contrast, adjusting glare, working with shadows, etc. All adjustments made to the photo are displayed on the histogram.
Even lower are the editing tools for clarity and color saturation. In the latter case, it is better to use the Vibrance slider to make changes to the image. With its help it is possible to carry out milder, gentle changes without the manifestation of strong color acidity. To reset the settings made by means of any bookmark, double-click on the name of the tool.
Tone Curve Tab
Below the Basik tab is the Tone Curve tab. Here you can make more subtle changes in the tone or sharpness of the photo using the curves. Work can be done in one of the color channels. Using the eyedropper, you can select a specific editing section. In the same tab, work is performed with the hue (Hue), saturation (Saturation) and brightness (Luminance) of colors. Moreover, each of them can be adjusted individually. Work can be performed in one of three tabs - HSL, Color and Grayscale.
Thus, we figured out how to save photos in Lightroom and how to process them in this program. Of course, this editor is simpler than the same Photoshop, but with its help you can get quite high-quality images.