The 21st century is the century of information technology. People chat on social networks, chase fashion and share beautiful photos with each other. Campaigns for professional photo shoots have become very popular. Especially in the youth community. But nobody wants to see the flaws of their figure in high-quality photographs. Fortunately, this is not a problem for Adobe Photoshop. Now everyone can learn how to remove their stomach in Photoshop.
What to use to remove the "excess" figure
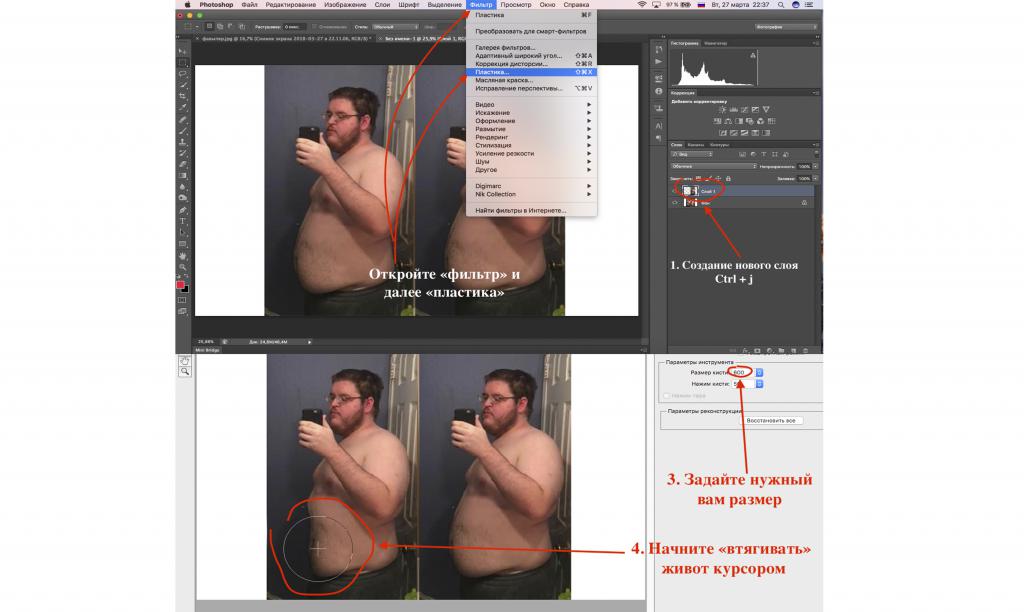
Adobe Photoshop has a large number of mechanisms by which you can make a masterpiece from a photograph. But it is precisely for the "removal" of the abdomen that you need the "plastic" tool. How do they work? A few easy steps will tell you how to remove your stomach in Photoshop and make it as realistic as possible:
- Open your photo in Photoshop.
- Create a new layer (Ctrl + j).
- Click the "filter" button on the top panel. In the menu that opens, select "plastic."
- You will see a panel on which you will work with the figure.
- You need to set the optimal cursor size for you.
- Start gently “pulling” your stomach inward, as shown in the photo in this article. Just hover over the problem spot and drag it clockwise. But it all depends on what kind of image you have.
- Do not overdo it, so as not to violate the human anatomy and leave the image realistic. Of course, if your goal is to remake the character - give yourself free rein.
- We can also tighten the skin on the hands and chin a bit to make the work look natural. The stomach cannot disappear, and the subcutaneous fat on the remaining parts of the body remains.
- After editing, click “ok.”
- If you want to see what was “before”, click on the “eye” next to the layer you are working on, and your changes will be lost. You will see the original version. Click on the “eye” again and your results will return to their place.
- It happens that after applying "plastic" on the skin there are unnatural bumps or wrinkles. They need to be removed using the “repair brush” tool, as well as the “stamp”.
- Create a new layer, combining the previous ones (Ctrl + Shift + Alt + E) and do it.
Done! Here's how to use the plastic tool to help remove excess weight in photographs. In general, this is not the best way to lose weight, but everyone decides what to do. Only through trial and error can you understand how to work in Photoshop correctly.
"Floats" background when editing a photo
If you don’t know how to remove your stomach in real life (and not in Photoshop), and you decide to use “plastic” after all, you may have difficulties. On some images, the background may “float” during processing. It will be very noticeable to others. People will immediately understand that you are clearly not losing weight due to going to the gym.
To avoid such situations, you will need to learn how to work correctly with the “restoration brush”, “stamp”, “layer masks” and the usual “brush”.
When your background is greatly distorted. This can be fixed in the following way:
- Select the lasso tool.
- Select for them that part of the normal background that should cover the distorted places.
- Press Ctrl + j. So you transfer the selected area to a new layer.
- Press Ctrl + T. This command will allow you to move the copied slice of the background and change it as you like.
- Move the cursor to the distorted area of the background with the cursor.
- Use the cursor to enlarge the fragment so that it completely covers the damaged part of the background, and press “ok”.
- Click on the “add vector mask” button located below the lines with layers.
- Press Ctrl + I (inverse). The piece of clean background that you added will disappear. It should be so.
- Select the "normal brush" on the toolbar and set the color to white. Start painting over damaged areas of the background. They will be stained with the color of the piece that you copied.
This is how you can avoid the "floating" areas in the picture while working with the "plastic".
Important tip
Be careful while removing the “smeared” background. It’s important not to hurt the person in the picture. If suddenly after processing the background will contain irregularities that give out your editing, you can hide them using the “recovery brush”. This is done in the same way as in the step where you removed the folds of the person depicted in the photo.
On a note
There is no universal way, like in Photoshop to remove the stomach. Therefore, it is impossible to provide accurate instructions indicating those or other editorial processes. Everything is very individual for each individual image, and you may not be able to perform good quality retouching right away. This is a creative process in which mastery comes with experience.