As you know, after the release of Windows 10 in the release, Microsoft proposed to switch to it for free and even without a boot disk or flash drive. To do this, it was only necessary to click on the corresponding icon that appeared in the lower right corner. Many people immediately took the opportunity to try out Microsoft's innovations. But the point is that not everyone liked them.
That is why this article will tell you in detail how to restore a previous version of Windows. This process can be divided into several stages and carried out by various methods, up to the cardinal ones. Therefore, it is better to enlist, so to speak, instructions and do everything on it in order to avoid irreversible consequences.
Rollback through the system
Perhaps few people know, but after upgrading to Windows 10 exactly one calendar month is given to refuse and return everything back. Just now, we will consider the option when after installing the OS you did not like it, and the allowable rollback period has not expired.
Many probably noticed that as soon as Windows 10 appeared in front of my eyes, on my hard drive, or more precisely, on drive C, a daddy called Windows.old was formed. Familiarized persons are aware of why it is necessary, and we will now enlighten those who do not know.
So to speak, just in case, the operating system saves its previous version just in order to return, if necessary. This past version remains in the Windows.old folder. It is stored there for exactly a month. That is why it was said above that a rollback from Windows 10 to Windows 7 can be carried out if the deadline has not expired. How to do this?
Now let's move directly to how to restore a previous version of Windows:
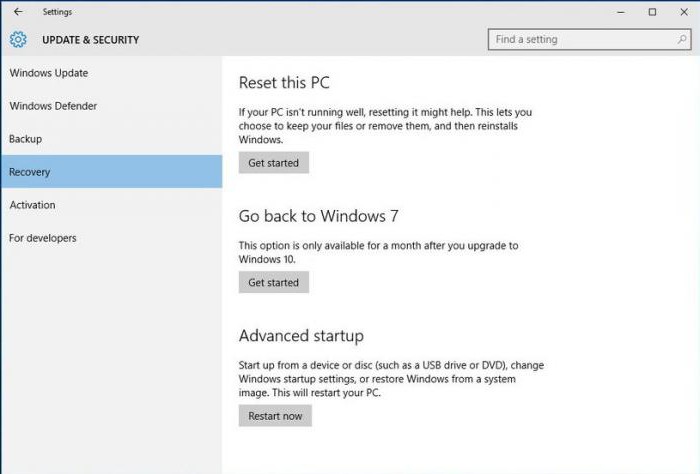
You should have a desktop in front of you. Press Win + I at the same time. The "Parameters" section opens.
We need the fourth line in the list - “Recovery”.
Now before my eyes there are various variations of further actions. We are only interested in the "Return to Windows 7" item.
Feel free to click the "Start" button. After that, they will ask you why you decided to restore the previous version of the OS.
Point out any option to choose from and move on. Even before my eyes, the possible consequences of the rollback and recommendations will be shown. Ignore it.
Now it remains only to click "Next". If you have no doubt in your actions, then feel free to click.
It remains to wait for the completion of progress, and after a while the seventh Windows will be your main OS.
As you can see, restoring a previous version of Windows is not such a complicated matter. However, now the simplest version of the development of events has been presented, and it is also possible that an attempt to restore a previous version of Windows may fail. Therefore, we move on to the next method.
Image recovery
The method that will be presented now is extremely rarely used, but not because it is not effective, but because it is little known. Nevertheless, it is worth mentioning, since this is another way how you can restore a previous version of Windows. It's hard to say how long it lasts, it all depends on how you prepared, but everything in order.
It is worth mentioning right away that rollback from Windows 10 to Windows 7 will now be considered, although this method is also suitable for other versions of operating systems. And the main thing you need to know is that you need to record the image at a time when you still have Windows 7:
First of all, you need to enter the "Control Panel" and select "System and Security".
Next, click on "Backup and Restore."
There, on the left side panel, there is the line “Create a system image”. Click on it.
Now you need to insert the USB flash drive into the USB connector.
In the window before your eyes there are three options on how to record the image: on the hard drive, on removable media or on the network. Choose a removable media.
After selection, a window will appear where you need to put a checkmark in front of your flash drive.
After clicking “Next”, the recording process will begin. Wait for the end, and you're done. Now your flash drive has an image of Windows 7 in its current state.
Now, to restore a previous version of Windows, you need to insert a USB flash drive into the computer and roll back through the BIOS.
Reinstalling system
If after you switched to the top ten, a month has already passed and you did not burn the Windows 7 image, as mentioned above, the only way out for you is to completely restart Windows. This is an extremely radical method, but there are no more options.
The fact is that you will need to initially create a bootable USB flash drive or disk. You can do this on any OS, we will just record Windows 7. So, now we will consider in detail what needs to be done.
Create a bootable USB flash drive
To create a bootable flash drive, you must download the program. It is called Rufus, no matter which version. It is also necessary to download an image of Windows 7 on the Internet. Make sure that the file format is exactly “.iso”.
Now insert the USB flash drive into the computer and run the program. You will see a small window.
Click on the disk icon in the lower left corner. You will see a window in which you need to pave the way to the downloaded image. Once the path has been laid, click "Open."
Now at the top of the window in the first line, select the USB flash drive.
In the second line, indicate "MBR for computers with BIOS or UEFI."
In the next line, select the file system. Specify NTFS.
Click "Start."
That's all, after the process of flash drive with the image of Windows 7 will be created.
Install Windows 7
After the flash drive is recorded, you must proceed to the installation. To do this, insert the USB flash drive into the PC and restart the computer. At boot time, press Del or F2 to enter the BIOS. After that, in the BOOT tab, you must select the USB flash drive as the first boot device. Then in the last tab we exit the BIOS, saving the settings.
After the initial computer startup screen, the Windows Setup Wizard appears in front of you. Everything is simple here. Follow the instructions, carefully read and install the OS on drive C. After the installation starts, about half an hour will pass (depending on the power of your PC) and a brand new and clean Windows 7 will appear in front of your eyes.
Conclusion
As you can see, rolling back from the top ten to the seven is not so difficult. Moreover, there are several options to choose from. Each of them is good in its own way. So, the first is not embarrassing and the easiest. The second method will teach you to burn Windows and use it in the future, and all its settings will be saved before recording. The third method will teach you how to reinstall operating systems. How to use, choose only for you.