In this article, we will consider such an unusual question as “do-it-yourself hard disk repair”. Probably, every second computer owner was faced with the fact that the hard drive that worked yesterday still stubbornly does not want to be determined by the motherboard.
Of course, if the
warranty period of the device has not yet expired, then you probably should not do it yourself with a do-it-yourself hard drive. But in the case where “there is nothing to lose,” you can try to restore the HDD’s performance on its own.
About breakdowns
Before you start repairing your hard drive with your own hands, you must clearly understand that not all breakdowns can be fixed at home. It all depends on the complexity of the malfunction. So, for example, you should not even try to repair the hard drive after a fall, but it is better to immediately contact a service center (SC). But failures in signal transmission over a loop and some similar "trifles" can be completely eliminated.
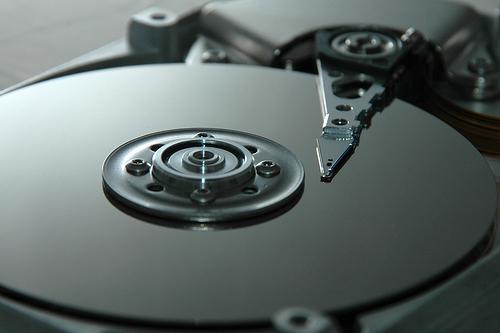
HDD device
Structurally, the hard drive consists of two blocks: a Hermoblock with a set of magnetic disks and a drive for read heads, as well as an external electronics board. It is impossible to open the pressurized enclosure without creating special conditions. The fact is that dust particles that inevitably get inside when the cover is removed will subsequently damage the magnetic coating of the discs. If it is necessary to at least read the data, the cover is still removed in the SC and after repair, dust particles are blown out by a stream of air from the can. But after that, you should not count on long-term operation.
Roll up your sleeves ...
Do-it-yourself hard disk repair begins with removing it from the system unit case, disconnecting the power cable and interface cable, and a thorough inspection. The electronics board should not have burned out elements (sometimes, due to overheating, the microcircuit breaks down). In most HDD models, all elements are on the outside and can be seen without removing the board. In others, they are turned to the germoblock. So, using a magnifying glass on a removed board, it is necessary to examine the places of soldering the connectors: sometimes one falling off leg interferes with the operation of the entire device. Soldering can be restored using a pulse soldering iron and a solid hand.
In older IDE HDDs, a loose connection often led to bending of one or more copper pins. If during the inspection such a malfunction is detected, then it can be eliminated with a small tweezers, aligning the contacts. The next problem is the violation of the electrical contacts of the board and the Hermoblock. Since the transmission of signals (and power) is carried out not by a loop, but by a simple clamping of copper points-surfaces, their resistance gradually increases due to oxidation. To solve this problem is simple: you need to use a stationery eraser to wipe the contacts on the Hermoblock and the electronics board.
It is noticed that some hard drives are unstable in high-speed modes. Therefore, it is useful to use the jumper (it is in most models) to put the hard drive in slow data mode . So, for SATA, the transfer will be not 3, but 1.5 Gb / s. "By eye" the slowdown will be almost imperceptible.
Repairing a removable hard drive is exactly the same. We note one important fact: many are convinced that by simply replacing the electronics unit with a previously removed identical model, the device can be revived. This is only partially true. The fact is that there is a ROM on the board in which specific information is entered (for example, about bad areas). Therefore, a simple replacement is not always effective, as it may require a flashing.