The ventilation infrastructure provides for special channels for the removal of combustion products, odors and kitchen fumes, which accumulate in different rooms of the house. The final link in the issue is the supravertual communications. In particular, for such purposes, a ventilation fungus is established. On the roof it is fixed with special devices, and, if necessary, supplemented with auxiliary functional devices.
Device purpose
The need to use a special riser to exhaust the exhaust air is due to high requirements for sealing and protection of the roofing cake and environmental standards. Risks of penetration of water and moisture into the under-roof space are completely eliminated, which cannot be controlled using an ordinary pipe, even with a small diameter. In turn, the ventilation fungus on the roof contributes to the effective removal of contaminated air masses without the risk of reverse penetration of precipitation. Moreover, the air is not collected directly from the attic or attic, but from the ventilation ducts from different rooms - for example, it can be a kitchen, sewer system, an underground niche, a boiler room, a bathroom, etc. Sometimes a direct ventilation passage is provided for the under-roof space, but this task, in view of the increased likelihood of moistening the attic, is nevertheless better solved by lateral perforated cornices with greater protection against the penetration of rain.
Construction and material of manufacture
The passage and exit channels are formed by pipes in several layers, as well as valve systems, deflectors, aerators (optional). Before, the main material for the manufacture of such mushrooms was galvanized steel, but today almost all of the niche manufacturers have switched to impact-resistant polypropylene, which is resistant to sunlight, frost and corrosion. Propylene is also beneficial for home use due to its chemical neutrality and environmental friendliness. In this case, the inner tube is sometimes made of steel alloys - as a rule, if working mechanisms like fans are used. The ventilation fungus for the roof does not do without a heat insulator. Warming is provided with mineral wool, polyurethane or expanded polystyrene. For sealing, EPDM rubber seals are used. This material is resistant to the effects of alkalis and acids, which is important when operating the system in industrial areas.
Dimensional parameters of the ventilation fungus
The total height of the structure, along with valves and caps, is on average 500-700 mm, although there are also 400 mm models. From the point of view of performance and throughput, in principle, the inner diameter is also important. The standard thickness of the fungus on the ventilation pipe is 110 mm, and the outer diameter can vary from 125 to 160 mm. The difference between the dimensions of the inner and outer pipes is determined by the type of heat insulator used and the materials that increase the rigidity of the structure.
Varieties of Vent Fungus
Classifications of outlet pipes on the market are expressed in functionality and purpose (location). In this regard, the following ventilation fungi can be distinguished:
- Universal elements. Typical walk-through structures that can be mounted on almost any roof. They create a natural circulation and are not suitable if an inflow / exhaust effect is needed.
- Models with a fan. This is a fungus on the ventilation pipe with centrifugal coolers, which due to the compact engine provide intensive removal of moisture and drying of the target premises. In terms of installation options is also universal.
- Models for flat and flat roofs. Ventilation mushrooms for installation on bitumen roofing, to which higher demands are made regarding sealing.
- Elements for roofs made of metal. Special versions, the feature of which is the possibility of mounting on profile and corrugated roofs. Joint tightness is ensured by rubber seals inside the flexible flange.
The position of the ventilation fungus in the roof
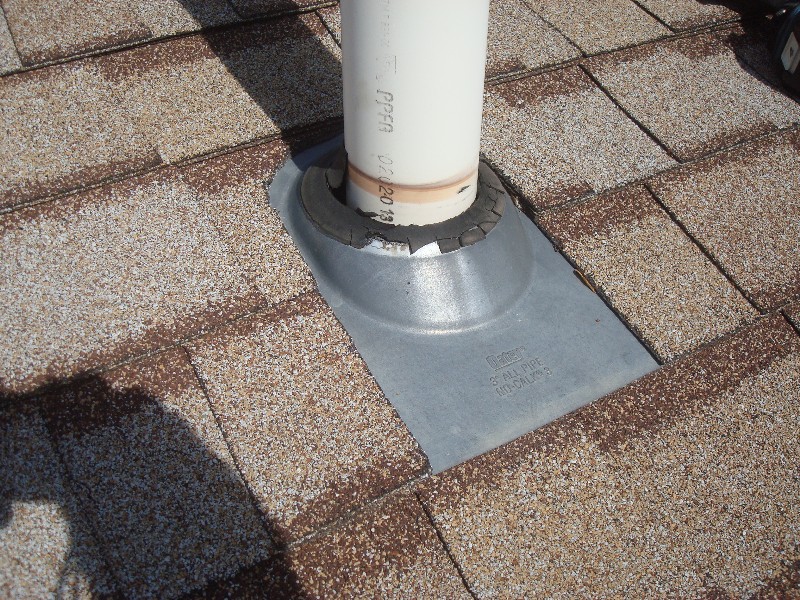
The passage with a ventilation outlet through the roof is mounted strictly vertically regardless of the angle of the ramp. In advance, the installation site should be thought out so that a free approach of the ventilation riser in the attic is ensured, and it was possible to make an opening in it with minimal violation of the roof structure. The fungus mounted on the ventilation pipe is fixed by mounting devices and provides a direct outlet of incoming exhaust air to the outside without obstacles from the roof itself. Regulation of air movement is carried out only by shutoff valves in the device.
Tools and materials for installation
During the installation process, you will need to work directly with the materials of the roof and the fungus, as well as perform fastening operations. For possible plastic cutting, a metal saw or an electric jigsaw will be required. It is better to cut the metal profile of the roof with mounting scissors, having previously made a slot hole with a chisel. It is desirable to tighten the screws with an electric tool - a screwdriver with the corresponding bits. For a sealed installation of a roofing ventilation fungus, a waterproof sealant will be needed. Full assembly is carried out using a deflector assembly, flange elements and gaskets, which are supplied with the ventilation duct.
Optional items
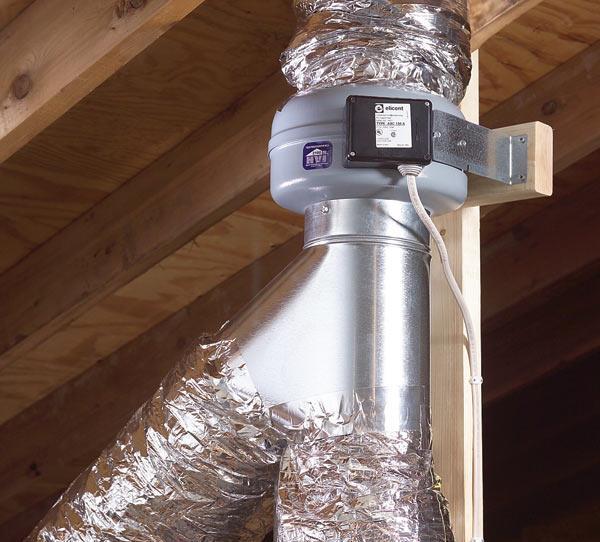
Some designs allow for the installation of fans and aerators. These devices are mounted at the final stage of installation. Particular attention in the selection of additional accessories should be given to protective devices. For example, a ventilation fungus mounted on a metal tile may include a water seal seal and antenna gates in the optional kit. If the installation is planned on a roofing made of combustible material, then heat-resistant linings for the mounted flange can be provided. But it is better to provide such protective properties in the edging, seals and outer coatings of the passage components. To control a system with a fan, systems that control its fan speed and valve position are recommended. These are special monitors, which, due to sensors, receive signals about the state of the ventilation system and weather conditions, in accordance with this, choosing the optimal operating conditions. The problem with the operation of such systems is only the need for electrical supply for the fungus.
Preparation for installation
In the under-roof space, it is necessary to free up space for installation and connection of the ventilation riser. By the time of installation, ventilation ducts should be routed from rooms with dirty air. From the outside of the roof, the place where the device is planned to be mounted is cleaned and degreased. It will also be useful to pre-markup. For a typical 110 mm ventilation fungus, a standard stroke for the mounting flange is sufficient. The correction is made only on the slope of the ramp. At the same time, you should not be afraid of small deviations up to 5 mm - they will be leveled by seals and sealant.
Installation configurations
Even at the design stage, it is necessary to determine the installation scheme of the device. How to install a ventilation fungus on the roof surface so that the exits work with maximum efficiency? A fundamental choice is made among two installation configurations:
- Spot mounting. The fungus is integrated into the area of the ridge or on the slope, collecting pipes from all channels of the ventilation network under its intake niche. In other words, one large-format aerator will serve the circulation of air from the entire house. This option is suitable for small buildings, where it is also supposed to minimize the number of cold bridges.
- Group mounting. Several fungi are used, each of which is responsible for the output from one or two ventilation risers. On the roof of the device are located on the ridge, but with a certain step from each other. This scheme is advantageous for more intensive airflow output, but requires more resources and consumables during installation.
Step-by-step installation instructions
Technologically, the installation process of the ventilation fungus is implemented as follows:
- After preparing the mounting points, mounting holes are created. Using a complete template, a niche of the required format is cut on the roof.
- If there are communications or elements of the rafter system directly below the installation site, then from the side of the under-roof space you will have to use elbows, adapters and corner adapters that will allow you to shift the supply channel.
- If the roof has a metal base, then after cutting the holes, the edges are treated with a special anti-corrosion paint.
- After drying of the applied coating, the sealing ring for the fungus is seated in the prepared niche.
- The supporting element sits on silicone sealant and is fastened with screws.
- A ventilation mushroom is mounted in a ring with a flange and is also fixed with hardware.
- On the back side of the pipe are connected to the riser brought up - the junction node is treated with sealant and fixed with a clamp-holder to the nearest rafter beam. Actually, for this reason, it is worth locating the exit points near the elements of the rafter system - they will allow for more reliable fastening in the section of the pipe passage to the hole in the roof.
Additional sealing and reinforcement
The installation can be strengthened with the help of protective covers and mounting plates, which are sold as an addition to roofing and ventilation mushrooms. The passage element is fixed at the base (the junction with the roof), from the back at the exit to the roof and at the point of connection with the aerator. If ventilation fungi on the roof with metal tiles are used, the emphasis is on increasing stiffness and sealing. This problem can also be solved with heat-insulating materials with a rubber substrate. Outside, pads are also mounted that cover the belt of the junction of the pipe and the roofing. As for the sealant, it is better to use a non-acetic basis material or a waterproof bitumen composition.
General tips for installing and using the device
In relation to the arrangement of ventilation fungi, roofers give the following recommendations:
- If it is decided to mount the structure on a slope, then the installation site should be located at least 60 cm relative to the level of the ridge.
- With the group arrangement of several fungi, it is worth starting from the calculation of 1 output per 60 m2 of area.
- In regions with heavy rainfall, a decorative cap on the top of the structure should also be provided as additional protection.
- The risks of exposure to snow masses that descend the ramp are also taken into account. Above the level of the location of the ventilation fungus, a snow retainer or other reliable barrier is mounted on the roof.
- In order to preserve the aesthetic attractiveness of the roof in the choice of the ventilation outlet, it is desirable to take into account the textured design, which should correspond to the color of the roof.
Conclusion
Properly functioning ventilation in the house is not only a prerequisite for maintaining an acceptable sanitary and environmental background. Removing condensate from the attic and soot from the boiler room eliminates the risks of destruction of building structures and failure of heating equipment. What role does the fungus play in this matter? Of course, its task is not the most important, but the quality of air circulation in the attic space depends on it. This function most likely does not even apply to ventilation itself, but to protecting the rafter system from precipitation, which can penetrate into the under-roof space when installing a direct duct. In other words, it is a regulator with a valve that releases unnecessary air flow and prevents the passage of precipitation.