Every modern car owner should study the installation manual for the rear view camera to find out how to do it right. There are various types of cameras on the market. First you need to find the best. Most of them are very easy to install.
Installation guide
You can install the rear view camera on the car yourself after reading the manual or watching video tutorials on how to do it right. After reading the tutorials, you can find out the various recommendations that you need to follow.
It is equally important to have an understanding of the installation, which will help in the process. Even a novice in this business can easily make a rear view camera according to the instructions.
Ways
There are various ways to install the camera. One of them includes a trigger-based system. After examining the device, the next thing you need to know is to install each of the components, because the camera cannot work if all the parts are not installed properly.
Remember that rear-view cameras use similar components, which means that if any camera was installed earlier, it will not be difficult to put another one in its place. If you want to use trigger wires, the information presented here will help during the installation process.
Main details
To install a do-it-yourself rear-view camera, you will need the following elements, which include:
- a camera;
- wiring harness;
- RCA cable.
What do you need to install the camera?
Without these components, installation will not be possible:
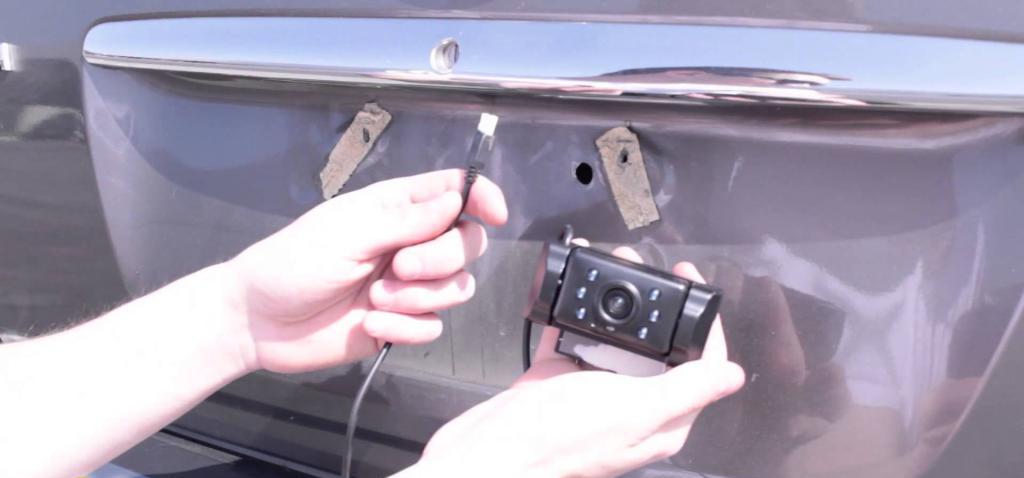
- The camera is the most important element that is needed during installation. In appearance, it looks like a monitor. This is due to the fact that it has a single cable and a DC power plug, as well as an RCA cord. It is needed to monitor objects while riding.
- The wiring harness is another tool you need to connect and install. It includes a DC power connector. This is a twelve-volt power wire, as well as a black ground wire.
- An RCA cable is another element required to install the camera. Usually includes a yellow RCA video cable, used for video communications. The function is designed to feed the image from the camera. The cable length can vary, it is from 8 to 25 meters.
In addition, it is important to indicate that these cables are used differently during the installation process. For example, the yellow inputs are for video only, while the red and black are for power. You can also install a mirror with a rear view camera, which will transmit the image using the same devices.
Rear View Camera Installation Guide
In addition, it is important to recall that most monitors are not equipped with a trigger cable, and this is because they have the so-called “video sensitivity” function. The video stream always starts them automatically.
Installation process
The first step in the process of installing a Ford rear view camera or any other brand of car is that you need to supply electricity to the monitor, to do this simply by connecting the red wire to the supply voltage. To send power to the monitor, you need to go to the fuse box. The way the monitor works is determined by the trigger cable used for the connection.
The best option to install it is to connect to the rear light of the car. When this is done, the monitor turns on automatically when reverse gear becomes active.
If you want to install a monitor for manual control, you do not need to connect it. The connection can be made at the source, and this means that whenever the car starts, the monitor turns on. It turns off when the engine turns off. This mechanism is the best for those who use commercial vehicles.
How to install a camera? For this connection, simply connect the A4 wiring harness, which is known as the female wiring harness to the camera output. It is usually regarded as a mama outlet.
At the stage of connecting power to the monitor and the camera, you just need to connect the red wire to 12 volts. Alternatively, you can do this by connecting to the positive side of the rear light of the car.
Monitor Installation
When you are sure that the monitor is already connected to the fuse box, and that the camera consumes power from the taillight equally, it's time to configure the system. Continue the connection by connecting it to the camera. When doing this, use the standard yellow A5 cable.
Video Based Connection System
The installation manual for the Mazda rear-view camera or other car brands mentioned above does not apply to a video-based system. It is intended for a trigger-based system. The first thing to do is to study all the components, which will facilitate the installation process.
Components
Video-based connectivity requires elements that include:
- monitor;
- wiring harness for monitor;
- a camera;
- camera wiring harness;
- RCA cable.
These are the main components that are required for this type of connection. They must perform important functions.
- Monitor. For this installation, the monitor is indispensable. It includes video inputs. Inputs for RCA cables, which have different sockets for red, white, and yellow cables. White and yellow are for video input. If you are used to such wiring on your TV, the installation will not be difficult, because it repeats the same wiring process.
- Wires to the monitor. This is another important aspect of the installation process. The monitor is equipped with a wiring harness that always attaches to the red or black DC power connector. On the opposite side are two wires. These include red wire and black. Black is the ground, and the red wire is the positive power adapter.
- Camera. It is the most important part of the system. This is not the same as in a trigger connection. In some ways they are different. It is equipped with two parts. This type of camera does not require large openings, it can be connected in a waterproof way.
- Wiring to the camera. Includes a DC connector, and this applies to power wires. The DC power connector connects to the 12-volt power output in the same way as the black for grounding. It uses a mama input, which is 12 volts.
- RCA cable. Another aspect of the installation process is an RCA cable. This is an important point in the installation. The RCA video cable connects directly to the camera. It serves to feed video to the monitor.
How to install a rear view camera? Reply to the video.
Stages
To install a video camera based on a video image, you need to perform a number of steps:
- First step. Connect the DC harness to the monitors for power input. You need to determine this and make the correct connection.
- The second step of this connection is to connect to the power monitor, connecting the red wire to 12-volt power and the black wire to ground. Typically, the power supplied to the monitor is taken from the fuse box.
- Third step. It's time to connect the video signal and camera power to the camera connector.
- Fourth step. We connect power to the camera by simply connecting it to the red wire and to a voltage of 12 volts. The black cable should go to the ground, as usual. The power that comes into the camera often comes from the rear light. In this type of connection, it is important to indicate that whenever the power reaches the camera, it turns on the monitor. This means that it works automatically. It is important here to repeat that when you want to connect to a connection, the cable length is important, as in a connection based on a trigger. Because of this, it is recommended to consider the cable length. The best length is from 6 to 25 meters.
In some cases, the cable contains a red wire, it can always become part of this cable. Typically, the conductor cable used for this type of connection is unprocessed, so it can be used for different purposes.