A fairly difficult task is gluing a ceiling plinth. Corner fitting and joining is the main problem. Below is a description of how to make the corner of the ceiling plinth.
Let's start with the tool we need for this. A miter box and a construction knife will be enough.
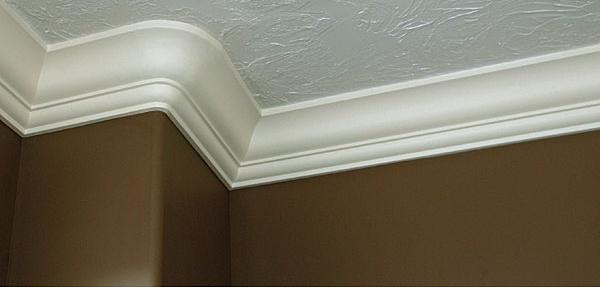
As a rule, you have to trim the baseboard for the inner corners. At first glance, it seems that everything is very easy, but when a brand new baseboard turns into unnecessary trim, you begin to understand that it is not so simple. Let's figure out how to do this.
How to cut a corner of a ceiling plinth?
The easiest and fastest to remember option is that the baseboard is applied to the upper corner so that it is to the left of it. We hold with our fingers the surface of the baguette that we will glue to the ceiling. We put the baseboard in the miter box. On the bottom of the wall should be the surface of the bar, which you hold with your fingers. Cut the corner with a knife, turning it at 45 0 so that its end looks to the left. The left side of the baseboard is ready. Now we will cut the right-hand side, i.e. the one to the right of the inside corner.
How to make the corner of the ceiling plinth in this case?
Attaching a bar to the corner, mark the surface that will be glued to the ceiling. We put the workpiece in the miter box, pressing the surface to its lower wall, which we will glue to the ceiling. Cut the corner 45 0 , while the tip of the knife should be directed to the right. Having cut off both parts of the plinth, we apply them to the inner corner to check the correctness and accuracy of the cut.
If the angle of the repaired building is flat, then we will not see the plinths and gaps. If the wall is with errors, the skirtings are cut, and then glued.
But there are also outside corners. How to make the corner of the ceiling plinth in this case? Let's look at this option. Although it is necessary to cut skirting boards for the outer corners of the rooms much less than the inner ones, it still needs to be done correctly. It should be noted that if you have learned well how to join the corners of the ceiling plinth with an internal angle, you will not have any external problems. This method is the opposite of the previous one. We mark the beginning of the corner on the baseboard. It is important that at the time of forming the outer corner on the baguette, the inner corner should be ready and fitted. This is clear. We prepare for trimming the baseboard left from the outer corner.
Attaching it to the wall, mark the side glued to the ceiling. We put the baseboard with this part in the miter box so that it lies on its lower part. And also pressed against the far wall of the device used. We cut the bar with a knife at an angle of 45 degrees. The tip of the knife should look to the right.
Glue this part of the corner. It is important that the short side of the product is not shorter than the corner of the wall. If it is a little longer - not scary. Using the same method, we prepare the right-side part of the plinth of the outer corner. We control their docking and glue. Now that you are in the know how to make the corner of the ceiling plinth with its internal and external parts, consider another interesting option.
How to make rounded corners?
Non-standard rooms with non-standard angles exist. Given the curvature of the angle, cut into small segments. We cut each of them from two sides with the help of a miter box and at an angle. Glue them joint to joint. The initial segment of the rounding is glued to the straight baseboard on one side, and the final to the straight baseboard on the other.