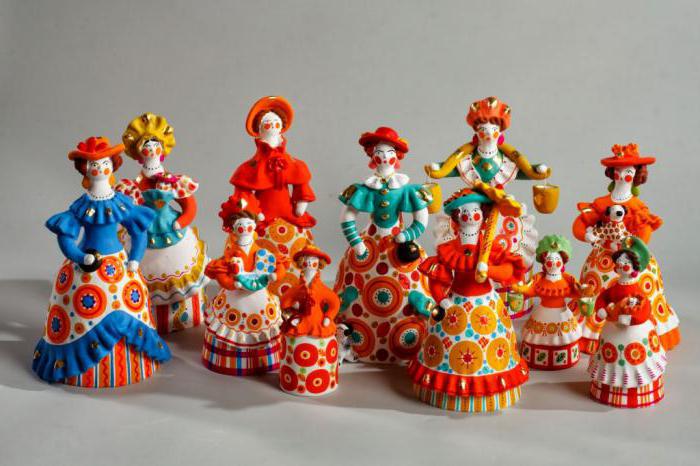
The Dymkovo toy is a Russian folk craft for making red clay toys with further firing in a furnace at high temperature and coloring with bright colors. In this article, we will consider how to make a Dymkovo toy with your own hands.
Dough for crafts
Of course, this process is very exciting for both adults and children. It is not necessary to use clay at home. It can be replaced with salt dough. It is very plastic and is perfect for various crafts, in particular, a Dymkovo toy can be made from it with your own hands. To prepare the dough, we need one glass of premium flour and the same amount of fine salt. We add half a glass of cold water to this mixture, and for a better softness you can add a tablespoon of PVA glue. We mix all the ingredients thoroughly and as a result we get a mass that is very similar to plasticine in consistency. All! The dough is ready.
Master class: toys from the test
Now we proceed to the most interesting - to sculpting toys. The most common stories are lords, birds, horses, rams, roosters, buffoons. In order for the Dymkovo toy, molded with our own hands, not to be too heavy, we will make the basis of ordinary foil. If you roll the foil in several layers and twist it into a cone, then we get a skirt for the lady. In the same way, you can make a body for animals and other large elements of a toy. It is worth considering that if you want to fashion a toy whistle or a hollow product inside, then you do not need to use foil. Divide the dough into small balls and mold from them what you need. From a larger ball, make a head for a toy. Now that all the basic details are ready, they need to be joined together. For this place of fastening parts, lubricate with water, gently press against each other and smooth the edges with a thin object. The main work has been done.
Details
So, after the large base of the toy is completed, we proceed to the manufacture of small parts and decorate the product. For example, a mistress toy is distinguished by its beautiful outfit. For the hem of the dress and sleeves, you can fashion ruffles. It is also necessary to make a magnificent collar and kokoshnik. A magnificent tail is required for a rooster, and a bell can be hung on a ram. Using sharp objects at hand, make a beautiful ornament on the surface of the craft. Dymkovo toy, made with his own hands, will gain volume. Show your imagination and make your dough product unique.
Drying
After the molding is finished, the toy must be dried. There are two ways to do this: in vivo and in the oven. Under natural conditions, it will take 3-4 days to completely dry the product. Do not dry the craft on the battery, as this may interfere with the natural drying process, and the product may crack or warp. It is best to leave it in a well-ventilated room or in the fresh air, after having placed it on a flat wooden or plastic surface. Do not leave the finished product in direct sunlight. There are two ways to dry a toy in the oven:
1. It is necessary to preheat the oven to 60-80 degrees. Place the product on a heat-resistant surface (for example, a baking sheet) and leave the toy to dry. On average, it takes about an hour, but the final time depends on the volume of the product: the larger the toy, the more time it will take for it to dry. For best results, leave the oven door slightly ajar.
2. The toy must be placed on a heat-resistant surface and put in a cold oven. Preheat the oven to 150 degrees, allow the product to dry. Then turn off the oven and leave the craft to cool inside.
Be sure to follow the drying process. The Dymkovo toy should be light brown after baking and firm to the touch.
Coloring
Now it's time to give the toy its characteristic features. At the stage of painting the product, it is important to take into account motives, distinguishing features, by which you can subsequently determine exactly what a Dymkovo toy is (the pattern of applied drawings is given in this article). Various ornaments (circles, rhombuses, lines), flowers, leaves are traditionally used in painting. Dymkovo toy, stage-by-stage, always bright and beautiful. Contrasting colors (red, green), standing side by side and underlined by a white background, give greater saturation. For painting, you can use various paints: watercolor, gouache, acrylic. The most convenient are acrylic paints, as they quickly dry, dilute with water and are not smeared subsequently. If you use glossy acrylic dyes, then in the end the product will turn out to be shiny, and it will not need to be varnished. As a rule, at first the toy needs to be completely covered with white. This is the basis, the "canvas" for painting. Then select 5-8 primary bright colors (for example: red, green, blue, raspberry, yellow, orange, brown). Previously, you can draw small details of the ornament with a simple pencil. For painting, use a thick brush for large parts and a small brush for small items. Finally, let the product dry well. Optionally, the toy can be varnished. This will protect her from external influences. If you used gouache in your painting, then varnishing is simply necessary, as gouache can easily be smeared.
Imagine and enjoy your work. This master class toys from the test describes in detail the entire manufacturing process. Following these recommendations, you will fashion colorful products that will perfectly serve as gifts for loved ones.