Ceramic tile is certainly an excellent and practical floor covering. It is especially good in rooms subject to moisture, and places characterized by high traffic. That is why such floors are most popular in many offices and institutions. Our apartments are no exception. Tiles on the floor today can be found not only in bathrooms and kitchens and hallways, but sometimes even in living rooms. Fortunately, in the construction market you can find an extensive assortment of this material, sometimes capable of simulating almost any surface. True, this flooring will be beautiful only if it can be correctly and carefully laid. And an important role in this procedure is played by the final stage - grouting of tile joints on the floor. It is on how correctly this is done, and the visual effect produced by the coating will depend.
What do the seams between the tiles on the floor overwhelm, how is it right and why do you need to do this? We will give answers to all these questions in our review.
What are stitches and why overwrite them
During the laying of ceramic tiles, craftsmen lay special crosses between the elements that contribute to the formation of seams - the same distances between each tile. And they are needed so that, firstly, the facing material in the end looks neat and aesthetically pleasing. In addition, laying is not always carried out on a solid foundation, sometimes under the tile there is a floor that can undergo shrinkage processes. And if you do not leave these small distances, then the ceramic coating can simply crack under the influence of the movements of the same concrete slab under it. However, if the seams are left empty, then over time they will simply clog up with dirt, which is unlikely to contribute to a favorable impression of the floor. And in those rooms where humidity is present, mold will begin to form in the seams altogether. And so that such problems do not arise, the seam between the tiles is filled using special mixtures - grouts.
What grouts are there
Before you look for information on how to grout the seams on the tiles on the floor correctly, you need to familiarize yourself with the types of this grout. Professionals call it still a fugue. The fact is that not every material presented in stores is suitable for a particular room. All grouting compounds are divided into types. There are quite a lot of them, but it is enough for a layman to know only that there are fugues made on the basis of cement, made on the basis of epoxy resin and combined, which are called epoxy-cement.
The first belong to the category of the simplest and are suitable for use only in those rooms in which humidity is practically absent. If we take into account the fact that it is practically impossible to not wash the floors, then this option can be completely not considered. That is, grouting ceramic tiles on the floor with a cement joint is undesirable.
Epoxy grouts are the highest quality and are suitable for any coating in any room, as they have high strength characteristics and are moisture resistant. However, they have one significant drawback. They are quite expensive. In addition, they are suitable for filling seams with a width of at least four millimeters, and it is quite difficult for an amateur to work with them. Therefore, it is recommended that the home foreman pay attention to an intermediate option, which is ideal for flooring not only in residential premises of apartments, but also in bathrooms and kitchens. Simply put, a cement-epoxy fugue is considered a universal option for the house, since you can wipe the seams on the tiles on the floor with it in almost any room.
How to choose your own grout
First of all, you need to read what is written on the package. The manufacturer must indicate there the optimal width of the seams at which it is rational to use one or another fugue. Accordingly, you need to know your own dimensions. There are also universal grouts. They can be used on flooring, the width of the seams of which is from two to twenty two millimeters.
Then, choosing the right composition, pay attention to its color. The palette of shades in the store is presented in a large assortment, but you still need to know some basic rules. For example, the fact that contrasting grout can be used only if you are sure that your tile is laid perfectly. As a rule, the best option is to choose a tone that is as close as possible to the color of the tile. If the latter has a picture of a different shade, then you can take the puffer of the same color as him.
Process steps
Before wiping the seams on the tiles on the floor, you must first wait a day after laying the tiles. This time can just be spent on buying a fugue and the right tools. The grouting process itself consists of several stages. These are: preparation of the base, dilution of the grouting composition (unless, of course, you have already purchased it in finished form, which, incidentally, is quite expensive), applying the mortar to the joints, removing excess and final cleaning.
What you need to have a master for the grouting procedure
Special equipment and tools will not be required, however, some set will still have to be prepared. Naturally, the grout mixture itself should already be purchased directly. By the way, it can be in the form of a powder, or it can be sold and is already ready for use. In principle, the second option is better in all respects, since it is much easier to wipe the seams on the tiles on the floor with such a composition, if only because it already has the desired consistency. The last to achieve is not quite a skillful master performing this procedure for the first time, with self-mixing it is quite difficult the first time.
Nevertheless, such a fugue has its drawbacks. And the main among them, in addition to the cost mentioned above, is that such a grout is not subject to long-term storage. That is, the remnants of an expensive mixture will most likely have to be thrown away. So experts recommend that novice masters still get dry grouts. And since this is the case, you need to have at hand in this case also a breeding tank. You will also need a trowel, a special spatula (rubber), a foam sponge and clean rags, a bucket for water, gloves and an abrasive grater.
Training
The tiled floor must be carefully cleaned of tile adhesive, if any, as well as dirt and dust. It also does not hurt to walk first with a vacuum cleaner, and then with a brush at the seams. Then you need to take a sponge and moisten them with plenty of water. Then you can start breeding grout.
How to breed a puffer
First, experts recommend that you carefully read the instructions. Despite the fact that the grouting dilution procedure is basically the same, each manufacturer can still have its own nuances. Therefore, do not be lazy and carefully study what is written on the label. Then take three quarters of the water from the norm indicated on the package and pour the puffer into it. Mix everything thoroughly. And then slowly add water until the solution reaches the desired consistency. After 10 minutes, you can begin to work. Grouting is necessary only with gloves, since the mixture is quite capable of corroding the skin of the hands with prolonged contact.
Advice from experts! Since the novice master does not yet have the necessary skills, and the grout dries within literally several hours, it is better not to dilute the entire mixture at once. Divide the contents of the package into two parts. And first work out one, and then another. As for the amount of water needed for mixing, it also needs to be divided in half.
Tile seams on the floor
The most common method is the use of a rubber spatula. Since it will not be necessary to work immediately throughout the entire territory, but to process the tiles literally per square meter, experts recommend immediately moistening a couple of “squares” with water once again before the process itself. In general, professionals process 2-3 square meters. m in twenty minutes. The novice master will not succeed in achieving such speed, but this is not so important. The main thing here is accuracy and careful adherence to technology. Well, the fact that you finish the work an hour or two later does not really matter.
So, how to grout a tile? Apply a puffer to the rubber spatula and begin to fill the seams with diagonal movements. Moreover, you do not just coat from above, but try to squeeze the composition, as it were, so that it fills the seam completely. Remove excess with the same spatula. At the same time, make sure that the filled seam in level matches the level of the tile. That is, if there are any recesses or voids, be sure to immediately add a puffer there. Since you need to wipe the tiles on the floor in stages, work this way for about half an hour. After that, proceed to clean the bonded area.
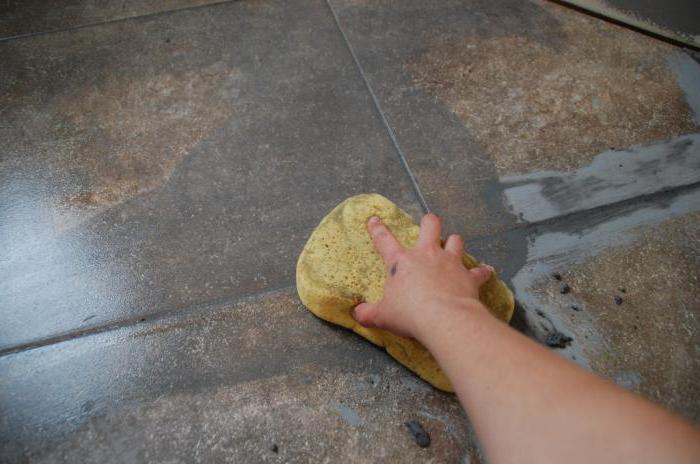
To do this, arm yourself with a bucket of water and a sponge. Constantly wetting it and squeezing it well, walk with foam rubber over the entire surface, making movements in a circle. Your goal is to remove the excess from the tile itself and the seams. If there will remain stains on the tile - it's not scary. They will be removed during the final cleaning. Now the main thing is not to leave pieces of dried fugue on ceramics. Removing it later will not be so simple. After you have processed one area, proceed to the next. And so on until all the seams are overwritten.
Final processing
After a day, you can proceed to the correction. It may well be that in some places the seams turned out to be insufficiently identical. That is, there are surpluses. In this case, experts recommend taking either an abrasive sponge or a grater and walking them at all seams, holding the tool at one angle. Simply put, sanded them. After this, the dry residue must be removed with a vacuum cleaner, and then again set to wet cleaning. That is, thoroughly rinse the seams and tiles with a foam sponge, periodically changing dirty water. After the floor has dried, stains may remain on it. Experts recommend in this case not to wash it a hundred times, but simply carefully wipe it with a dry cloth. On this procedure can be considered completed.
How to wipe tiles in the bathroom on the floor
In the same way as in any other room. Except that in this case, experts recommend adding another step - coating the joints with sealant. After all, the bathroom, like no other, is exposed to moisture. And quite often, the seams on the floor, and on the walls in it, blacken from the formed mold. And so that this does not happen, buy a special sealant composition. It is a liquid. It should be applied three days after grouting (you need to let the fugue dry). Take a thin brush for drawing and gently brush with its composition the seams.
Conclusion
We tried to tell you as much as possible about how to wipe the tiles on the floor. And at the same time they shared the secrets of experienced masters and brought recommendations of experts. We hope that now you will have no difficulties with grouting tile joints.