If the furniture is tired or outdated, this is not a reason to throw it away. Having at hand a little paint, varnish, glue and time, you can do it yourself do-it-yourself wallpaper decoupage of furniture, turning it into an exclusive interior detail.
What is decoupage
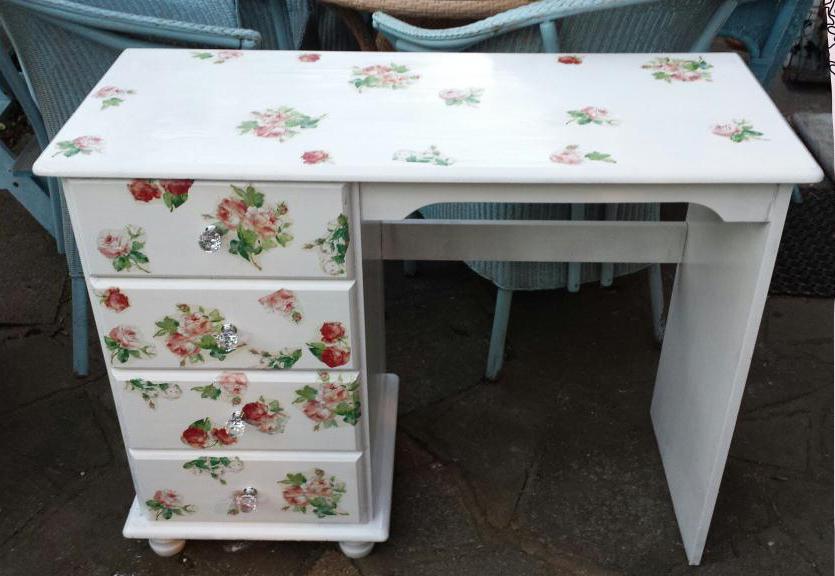
The term "decoupage" came from France, in translation it means "cut". In simple terms, the process resembles the creation of an application that is varnished on top. Some also use acrylic paints in their work. With the help of wallpaper decoupage, an old thing gets a second life. Most often, this decoration technique is used to give the household item exclusivity, as well as to mask scuffs, bumps, or to stylize it as an interior room or home.
Decoupage Types
There are various ways to perform decoupage. The final result and effect completely depends on the chosen method:
- Traditional - gluing the plane of the product and applying varnish on top. As the material can be used paper, wallpaper, decoupage napkin. Sometimes cards are used to decorate such a technique.
- Reverse decoupage - glue is applied to the material from the outside, and the fragment is fixed to colorless glass.
- Artistic style - a pattern is superimposed on the painted plane, so that a single artistic panel is obtained.
- Dekopatch - the product is completely pasted over with various pieces of material. For work, elements cut by curly scissors or torn by hand are used. They are glued very tightly to each other.
- Volumetric decoupage - the finished product is embossed. Most often, this technique is used for the Baroque style.
Execution technique
Wallpaper decoupage of furniture refers to the classical method, therefore, the standard gluing technique is used. For work, you can take any kind of wall paintings. The vinyl type should first be soaked in water to separate the paper base from them. The product can be pasted over with a piece of wallpaper with an image or a solid canvas.
Are you going to make decoupage, but how do you not know how to glue wallpaper on chipboard furniture? For this, it is necessary to use a special fixing agent, since PVA will not cope with thick paper. And also, in the process it is recommended to use a rubber roller for smoothing and better grip.
Wallpaper decoupage
Stubborn pieces of wallpaper combined with imagination and special glue can turn a boring piece of furniture into an exclusive, original thing. This will require:
- Wallpaper glue.
- Paint roller and brushes.
- Different types of scissors: large, with pointed ends and small.
- Ruler.
- Sandpaper.
- Decoupage glue.
- Acrylic paints.
- Acrylic lacquer.
- Wallpaper.
- Item for decoration.
Training
The decoupage process of old furniture with wallpaper begins with the preparation of the surface. The working base should be completely even, only in this case the image and varnish will hold well. So, the process consists of the following steps:
- Cleaning and wiping the surface of the product.
- Filling small cracks with a pore filler, and large ones with a filler composition. Drying out.
- Leveling the surface with medium hard sandpaper. To obtain a smooth surface, a shallow one is used. These are two consecutive stages.
- Cleaning the surface from dust and coating with a primer or paint.
Decoupage creation
Do-it-yourself wallpaper decoupage of furniture is carried out in the following sequence:
- After the preparation of the product and the absolute drying of the primer (paint), the preparation of the material begins (in our case, wallpaper). They fit the size of the product, taking into account allowances on each side, approximately 7 cm.
- Special glue is applied to the work surface and wallpaper. The composition is aged for 5 minutes for impregnation.
- Gluing wallpaper or scrapbooks with the image on the furniture. A rubber roller is recommended for smoothing. You need to work from the middle to the edges. All movements should be extremely careful, as the paper impregnated with glue easily breaks.
- Everything dries well.
- Excess material is trimmed and the edges are ground with sandpaper.
- A layer of acrylic varnish is applied over the decorative coating. It is dried out.
Interesting! For additional decoration of the surface of old furniture, you can use all kinds of elements - foil, book pages, sparkles, favorite photos, feathers, dried flowers, lace and ribbons.
Create a relief surface
The described master class on decoupage of furniture with wallpaper can be complicated and make not a smooth surface, but a relief.
The preparatory phase is also carried out as described above. After that, the wallpaper is glued onto the finished surface and dried. When creating a relief surface, the first layer is the base layer and sets the general background for the future composition.
Next, you need to prepare individual images or geometric shapes that will decorate previously glued furniture. Large elements are glued along the perimeter of the surface indented from the edge by several centimeters. On top of these fragments, smaller pictures are fixed, then even smaller and so on. In total, up to 20 layers can be made so that the elements along the perimeter become embossed. If geometric figures are used for decoration, then the result should be the effect of a truncated pyramid. For gluing, it is better to take multi-colored, bright elements, then the product will turn out to be very interesting and unusual.
In the central part of the countertop, an application of leaves can be placed. If plants dried from the fall are taken for work, then they can be glued immediately. Summer fresh leaves must first be dried under a hot iron so that they do not rot under a layer of varnish.
To obtain an effect that is unusual from an aesthetic point of view, you can “walk” along the contour of the leaves with a silicone colorless sealant, it will give the application an extra volume. After decoration, the product is covered with acrylic varnish on top.
Additional tricks
In the process of the master class “Decoupage furniture with do-it-yourself wallpaper”, or rather, upon its completion, you can use additional techniques:
- Craquelure - used to create an artificial effect of aging furniture. It manifests itself in the form of microscopic cracks. To do this, craquelure varnish is applied to the surface, and on top of it is acrylic paint of the main shade. In the process of drying, the coating cracks and the effect of antiquity is obtained.
- Patina - also used to create the illusion of antiques, but most often when it comes to metal elements. She darkens them.
- Abrasion - created by applying wax to the desired surface area. Next up is a coat of paint. After complete drying, the shaded area is processed with sandpaper.
- Toning - a small amount of pigment of the required shade or sparkles is added to the varnish and the surface is coated with the resulting composition.
- Potal - silver, gold and other colors of metallic paints are used. It is sold in the form of a thin sheet, crumbs, or in liquid form. Furniture decoupage masters advise the latter option, it is more convenient in work.
Ways to emphasize the style of the interior
In order for the furniture to harmoniously fit into the interior of the room after decoupage, it is necessary to use the appropriate materials and drawings in the decoration process:
- Provence. Ideal option - images of flowers in light green, blue and pink shades.
- Baroque. Relief patterns on furniture surfaces.
- Retro. Decorating products with wallpaper in black and white checkered and striped.
- East style. It is necessary to use wallpapers with appropriate motifs and patterns.
- Children's room. The choice is diverse - the image of your favorite heroes, numbers, letters, animals and more.
- Art Deco. Linear patterns in white and black.
It is not difficult to make a decoupage of furniture, but only those who are creative and will follow the rules of the application technique can get a good result.