In the garage of a motorist, you can find many useful and not very useful tools. In addition to the usual set, an air compressor will also be useful. It is suitable for painting a car, inflating tires, air supply for the operation of a pneumatic tool. Let's see how to make a compressor for painting a car with your own hands. We will also find out how it works and by what principle it works.
Compressed air to help motorists
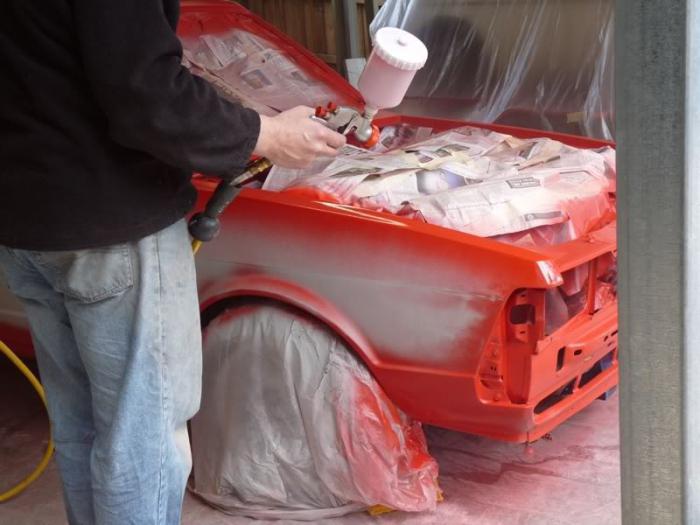
Air compressors are very useful in workshops and garages. There is always a task for these devices. This can be a banal cleaning, cleaning from dust that has formed after grinding, or creating air pressure for the operation of various air tools. More often, compressors are used for painting. This imposes some requirements on the device.
Airflow and spray painting
For work with paint, the air flow must be as uniform as possible. Also, there should not be particles of water, impurities of oil or other oil products in the compressed air stream. In the stream, the presence of suspended and solid particles is unacceptable.
Sometimes when painting you can see defects. Often this is the graininess on the freshly applied paint layer. This happens because there were foreign particles in the stream. If drips of paint or dull spots are observed, then this is a sign of uneven supply of paint, enamel or varnish.
Brand or homemade?
What is the difference between a branded compressor? Its characteristics are ideal for working with an airbrush or spray gun, but at the same time factory products cost serious money. If the device will be needed infrequently, then you can save a little and make the unit, which will not be inferior to the factory models.
Compressor operation principle
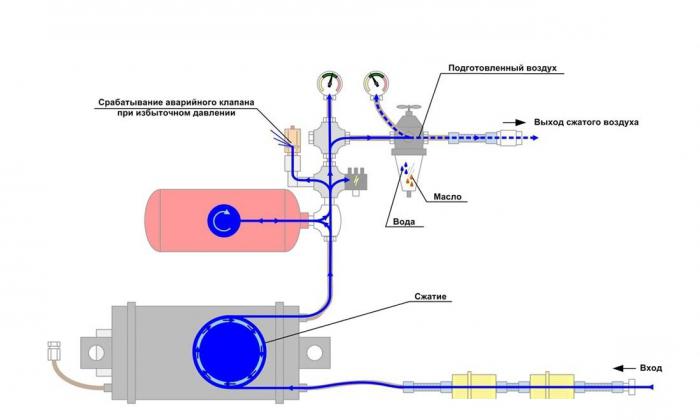
Both professional and self-made devices work on the same principle. An excess pressure level is created in a container for storing compressed air, which is called a receiver. The air itself can be forced into the receiver either automatically or manually.
If you work in manual mode, then it is certainly very cheap in terms of finances, but it will require significant energy costs. You also need to constantly monitor this process. After such work, it is unlikely that he will want to do anything else.
If you use mechanisms for pumping air, then this will facilitate the process. There are no drawbacks, you just need to change the oil in the air pump, depending on the regulations.
Further, the flow of compressed air passes through the outlet valve of the compressor or in this case the receiver and is directly supplied either to the airbrush, or to the car’s chamber, or to a pneumatic tool. In general, the principle is very simple, and therefore the simplest working model can be built in a couple of minutes.
Homemade compressor
Let's look at how to make a simple compressor for painting a car with your own hands. As one of the options, we will try to make a device for painting work from a car camera. To create, we need a receiver, a supercharger, a spool from a damaged camera, a repair kit, an awl. When everything you need is assembled and prepared for work, you can start assembling.
At the assembly stage, you need to check the tightness of the camera. You can use a car pump for this. Every motorist knows how to do it. If the rubber keeps the air pumped into it, you can go to the next step.
If air leaks are detected, then you can use a repair kit or vulcanize the hole with crude rubber.
At the next stage, in the so-called receiver, you need to make holes for another spool. It will be an outlet valve. This fitting can be glued using the same, pre-stocked repair kit. This valve is connected to the airbrush. The nipple must be unscrewed from the fitting. The compressor circuit provides for the free passage of air. In the main valve, we will not unscrew the nipple. He will hold the pressure.
Then, using the scientific pump method, we will try to determine the necessary pressure level in our receiver. To do this, use a spray gun. If the paint goes smoothly, without jerking, sagging or anything else, then everything is done correctly. The amount of overpressure in the receiver is desirable to control. When you press the airbrush button, the level should not jump.
As you can see, this is the most primitive compressor for painting a car with your own hands. Now you can create masterpieces or just repaint the body.
It is not difficult to assemble this unit, and its use can be seen in various repairs. If you used
paint in spray cans before painting
, then you can definitely appreciate all the benefits.
Just remember that in no case should liquid, dust or anything else get into the spray gun and the chamber. In case of a violation, dust or moisture will mix with the paint, and the work will have to be redone. Then no adjustment of the spray gun will help. It will be more convenient if our camera is fixed on something. This will exclude her movement on the floor.
This model works great, and it can already be applied. But it’s even better to make the injection system automatic with minor changes. Then we will learn how to make the compressor more serious.
Semi-professional equipment
Professionals say that such artisanal equipment has a huge resource and service life, unlike factory models of foreign brands and domestic manufacturers. But this is understandable, because, knowing the scheme of work, if any part fails, it can be easily replaced. Let's see how to make a compressor that can be used for professional purposes.
What will be needed for assembly?
So. Easily accessible compressor parts will be needed here. This is a pressure gauge, as well as a gearbox with a filter. You also need a relay to control the pressure in the chamber, a fuel filter from the car, a water tap with a female thread on ¾. In addition, you should choose threaded adapters, car clamps, a motor, a reservoir for the receiver, 10w40 oil, a toggle switch for 220 V, brass tubes, and oil-resistant rubber hoses. These compressor parts can easily be found in the garage.
Thick wood will be used as the basis for the unit. You will also need a syringe from the nearest pharmacy, a liquid for corrosion protection, fasteners, sealants and FUM tape, paint, a file-file, wheels from an office chair and a filter from the car’s power system.
So, knowing the principle of the compressor, it is time to begin construction. Let's start with the supercharger.
Engine as a supercharger
As a motor, we will use a compressor from old refrigerators. Often, it already has a built-in start relay, which in our case is very convenient. This will automatically maintain the desired pressure in the receiver chamber. It is better to use a motor from old Soviet refrigeration units. They have higher characteristics compared to imported products.
Preparatory procedures
Feel free to get the executive part out of your old refrigerator. Naturally, you need to clean the part, because over the years the block managed to grow with centuries-old dust, and also, possibly, to rust. After cleaning, you can treat the case with a rust converter to protect the unit from corrosion. So, the preparation for painting has been done.
Change the grease in the actuator unit. It’s rare which refrigerator has received scheduled maintenance. This system is almost completely isolated from environmental influences. Semi-synthetics are suitable for changing the oil. It is no worse than specialized compressor fluids.
Inlet, outlet and oil change
The refrigeration compressor must have ducts. Two of them are open, one is sealed. Open tubes are used for air inlet and outlet. To find out which handset is the input and which is the output, you can briefly turn on the power. Next, remember which of the tubes bleeds air.
The compressor circuitry from the refrigerator says that grease needs to be changed through the sealed tube. You should very carefully file the end of the tube with a file. It is necessary to cut so that the chips do not get inside. Next, the tip must be broken off and the old grease should be poured into a jar. Then, with the help of a pharmacy syringe, we will fill in more grease than spilled.
For the unit to work as expected, the lubrication tube must be sealed. A screw of suitable diameter will help us with this. It must be wrapped in a pre-prepared FUM tape and screwed into a long-suffering pipe.
Next, attach the device to the board using the prepared fasteners. The electronic part is very sensitive to position. Therefore, the top cover of the relay is marked with an arrow. Modes of operation will switch only if properly installed.
Choose the capacity for the receiver
As practice shows, a homemade compressor for painting works best if you use a used fire extinguisher as an air tank. These cylinders are good in that they have the necessary margin of safety. In addition, the fire extinguisher is designed for high pressure. This choice is also good because various attachments can be placed on the container body. Take, for example, a metal 10-liter cylinder from the OU-10. It holds a pressure of 15 MPa and has high strength.
Extinguisher preparation
Immediately boldly twist the locking and starting device, we do not need it. And in place you need to tighten the adapter, pre-winding the FUM tape on the thread. If the case is rusted, rust must be treated with either chemistry or sandpaper.
Outside, in the fight against corrosion, everything is very, very simple. But what about corrosion inside? Pour the cleaner into the bottle, and then you need to mix the product very well. Then screw the crosspiece from the water supply. And do not forget to seal threaded connections. Now everything is almost ready.
We mount attachments
We almost made a compressor for painting a car with our own hands. So that it can be conveniently moved, the best option is to mount all the nodes and parts on one platform. We have a wooden plate. The motor from the refrigerator has already been fixed on it, and now you need to place a fire extinguisher receiver there.
In the plate, holes for fasteners must be made in advance. The motor from the refrigerator is already fixed with studs and nuts. The fire extinguisher should be positioned vertically. To do this, you can use plywood. To do this, you need three sheets.
In the first sheet, cut a hole suitable for the diameter of the cylinder. Fix the rest on the stove. Next, fix these plates on the plate together with the sheet with the hole with glue. To make the fire extinguisher conveniently located on the platform, you can make a recess under the bottom. To make our device maneuverable, take out the prepared furniture wheels and screw them onto the platform.
Protection against dust and small debris
Naturally, the equipment should be protected as much as possible from dust. To do this, we use a rough filter from the car. The filter must be mounted in the air intake.
How to do it? We will use a rubber hose. It should tightly compress the autofilter fitting and the compressor inlet pipe from the refrigerator. On the inlet pipe, you can not clamp the hose with clamps. There is no high pressure.
Moisture protection
At the output part, an oil and water separator needs to be installed. It will prevent liquid or particles of oil from entering the system. To do this, you can apply a filter from the diesel power system. The connection is made using the same hose. But here it is already necessary to strengthen the connections with a clamp, because the output will be decent pressure.
Denouement
The diesel filter must be connected to the input of the gearbox. It is necessary to decouple the pressure at the inlet and outlet of the refrigeration compressor. To do this, screw the high pressure outlet of the supercharger into the left and right parts of the cross.
We fix the manometer
At the upper entrance of the crosspiece, a pressure gauge is strengthened. We will perform pressure control on it. You also need to tighten the control relays. Do not forget that threads must be sealed.
The importance of the relay
This device makes it possible to widely control pressure levels. It can, if necessary, interrupt the power of the refrigeration motor. For these purposes, either PM5 or RDM5 is suitable. Both devices will start the engine if the pressure drops, and turn off when it increases. The pressure level is adjusted using springs from above. So, with the help of the large we set the minimum levels, and with the small - the maximum limits.
Electricity
To make this work, we connect the zero power wire to the relay, and connect the second wire to the refrigeration engine.
Pass the phase wire through the toggle switch to the second contact of the compressor. This will allow you to quickly turn off the power. Naturally, after connecting you need to reliably isolate all this.
So we made a compressor for painting the car with our own hands. It remains only to paint, tune and test it.
Adjustment and first tests
After assembling all this together, you can safely proceed to the first tests. Connect the actuator to the output of the unit. Then insert the cord into the outlet, set the relay to the minimum and turn on the toggle switch. Look at the pressure gauge. If you are convinced that the relay turns off the motor, you can check for leaks. To do this, use the grandfather method with soap.
If everything is fine, then bleed air from the receiver. When the pressure drops, the relay should start the motor. If everything works, then painting with a spray gun will no longer cause difficulties.
First samples
To test the unit in operation, any unnecessary part will do. There is no need for any surface preparation. It is important to determine the working pressure by trial and error. Using experiments, determine the figure at which the pressure is enough for a complete painting without frequent engine starts.
As you can see, it’s quite easy to make 220V air compressors for painting. This unit can already be fully used for professional activities. Costs will surely pay off soon. The compressor is necessary not only for painting work. It has a very wide range of applications. A semi-automatic system will allow you not to be distracted from work.
Spray guns
In addition to the compressor, airbrushes are also needed for painting work. To do this, you need to purchase a pneumatic model. A correctly selected airbrush will allow you to successfully carry out work. The tool should be selected based on the characteristics of the compressor.
The paint spray gun for a car should be picked up correctly according to working pressure. With the wrong choice, the pressure will drop too quickly, and the quality of work will be very low. There are several technologies that are used in this tool. They need to be selected based on the task. For example, modern LVLP technology allows for very economical use of paint at a low air flow rate, and the surface will be high-quality.
How to set up a spray gun?
High-quality painting is possible only with properly configured equipment. Setting the spray gun allows you to change the width of the torch, air pressure, as well as the flow of paint.
With the width of the torch, everything is extremely clear. Maximum width - maximum speed, uniform overlay. For tinting, the torch is reduced, but the air supply is also reduced.
Adjusting the ink supply is also easy. Many experts open it to the maximum. But air supply can cause difficulties. For proper settings, you will need a compressor, instructions for a specific spray gun. It is necessary to use a sheet of whatman paper and to direct a stream from an airbrush at it. If the torch is in the shape of a figure eight, reduce the pressure. If the paint is applied in droplets, add it. Find the optimal position.