Quite often today, the textured bark beetle plaster is used for decoration both inside and outside. With their own hands, it is applied to various surfaces. It should be said that the technology of laying the material is simple. Undoubtedly, there are some nuances that you need to know. Next, we will get acquainted closer with the material, and also figure out how to make decorative bark beetle plaster with your own hands.
General information
Stucco got its name for the drawing that is obtained on the surface - it looks like traces of a bark beetle remaining on wood. Today, there are two types of this material. "Bark beetle" can be on a plaster or acrylic basis. The first is sold in dry form, and the second - as a finished mixture. If we briefly describe the material as a whole, then we can say that this is a composite plaster, which contains small pebbles. Each manufacturer in the manufacture of using one or another recipe. However, as a rule, marble or mineral chips are used as granules. The grain size of the material depends on the size of the inclusions. It can be from 0.1 to 3.5 mm.
Material benefits
Due to the use of polymer components and mineral filler instead of sand, the mixture acquires lightness. This prevents excessive load on the structural elements of the structure. Decorative bark beetle plaster does not contain harmful impurities, therefore it is environmentally friendly. The material is resistant to various temperatures. In particular, the coating withstands drops from -55 to +60 degrees. Stucco is not subject to fading in the sun, resistant to fire. With increasing temperature, the coating does not emit harmful compounds. One of the undoubted advantages of the material is its durability. The coating is not exposed to chemicals, mold, precipitation. Plaster "Bark beetle" is not exacting to leaving. It is enough to wash it regularly with water. Resistant material and mechanical stress. When washing, you can use a sponge or vacuum cleaner. Also, the coating withstands light impacts. The main color is white. You can change it by adding dye to the solution during preparation. You can also paint a dried surface. The material is quite common, and its cost is quite affordable.
Use possibilities
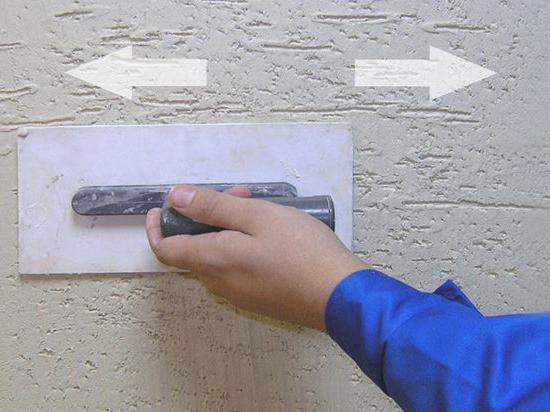
Due to its characteristics, the material is widely used today. As mentioned above, you can use the coating both outside and inside the structure. For exterior decoration, facade bark beetle plaster is used. Do-it-yourself coating is easy. The picture will ultimately depend on the owner’s imagination. The pattern is formed by certain movements, with the help of which the Bark beetle plaster is applied. With your own hands you can create various patterns: wave-like, transverse, longitudinal, chaotic. If you wish, you can even get a very original picture.
Material selection
Before you apply the bark beetle plaster with your own hands, you need to choose the right mixture. There are a lot of manufacturers today, each of which applies one or another method of preparing the material. When selecting, you should pay attention to its grain size and type. The first characteristic determines the width and depth of the grooves that will be obtained in the process of laying and creating a picture. One of the features that the coating has is that the consumption of material will depend on the size of the granules. So, plasters with a grain of 3.5 mm will need more than one with 2.5 mm aggregate. You also need to decide which mixture the work will be carried out - dry or ready. The latter option, of course, is preferable. It is more convenient and faster to work with the finished mixture. However, its cost is slightly higher. At the same time, it should be said that a correctly prepared dry mixture will in no way yield inferior to a finished mixture.
Suitable surfaces
The base on which the Bark beetle plaster will be laid with its own hands should provide good adhesion (adhesion). In this regard, to cover the glass with material, iron is inappropriate, since it simply will not be kept there. The most suitable surfaces are concrete, brick, drywall. DIY plaster is laid on these and similar substrates without any particular problems . "Bark beetle" refers to the category of topcoats. In this regard, the material is not used to grout and mask pits or surface cracks. It should be said here that not only wall plastering by the Bark beetle is often carried out. Do it yourself with this material you can finish the ceiling.
Tools for work
If you want the Bark beetle plaster to be laid with your own hands, you should prepare everything you need. To work, you will need:
- Set of spatulas.
- Bucket.
- Plastic grater.
- Drill with a nozzle "mixer".
- The mixture itself.
For work, it is recommended to choose the autumn or spring period. You can lay the coating, of course, in the summer. However, it should be remembered that the solution will dry quickly at elevated temperatures, and therefore will have to work quite quickly.
Foundation preparation
Before the Bark beetle plaster will be laid on its own, it is necessary to work with the surface. The base should be cleaned, remove dust, dirt, mold (if any). Next, you need to evaluate the surface condition. If there are bumps, cracks or holes, they should be filled with putty. As a result, the surface should be relatively flat. The pits should not exceed the grain size of the material.
Primer
After preparation, the base should be treated with a special composition. Primer paint will provide the necessary adhesion of the material to the surface. The composition should be chosen in white or the same shade as the coating. This will prevent the primer from showing through the plaster. If an expensive composition was chosen, then it can cover the surface in one layer. It has the necessary thick and high-quality consistency. If the soil is cheaper, then it will have to be laid in several layers. The coating dries in about 4-6 hours. After this, it is already possible to start plastering. Experts recommend using materials from the same manufacturer to get the best result. If we talk about specific manufacturers, then, for example, for the “Ceresit” plaster, it is recommended to use the ST-16 primer when preparing the surface.
Cooking
The dry mix should be diluted in accordance with the manufacturer's instructions. However, there are some general rules. So, first water is poured into the container, and then the mixture is poured. The mass is mixed with a drill and a mixer tip. After the mixture reaches the required consistency, it must be allowed to stand for several minutes, and then mix thoroughly again.
Working process
For applying decorative plaster grater is used. The tool should be positioned at an angle of 60 degrees. in relation to the processed plane and spread the material on the base. The layer will have a thickness corresponding to the grain size of the coating. As soon as the mixture, applied to the surface, ceases to adhere to the tool, you can begin to form a pattern. This is done using a plastic or wooden grater. Furrows can be vertical, circular, horizontal, crossed - it all depends on the imagination and preferences. It is recommended to cover the entire surface at a time without smoke breaks and breaks. The material will dry about 1-3 days. With quality work performed on the surface, there will be no noticeable glossy areas, as well as joints. In general, the coating should be even and uniform.