Currently, maintaining body hygiene is not possible without plumbing devices such as a bathtub or shower. The latter is much more popular, since taking a bath takes a lot of time, and you can refresh yourself with a shower in just a few minutes.
Flush-mounted faucets are an excellent solution to the "small area" problem, as this is one way to significantly save space. All models have one purpose, only different devices.
What is a flush-mounted mixer?
Conventional appliances involve the placement of a device for adjusting and supplying water in a housing. A flush-mounted mixer is a device that exists separately from the spout. You need to install such a device at the moment when the water pipes are being diluted, since there is a wall installation. Outside, only a metal nozzle and control lever are visible.
Each manufacturer seeks to release their mixers with flush mounting, but in general, there are 2 main types:
- The built-in mechanism is a monolithic metal cast frame with holes for supplying hot and cold water, equipped with fasteners. The only collapsible part of such a mixer is the cartridge.
- Built-in box. These universal mixers with flush mounting are of two types: a device for a shower (ceiling watering can or a watering can equipped with a flexible hose) and a device for a bath and shower (two water outlets: a shower watering can and a spout).
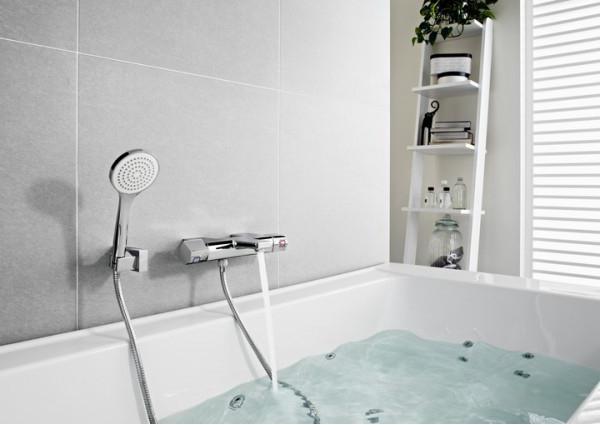
Stationary appliance with watering can and single lever switch
The flush-mounted mixer is a regulator of temperature and pressure of water that comes from a faucet or shower head. The latter are simple and multi-mode. The most primitive is a single-lever system, which is based on a cartridge that performs the same function as a valve and ball mixer in a traditional device.
A watering can with a mode switch and a mixer are connected by a long flexible metal corrugated hose. Mounting to the wall is carried out using a special bracket.
Mixer installation or replacement sequence
The concealed faucet can be installed independently, all that is required is a little experience and special tools.
The procedure is as follows:
- Using a grinder or chamfer, you need to make a groove until the required height is reached.
- Pipes for hot and cold water supply must be laid from the riser to the place of installation of the mixer and hide them in the wall. By the way, special “stockings” are capable of compensating for thermal expansion, for the manufacture of which foam polypropylene is used. When withdrawing pipes, it is necessary to observe the requirements regarding the level and distance, otherwise the process of threaded connection with the device body will be delayed for a long time.
- Installation of the hidden part is carried out directly into the wall. In this case, a perforator and crowns are used. We must not forget about how thick ceramic tiles or plastic panels will be used for wall cladding.
- To achieve the optimum value of tightness allows the use of fum tape. No less effect provides tow in combination with oil paint.
- Now you can begin to fasten the bracket and attach the flexible hose to the corresponding pipe of the mixer.
- The final step is to open the taps and check the tightness of the system. If a leak is found as a result, then first of all, check whether the gaskets fit snugly on the nozzles and tighten the nuts.
Types of hygienic shower with mixer
Hygienic shower with concealed mixer may be different depending on the features of its design:
- Toilet bidet. Outwardly, it is practically no different from a conventional toilet, but it is equipped with a nozzle that supplies warm water. The location of the latter can be either a toilet casing or a retractable fitting. The installation of such a hygienic shower involves replacing the toilet in the house. It is also necessary to provide a water supply and install a built-in shower mixer for concealed installation, which should be included.
- Bidet cover. Installation of such a device is much simpler than the previous version, in addition, it can be installed on a regular toilet. The cover may be electric or conventional. The former is characterized by the presence of additional functions, for example, water heating and a hairdryer.
- A wall-mounted hygienic shower plus a concealed mixer is the same design as an ordinary shower, but with some differences. The watering can has a significantly smaller size and is equipped with a shut-off valve. You can install such a shower either separately or on the toilet. Before proceeding with self-assembly, you need to find a separate hidden niche in the wall, necessary for the supply of hot and cold water supply, and then begin to deal with the mixer. The result is warm water. If you plan to install such a shower directly on the toilet, then first you need to stock up with a tee to supply water to the tank. This option is much less labor intensive, but in the end only cold water will be available.
Briefly about the main thing
The flush-mounted mixer is the device that is best installed at a time when the finishing and plumbing work is not yet complete.
Ideally, installation should be performed by a qualified technician. If it was decided to work independently, then you can ask for help with special brochures developed by leading world manufacturers - in them you can find detailed step-by-step instructions for installing the built-in mixer.
Where can I install a concealed mixer?
Regardless of the type of wall and its thickness, there are the following installation options for the mounting block:
- on the wall;
- on the supporting frame;
- to the interior partition using the mounting rail;
- inside the wall.
The value of the optimal depth of the niche for the box varies from 80 to 100 mm. If there is such a need, you can use a hairpin extension, usually included in the kit. The partition, for the construction of which tongue-and-groove or gypsum blocks with a depth of 100 mm, were used, need special reinforcement, for example, in the form of a metal sheet bolted.
Water supply
After the flush-mounted built-in mixers have been installed, you can proceed to the water supply: the fuel must be placed on the left side, and the cold one on the right. Manufacturers usually include in the kit everything they need, namely: an eyeliner, several reducing nipples and a plug.
Finishing work
The next stage is the decoration of the walls or the manufacture of false walls from drywall. The second option involves mounting the mounting block to the GCR, in accordance with the design. In conclusion, the mixing unit is mounted and the inside is closed with the panel on which are located: control lever, switch and spout.
Instructions for installing the concealed mixer
Installing a flush-mounted hygienic system is much more difficult than installing a matching sink design. In this situation, you need to either drill a wall or make a special box in which you can place the inside of the product.
Such work involves the sequential implementation of the following steps:
- Studying the instructions in order to get acquainted with the device and its features.
- Consideration of the installation location of the mixer and its components.
- Wiring the water supply system.
- Determination of the outlet point of the shower hose.
- Laying a connecting water supply.
- Preparing a niche in a wall or duct. The manufacture of a niche involves the use of a hammer with a special nozzle installed on it.
- Laying in the holes all the necessary elements (pipes and bends).
- Installing the mixer in a niche in accordance with the instructions.
- Conducting a test run, namely a careful inspection of the system at the time of the leak, the study of each centimeter, especially at the junction.
- Wall repair.
Important! When purchasing a concealed mixer, you should pay attention to the installation box. The presence of this device greatly facilitates the repair work.