This overview will not only describe how to configure the Rostelecom WiFi router, but also do it properly using the F @ ST 2804 network device developed by Sagemcom as an example. The algorithm for switching the router, setting up its configuration and testing below , is universal and can be applied to other routers sold by this leading Russian Internet provider.
Information about the company and the services provided
The Rostelecom company originates in far 1992. This state-owned enterprise at that time was formed by combining about 20 organizations specializing in the provision of fixed telephone services. Over the past 24 years, various organizations have constantly been added to this company. Either by acquisition, or by merger. As a result, Rostelecom is currently one of the largest companies that provides not only landline telephony services, but also mobile communications, Internet access and interactive television. The presence of fixed-line telephony in almost any locality of the Russian Federation allows this company to organize access to the global web without any problems. Only here the connection of a WiFi router in this situation is slightly complicated by the non-standard type of its input port. Typically, all modern network routers have an RJ-45 input port. But this telecommunication organization has for this purpose a completely different port with the designation ADSL. Essentially, branded routers in this case combine 2 devices in their case at once: an ordinary router, which allows you to create a wired and wireless computer network, and an ADSL modem that converts the signal from the telephone line into a clear signal for the router.

Technical specifications of the router
The F @ ST 2804 router has the following technical specifications:
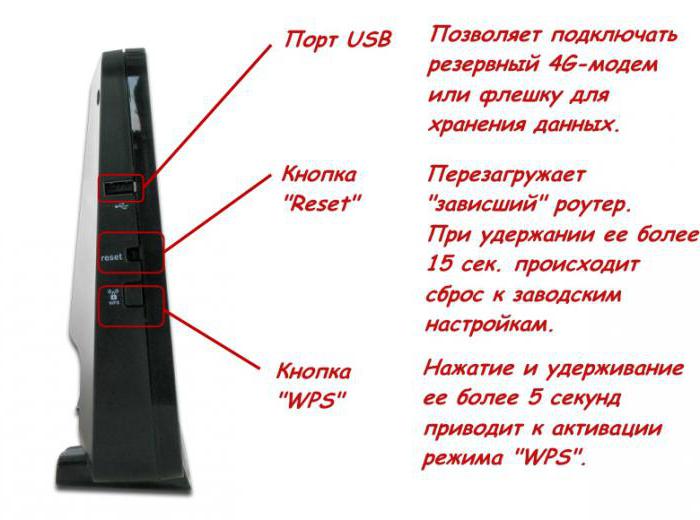
- The input signal device can be an ADSL port, an Ethernet port, or a 4G modem installed in a USB port.
- The transmission speed in the wired part of the network can reach 100 Mbps, and in the wireless part when the 802.11n mode is activated, it can reach 150 Mbps.
- This router can function as a print server or even a file server. In the first case, it is necessary to connect a printer via the USB port, and in the second case, a flash drive in the same port.
A sticker is glued on the side wall, where the detailed parameters of the router are indicated. This is his model, this is the possible modes of operation, this is the MAC address, username, and password for WiFi. Rostelecom installs special firmware on its routers in its network devices, and to access the settings of the latter, an individual login with a password is provided. Therefore, before setting up such a device, it is recommended that the contents of this sticker be rewritten on a separate sheet of paper. This will greatly simplify the setup and testing process in the future.
Network device configuration
The configuration in this case is as follows:
- Router
- Installation disk with drivers and electronic version of the complete documentation.
- Power Supply.
- Setting up the Rostelecom Sagemcom WiFi router of this model is described in detail in the user manual.
- Warranty card.
- Twisted pair crimped on both sides about 1 m long.
Connecting a router for configuration and further operation
The scheme, regardless of the configuration and type of equipment used, must be assembled on completely de-energized equipment. And this applies to both the router and personal computers, laptops, televisions. As an example, we will consider connecting a network router with an ADSL input. In some cases, this one universal device is replaced by two. One of them is an ADSL modem, and the second is a regular router. In this case, the scheme will change and the connection of the Rostelecom WiFi router will be carried out in the following order:
- Connect the input wire from the telephone line to the input of the ADSL modem.
- The output wire (crimped twisted pair from two ends) is connected with one end to the ADSL modem, and the other - into the input port of the router with the inscription WAN.
- The modem power supply is installed in the outlet, and the wire from it to its socket.
- The second power supply from the router is connected to the second free outlet, and the wire from it is connected to the corresponding socket for supplying voltage to the network device.
- We connect the wired part of the network to the LAN ports.
In the future, setting up such a system is no different from setting up a regular router. Therefore, we will not consider such an option in the future. Connecting a Rostelecom WiFi router with ADSL input is performed in the following order:
- We install the complete power supply into a wall outlet. We lead the wire from it to the router and connect it to its corresponding socket.
- We connect the wire from the telephone line to the port of the network device with the inscription ADSL.
- We collect the wired part of the computer network by connecting to the ports labeled LAN and numbers from 1 to 4.
Supply voltage and enter the setup menu
Next, you need to verify in detail the circuit assembled at the previous stage and make sure that it is correct. Then we turn on the toggle switch on the back cover of the network device, next to which is the inscription Power. Next, you need to wait for the end of its download, which, as a rule, takes no more than 60 seconds. Then we launch a personal computer or laptop. It is with the help of such equipment that it is recommended to configure a key component of a computer network. At the next stage of how to configure the Rostelecom WiFi router, you need to go to its settings menu. To do this, after the PC has finished loading, we launch on it any of the available browsers. In his line of dialing the address, type rt and press "ENTER". After that, a window will appear where you must enter the administrator name and password. This information can be taken from the company sticker located on the side of the network device. Enter it and click OK. After that, the router settings window will open .
Software configuration of a network device
Now we’ll figure out how to configure the Rostelecom WiFi router at the software level. In the menu that opens, there will be only two items: “Setup Wizard” or “Manual Setup”. Since the first of them is much simpler, we choose it. The second configuration option is better suited for more advanced users. In the next window you must specify:
- The region of your location.
- In the second field, you must select the city or branch to which your locality belongs in the Rostelecom hierarchy.
- Third field - select the type of service. The easiest option is just the Internet. A more complicated case is the telephone and the Internet. But the maximum level of complexity in this case has the option - telephone, Internet and TV. The type of service is indicated in the contract and it is there that it can be specified if necessary.
As soon as this data is indicated, we point the manipulator to “Continue” and click on this button. If you are using dynamic IP technology , the next step will be automatically skipped. But when using PPPoE technology, it will be necessary to set the user login and code to access the global web. In the next two steps, you just need to check the boxes opposite the ports to which the set-top box and telephone are connected. Next, set the name of the wireless network and access code to it. After moving to the next window, check the correctness of the set values and save them. Close the browser window. After a further reboot of the network device, everything is ready and you can begin testing.
Checking the wired part of the computer network
After the previous steps, setting up the Rostelecom WiFi router over. Now you need to make sure that it works correctly. To do this, start the browser on the switched on computer and enter the address of any page that interests you. Next, press "ENTER". After that, the page you need should open.
WiFi testing
Next, we’ll figure out how to connect a Rostelecom WiFi router and any mobile device. To do this, in the last we enter the setup menu and go to the "Wireless Networks" section. We find the activation menu "WiFi" and run a scan to compile a list of available wireless networks. In this list, select the name that was previously set. Then in the request we enter the password to gain access. After that, close all previously opened windows. Then we launch the mail client and check for new mail. If everything is done correctly, then the list of received letters will be automatically updated.
Summary
This review article describes not only how to configure a Rostelecom WiFi router of any model, but also correctly connect it. A test methodology is also described. All this will allow you to configure the connection of this provider to the global web on your own without any problems.