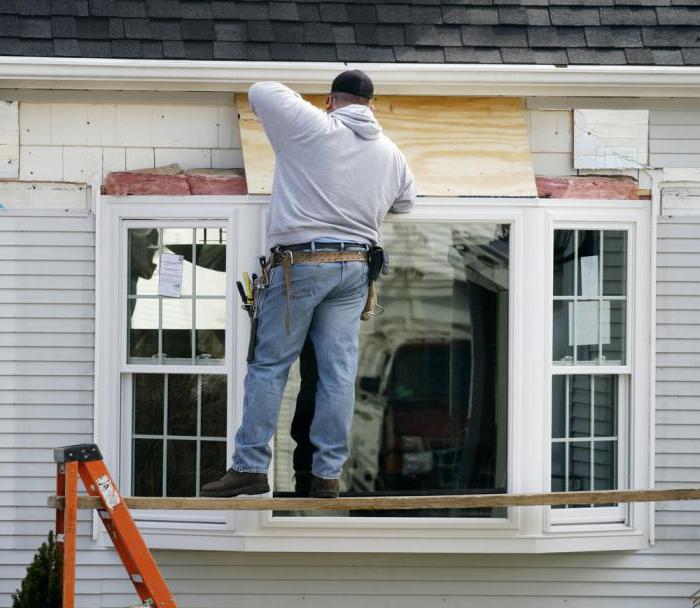
Any structure, especially the old one, can be refreshed by siding. But in order to add this design a complete look, it is necessary to make a window-plank. In addition, such a finish can decorate the appearance of the window and make it more aesthetic. Next, you will learn about the specifics of installing this bar and the requirements for completing the work.
Purpose and characteristics
A window siding strip is designed to close door slopes and window openings. And it gives the structure a complete look. Typical dimensions of the near-window bar: length 3.5 meters, width 7.5 cm. The part is produced using the same technologies as the panels, this makes it possible to select materials precisely according to the color and texture of the cladding. If desired, windows and other architectural elements of the building can be easily distinguished using contrasting color solutions, since window siding strips come in different colors.
The cost of this part varies in a wide range, and for fixing products you will need screws and a screwdriver.
Before you get started
Window decoration with siding involves preliminary preparation, as well as the presence of some knowledge in this area. Taking into account the fact that the materials used to install a window-plank are affordable, most home owners prefer to do the work on their own. Therefore, the information described below is likely to be useful to many of them.
- The material used for cladding windows changes its physical characteristics when the temperature changes (it expands when heated and contracts in the cold), for this reason, when installing a window-plank, it is necessary to leave a gap of 6-9 mm between the panels - in the summer and around 10 mm (in winter).
- When installing the profile in the cold season, it needs to be warmed up in a warm room for at least 12 hours. If this is not done, then the plastic will crack in the cold.
- Do not tighten the screws tightly during the fastening of the profile, as this will lead to the destruction of the material, which will increase or contract depending on weather conditions.
- When calculating, you should take into account the margin for trimming and take about 6-7 cm more.
Applying these tips during installation, you can be sure that after a certain time the profile will not become worthless and will not need to be replaced. Accordingly, the owner of the building will not need to redo the work and spend money.
Mounting Materials
In addition to the profile itself, the installation of siding and a window-panel plank requires materials:
- Plank J-shaped. This detail is needed to hide the siding sections formed around the window openings.
- Finish line. Used to strengthen the window strip.
- Platband. It is used only when the window opening is located at the same level with the wall.
In addition to materials, you will need the following set of tools:
- Measuring tape.
- Building level.
- Hammer.
- Cutter.
- Hacksaw.
- Screwdriver.
- Hermetic.
- Wood screws.
Material calculation
Before starting work, it is necessary to calculate the amount of materials that will be required. To do this, you need to calculate each window separately, because in most cases, in practice, even the ideal structure has errors in volumes that are not noticeable at first glance.
The calculation process is elementary - measure the length of all sides of the window. Do not forget to add 6 mm to the margin on all sides, they will be required for joining the corners and pieces of excess with the maximum fit of the elements.
If there is an ebb in the lower part, its length is not taken into account, since it usually replaces the near-window bar.
In addition, it is important not to forget that the window-panel should be installed in a continuous array, because the window is the first thing that guests and passers-by see. The aesthetic appearance of the windows creates the first idea of the house as a whole, and if the decoration consists of several parts, then the view will be appropriate. Such oversights cannot be hidden even in the photo, and even more so it is impossible not to notice, being nearby.
Bar setting
The dimensions of the window siding strip are always standard, so to speak, Euro sizes, so there are only two types of window frames :
- "Pressed window" to a depth of 20 cm.
- More than 20 cm.
If the depth of the slope is less than 20 centimeters, then in this case, you can install a near-window bar. Such an arrangement is considered exemplary for installation. The near-window bar is installed in two stages.
Stages
- It is necessary to start installation from the finishing strip, which is installed along the entire border of the opening.
- The window sill is fastened.
At first glance, it might seem that everything is quite simple, but if you do not take into account some details in the work, you can ruin everything. Therefore, for those who have not yet performed this kind of work, it is recommended to study some rules:
- Installation of parts begins horizontally, and only then you can move on to vertical elements. If you plan to install a window sill, then the lower bar will not come in handy.
- Corner joints are made by the method of bending and cutting.
- It is very important to leave small gaps (about 4-6 mm) for the upper window profile. This gap later compensates for temperature differences.
When installing a window-plank in old buildings, extra crevice spaces between the panels may form. Silicone sealant, which is ideal for working with siding elements, will help to cope with this problem. The main thing is that after the installation of the window sill there is no need to equip the tide.
Features of installing the J-bar
When the landing depth is more than 20 cm, you should use the J-shaped bar and special angles that are placed on the outside.
This bar is fixed strictly along the border of the window. First, these elements are fixed on the sides. After that, an incision should be made from above on the lower horizontal part so that as a result an “eye” is formed, which will need to be bent a little down. This part must necessarily fit under the side rails, moreover, strictly from top to bottom.
In the slats of the side elements, the cut is made exactly to the size of the "eye". A right angle is cut along the edge of the element located above. There are established slope criteria that directly depend on the location of the angle:
- Right side - is placed from top to bottom and certainly from right to left, while the angle should be 45 degrees;
- The left side is the direction from top to bottom, already from left to right and also 45 degrees.
The back side of all the strips can be executed in exactly the same way, but provided that after installing all the components of the siding it will not be visible, because the result can be a right angle. An ordinary wide platband is also installed according to the same scheme, but in this case all allowances should be slightly larger, it all depends on the characteristics of the profile width.
Important
When installing a near-window bar, it should be remembered that all the voids formed must be filled with polyurethane foam or insulation, otherwise cold air will enter through them in winter. In addition, it is important to pay attention to the waterproofing of these areas so that rainwater or snow does not leak under the profile, which can damage the insulation and walls of the building.