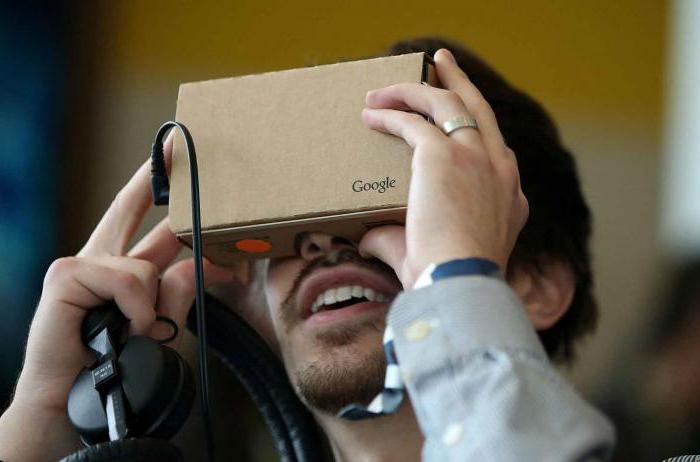
Own virtual reality module is a dream of many since childhood, and progress has come close to creating such devices. In 2014, Google developers introduced the world to a stunning invention that leverages the power of conventional Android smartphones. Right at the conference, any participant could assemble a virtual reality helmet from cardboard and several simple parts and appreciate the delights of three-dimensional graphics and atmospheric video with the ability to view it at 360 degrees.
Virtual reality for cheap
Google Cardboard did not become a technological breakthrough, virtual reality helmets have been around for a long time, moreover, many are familiar with children's devices for viewing three-dimensional images. The ability of smartphones to navigate in space now also few people can surprise, no, the public was surprised by something else. The simplicity and accessibility of the design - that's what really deserved attention, in addition, the developers have by now released a lot of applications that use this device to immerse themselves in virtual reality.
Google Cardboard developers opened all the technical documentation for the device, refusing to trade their invention, and manufacturers instantly picked up the idea. At the moment, there are many different models of plastic, cardboard and even leather products. At around $ 20, you can purchase cardboard kits like the ones that were first presented at a developer conference in June 2014. Also, instructions and schemes are available to anyone, and it will not be difficult to assemble a Cardboard with your own hands.
Materials
Prices for a cardboard box, of course, are quite significant, but before you make a Cardboard yourself, you should know where to find or purchase other materials. We will need:
- A smartphone based on the Android operating system with a very high screen resolution.
- Cardboard 1.5-2 mm thick and about a quarter square meter square.
- Optical lenses.
- Tape to hold the device on the head.
- Office gum.
- A piece of textile Velcro.
- Two magnets.
- NFC tag.
Electronic component - a powerful smartphone
Now we will analyze all the components by points, starting with the models of suitable smartphones. Anyone can find the drawings invented by the developers for the assembly of Google Cardboard. The sizes of phones suitable for such versions of glasses 2.0 are limited to a width of 83 mm and a diagonal of 6 inches. For other sizes, you will have to think through your own design, choosing the distance to the lenses empirically or look for an option from the finished products in the store. Additional requirements for 3D glasses are placed on the device’s screen. Remember, you will not just look at the phone screen from a very close distance, but get an increase through the lenses. Of course, the better the screen, the less discomfort. At the moment, you can use smartphones based on iOS 6.0 and above (from 4 iPhone) or Windows Phone 7.0 and above, but initially the whole system was designed specifically for Android 4.1. Download any VR application and check your smartphone for compatibility by rotating it and watching the picture.
Body material
It’s easy to pick up the cardboard for the base of our glasses; a large pizza box has suitable parameters. Cardboard can also be purchased at needlework stores or to disassemble some orphaned box for household appliances. Too thick cardboard will be inconvenient to cut and bend, while thin cardboard will most likely not hold the lenses and the smartphone in a rigidly fixed position on the head.
Optics
With lenses, perhaps it will be the most difficult, but it is the most important material for 3D glasses. Google recommends using lenses for Cardboard with a focal length of 45 mm, respectively, the dimensions of the virtual reality glasses themselves on the site are designed only for lenses with this focus. Thus, the desire to use other lenses or, perhaps, a system of two or more lenses for each eyepiece will inevitably lead to a reconfiguration of the distance to the eyes and screen, thus changing the entire structure. If you feel confident enough, it’s worth experimenting, but it’s much easier to order lenses.
Fasteners
As a fastening to the head, you can use fabric elastic or a Velcro strap. It is not difficult to find stationery gum for the case, and replacing it is even easier. After assembling the entire structure, it is needed only to maintain shape. You can simply glue the 3D glasses on all joints after adjusting the lenses with glue or tape. Two Velcro tape with a size of 15x20 mm will be needed to fix the closed cover with the inserted smartphone. In the absence of such, there are many options for fixing a cardboard cover, the main thing is to make sure that the smartphone does not fall out when using 3D glasses.
Additional controls
Magnets are needed to make an optional 3D headset control button on the case, and are only suitable for smartphones with a built-in magnetometer. When creating a helmet for testing, you should not spend your energy and money on finding suitable magnets. Such a button can be attached to the virtual reality glasses separately after fully testing the device or not installing it at all. For long-term 3D glasses, you will need a neodymium magnet ring and a magnetic ceramic disk, both with dimensions not exceeding 3x20 mm. You can also cut holes and control your smartphone with your fingers.
The NFC sticker is glued from the inside of the glasses, which allows the smartphone to automatically launch the necessary applications. You can find it, probably, in communication stores or in online stores, it is also not obligatory, and you can put it on later somehow.
Instrumentation and safety
The tool for work will need the simplest:
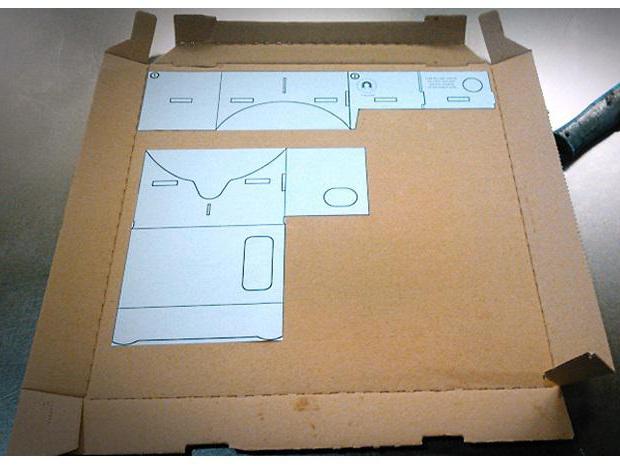
- Google Cardboard Template. The drawings are in the article.
- A sharp knife, a durable clerical one. The cardboard needs to be cut clearly along the lines of the template, especially the grooves and holes, so the scissors can’t cope here.
- Adhesive tape or glue.
- Hard line.
Google claims that there are enough scissors to work, do not flatter yourself, thin slots and locking grooves are much more convenient to cut with a blade.
The design is reinforced by stiffening ribs from the inside, so there is not much difference to cut an entire pattern from a long piece of cardboard or assemble from 2-3 parts, connecting them with tape. When cutting with a knife, be careful not to scratch the surface of the table or floor, take for this purpose a special board, for example, a chopping board from the kitchen. Particular care must be taken when cutting out lens openings so that subsequently the lenses lie in the same plane perpendicular to the gaze.
Device assembly
Assemble according to the drawings, strengthen the frame with adhesive tape and carefully monitor the location of the lenses. In the locked position, the cardboard will firmly press the lenses so that they do not move relative to each other. Next, you need to stick Velcro as fasteners on the edges of the upper side and on the inside of the lid, and also install the magnets in their place. At this stage, it is already possible to try on 3D glasses to the head to determine the places of possible skin rubbing. When watching a movie for a long time, for example, these points can be very annoying, so you can additionally lay them with thin strips of foam.
Is the game worth the candle?
The 3D glasses are ready, it remains to fix them on the head with an elastic band or a strap of your choice, insert a smartphone with a 3D application and enjoy virtual reality. Regarding the cost of the resulting device, there are many offers of ready-made kits for less than $ 10. You can save money only if all the parts are at hand or are easily accessible. If you order spare parts, taking into account the various costs of shipping and lead times, it turns out to be somewhat more expensive than buying the whole kit. Naturally, if your dog bites 3D glasses for sitting in virtual reality instead of feeding or walking the animal, you can easily collect new ones using the instructions above and the remaining details. In the meantime, you are looking for cardboard to replace the damaged one, in order to restore the Cardboard with your own hands, you can walk and feed the dog.
Device features
At the moment, there is already a tangible number of applications optimized for Google Cardboard and several films. Paired with headphones, virtual reality glasses can easily replace a good 3D cinema, and games, according to users, despite their primitiveness, can add a strong sense of presence and atmosphere. For craftsmen and amateurs of various technical problems, it can be noted that there is the possibility of connecting Cardboard glasses to a computer for using the virtual reality module in games. This is where truly complete immersion is.