Mastic - the product for confectioners is far from new. It is used to fit and decorate cakes and other confectionery. With its help, real masterpieces of confectionery art are created. You can make mastic yourself (there are many recipes) from condensed milk, marshmallows or gelatin, or you can buy a professional one. Mastic bunnies, princesses, pirate ships - create masterpieces as far as your imagination allows.
Bunny with orange
This little bunny will be a good addition to any celebration. You can make a lot of them to put on muffins or just make one to decorate a birthday cake.
What you need:
- Ready mastic of white color;
- A brush and a glass of water;
- Green or orange mastic;
- Modeling tools (hook);
- Skewers or toothpicks;
- Sharp knife;
- Pink food coloring
- Black food marker or liquid dye.
Step-by-step instruction
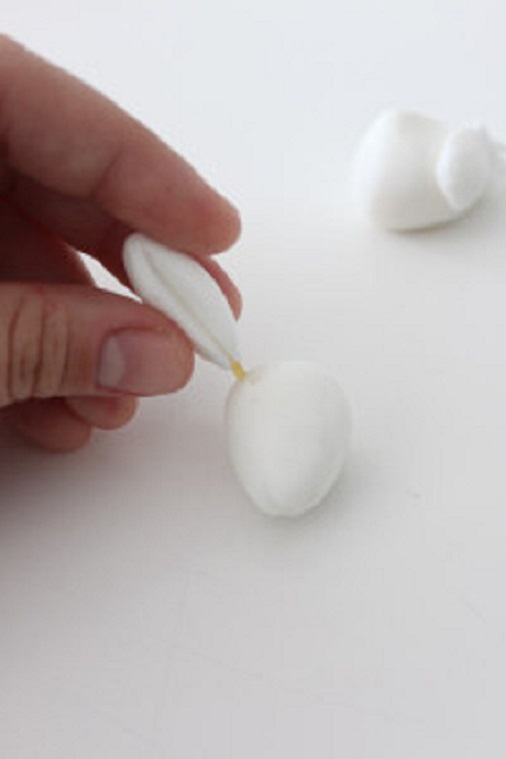
Roll out two balls and give them an egg shape. We need one big for the body and one about 50% smaller for the head.
Carefully, holding your bunny head in your hands, carefully mark the nose and mouth with the help of a modeling tool (hook). From small pieces of pasta, make pens and insert them into the body. Roll out the long, drop-shaped bunny ears. Be careful not to make them too long or too thin, as they will be unstable and bend. Using the tool, gently push down to form the ears of the correct shape. Then carefully insert the toothpick inward (for support).
Mark the place on the head where the ears will be, and then carefully stick the ear in there. Add some water to the bonding spot to improve traction. Roll out two small legs and bunny arms. Use the knife to mark the lines. Roll a small ball of orange mastic and, putting small dots with a tool around the ball, give it the look of a real orange. Make a tiny piece of green mastic and stick it on an orange ball, fastened with water. Now connect with an toothpick an orange and a bunny’s pen. Dampen with water. Attach the legs and make sure that the bunny's body sits exactly on them. Brush with a small amount of pink powder dye to color the ears and nose, and then paint the eyes with a black food marker.
Easter bunny
Following this simple lesson, you will learn how to create a bunny from mastic step by step and you can decorate Easter cakes, cupcakes or cake. Thanks to this, you will also learn the basics and be able to create other animal figures.
What you need:
- White mastic;
- Food gel dyes: green, orange, pink, black;
- Food glue;
- Design tools;
- Brushes;
- Toothpicks.
How to make an Easter bunny from mastic (with photo)
Step one: take a piece of white mastic and shape it into a “rugby ball” or in the form of an egg. This will be the head of your rabbit. Putting your head on one side, take a generous piece of white mastic and form an "oval" egg. Now you have the head and body of your rabbit.
Step Two: Take the rabbit’s body and stick a toothpick one centimeter where it has a neck. Put a small amount of edible glue around the handle and put the rabbit's head in place.
Step Three: Using a small amount of pink mastic, roll up a small ball and glue in the center of the face of your rabbit. Now the rabbit has a nose!
Fourth step: set aside the rabbit for a while. Take a small amount of orange mastic and form into a sausage, tapering at one end to create a carrot. Roll out three small balls of green mastic. Spread the blunt end of the carrot with food glue and stick the green balls there. Carrot is ready!
Step Five: spread food glue on the place where the carrot will be located, glue it and hold it with your fingers for several minutes so that the glue seizes.
Step Six: Now is the time to create your rabbit's legs! Roll two balls and give them the shape of an egg. Pin one side down with your fingers to one millimeter. Now spread them with food glue and plant a rabbit on them, crushing for a couple of minutes.
Seventh step: from two mastic, form two "carrots". Flatten them slightly and attach them to the body with edible glue. Place one after the carrot, as if your bunny is holding it.
Step eight: mark the place where the eyes will be located, and put the dots of glue. Roll up two tiny balls and glue them.
So your bunny is ready from mastic! The master class can be applied in the creation of other mastic animals.
Cute mastic bunny
What do you need?
- 250 grams of white mastic;
- Modeling tools;
- Corn starch;
- Pink powder food coloring;
- Pink dragee - 1 piece;
- Skewers or toothpicks.
Create a bunny
Dust the working surface with corn starch. To make the body of a bunny, roll a large conical shape out of mastic. Having retreated 3/4, use your finger to roll the body, making the hare “waist”. Bend the upper part. These are the paws of a rabbit. Make a small incision in the center and part slightly. Draw the fingers with the tool. Poke the center of the body with a skewer or cocktail tube, leaving a small portion to set your head down.
In a similar way, make the legs, just cut the legs more, and then cut them. Using the blade, cut out the circles for the legs, which will later be attached to the body.
For the ears, roll the sausages out of mastic with your own hands and cut them in half so that you have an equal amount for each ear. Shape each into an elongated cone with a pointed end. Use the cone tool to make indented lines in the center of each ear, tuck in with slightly pointed ends. Mark on the head the place where you will stick the ears. Pierce the ears with toothpicks and insert into the head.
Cut emoticons out of black mastic. Use food glue to attach them to the rabbit's face. Paint eyelashes and put white dots on your eyes. As a nose you can use a pink dragee or roll a ball of pink mastic. Place the mastic bunny on the cake.