Currently, owners often use siding panels to effectively decorate the facade of a house. This finishing material, made using modern technology, can imitate brick, stone, wood or any other surface. Such decorative panels owe their popularity to low cost combined with high quality characteristics.
It is possible to install siding with your own hands. Performing such work will not require any special skills from the owner of the house.
It is recommended that you study the instructions for installing do-it-yourself siding for dummies below and get down to business.
Basic rules and recommendations
A step-by-step instruction for installing the siding with your own hands provides for the consistent execution of certain works. In this case, the main stages in the arrangement of the facade are the following:
- The installation process of decorative panels must certainly begin with the fastening of the starting profile. Subsequently, it will be completely covered by the first panel. Do-it-yourself installation instructions for siding indicate that the start profile must be fixed strictly according to the level. Otherwise, all subsequent panels will fall unevenly on the facade wall. That is why the correct installation at the initial stage should be carefully monitored.
- Each of the siding panels has a special lock. With its help, the subsequent profile is fixed with the previous one. In addition, the manufacturer provided for perforation at the top of each product. These are the holes through which the plates are directly fastened.
- The final step in the assembly of the wall is the installation of the finishing strip.
- When installing siding with your own hands, you should consider the likelihood of linear expansion and contraction of the material, which are possible due to temperature changes. To prevent cracking of the panels with changing weather conditions, gaps specially left between the slats will allow. For this, the DIY installation instructions for siding for "dummies" indicate the inadmissibility of the fact that the angular and vertical details of the created facade are inserted tightly into each other. In addition, the head of the self-tapping screw, which will fix the plate to the wall, should not be twisted with force. The plate should not be pressed strongly against the frame.
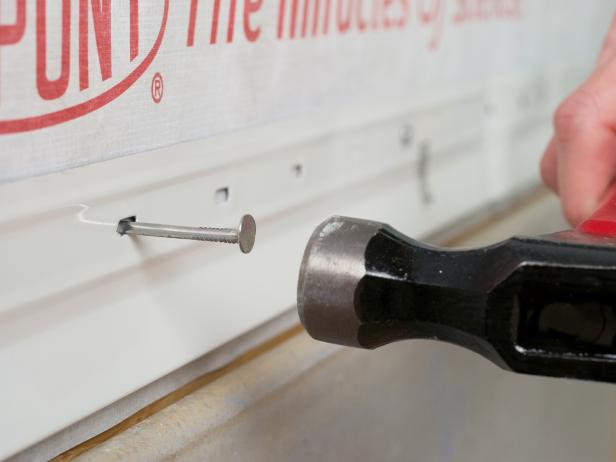
- The panels should be fastened in the middle of the perforation hole available on them. It will also provide siding mobility with changing temperatures.
- To fasten the panels, you will need to purchase galvanized short self-tapping screws without a drill and with a rounded head. The instruction permits the use of roofing nails.
- If the facade surfaces are uneven, then for the installation of siding, you will need to equip the crate. When performing the cladding without it, the curvature of the walls will be reflected in the panels. It is recommended to perform the crate even when the surface of the facade is almost perfect. In this case, ventilation of the walls will be provided, which will have a positive impact on the operational characteristics of the house.
Under what weather conditions can siding be installed?
There are no specific instructions in this manual. But still it is desirable that the air temperature in the street should not be lower than -10 degrees. At the same time, weather conditions must be taken into account when performing special clearances necessary to eliminate cracking of the material. So, in the summer period for ventilation should be left almost 10 mm, and in cold periods - up to 12 mm.
Surface preparation
A step-by-step instruction for installing siding with your own hands at the initial stage of the work involves the arrangement of the crate. Of course, the owner of the house may decide to fasten the decorative panels directly to the walls of the facade. But this is possible only if:
- even base;
- insignificant surface area;
- providing ventilation clearance;
- lack of specially installed heat-insulating material under the panels.
All other cases, regardless of the type of siding, will require the installation of the frame. And at the first stage of its arrangement, it will be necessary to prepare the base of the facade surface. To do this, you need:
- Remove all elements protruding on the walls. It is necessary to remove the excess, regardless of what material the house is built from. Such interferences can be considered the ebb and protruding window sill, swollen paint and deformed plaster. If boards appear on the facade of the house, then you just need to nail them.
- Close up cracks. If there are any, then they must be puttied with cement-sand mortar (for a brick wall) or stuffed with tow (for a wooden one).
- Get rid of everything in contact with the facade. This can be shrubs or tree branches, places where lighting fixtures, peaks and canopies are attached. All these obstacles should be eliminated, otherwise installing the siding with your own hands will become a more problematic process, and the results of the work will be less quality.
- Remove roots that can sprout after they are under siding. And if at first their influence will be invisible visually, then over time it will manifest itself in the deformation of the panels.
- Level the walls. Siding will create a great visual effect only on a flat surface. To level the facade, use a plumb line and level.
Materials and tools for lathing
It is advisable to prepare them before starting the installation of siding with your own hands. Only in this case, the owner will not have to interrupt the work he has begun in order to search for tools or purchase the missing material.
So, to equip the crates you will need:
- roulette;
- metal scissors or grinder;
- square;
- plumb line;
- hammer
- building level;
- hacksaw.
With a significant height of the house, the owner will need to build scaffolding. As for the material, its type depends on whether the crate will be metal or wooden. The number of elements is calculated based on the area of the facade, which is planned to be faced.
Types of lathing
The frame for attaching decorative panels can be made of wood or metal. In the first case, wooden bars are used, the cross section of which is 50x50 mm. Calculate their number based on how many vertical profiles should be mounted using a pitch of 500-600 mm. In addition, hardware is purchased. Their number is determined in this way: for every 400 mm, 1 pc.
When choosing a tree for the crate, you need to pay attention to the level of its moisture. With the value of this indicator exceeding 12%, the timber should be subject to additional drying in natural conditions. After this, it is advisable to soak the wooden parts with a special solution. This will increase their service life.
The metal frame for siding will cost the owners more. But still he is also popular. Indeed, the installation of such a crate is easier to perform, and its durability is several times higher than wooden.
To perform a metal frame, you will need to prepare:
- UD profile that will serve as guides;
- CD profile (stand);
- ES-brackets fixing the CD-profile to the surface;
- hardware needed to secure the UD profile;
- hardware "fleas", designed for fastening metal parts to each other.
Crate marking
What kind of work is done after preparing the walls so that in the future it is possible to do the installation of siding with your own hands? A step-by-step instruction provides for marking the lathing under decorative panels. It is performed using a plumb line and level. In the future, according to this markup, a frame will be installed.
If the geometry of all the planned lines is made correctly, then in this case the panels on the facade can be installed easier. Do not hope that the defects of the crate will subsequently be hidden when installing the siding with your own hands. All of them will certainly appear, and quite distinctly.
Arrangement of the frame
When installing a wooden crate , the installation of a horizontal profile is not required. Vertical bars are fixed with self-tapping screws in increments of 400 mm. With strong winds in the region, this distance is recommended to be reduced.
To perform the crate for siding, which will be mounted around the windows, you will need to fasten the horizontal bars. They will provide rigidity to the frame.
When installing a metal crate, work begins with the installation of a UD profile. It is fixed along the perimeter of the facade, without framing the door and window openings. Subsequently, it will be necessary to install the panels on a metal crate using a CD profile. His step in the installation of siding with insulation with his own hands should be equal to the width of mineral wool or other similar material.
The CD profile is fixed to the wall using ES brackets. Their use is convenient in that the frame is easily constructed at the desired level without installing additional beacons.
Facade insulation
What is the next step in installing a siding yourself? After arranging the battens, a heater is placed between its guides. If the step of the bars or profiles does not match its size, such material can be supplemented with inserts or, on the contrary, cut. The insulation sheet is attached to the walls using a special adhesive or dowels.
After laying the material, it is recommended to protect it from moisture with a vapor-permeable sheet, the rolls of which should be rolled out horizontally when moving from the bottom up.
Determining the starting point
Russian consumers most often choose vinyl siding as the material for decorating the facade of their home. It allows you to quickly resolve the issue of home decoration, skillfully hiding all existing wall defects.
Direct installation of vinyl siding with your own hands is not so time-consuming process, and you should start it with a search for a starting point. To do this, it is recommended that before starting the direct work, carefully inspect the building and think about where it will be easier to fix the slats. If previously the facade was already decorated with cladding, then the new coating can be mounted taking into account the features of the old. Well, if such work is performed for the first time? In this case, the installation of vinyl siding with your own hands should be started so that the starting row overlaps the upper edge of the basement of the house. For the correct placement of the first panels on the facade, draw a straight line using a marker and a plumb line.
Accessories Installation
What is the next step recommended to do according to the instructions for installing vinyl siding with your own hands? In the process of performing the work, it will be necessary to install such additional accessories as corner panels and platbands, the initial strip, etc.
To do this, it is recommended to watch the video instruction on installing vinyl siding with your own hands. In it, professionals are advised to begin all work with the installation of accessories. First of all, corner elements should be placed. At the same time, it is recommended to leave 5-6 mm in the form of a small gap between the cornice and the top point of the facade.
Next is the installation of the starting strip. It will need to be placed perfectly evenly. Indeed, the installation quality of all subsequent decorative trims will directly depend on this in the future. From the horizontal marking line, which indicates where the lower edge of the starting bar should be, it is necessary to draw a second line parallel to it. It should be at a distance equal to the width of the first strip. Next, the starting bar is attached to the wall. Similar work is done using nails or self-tapping screws. For those who are installing vinyl siding for the first time, it is recommended that the panels have mounting holes. It is necessary to drive in clamps in them. Between adjacent strips should leave a gap of 1-1.5 cm.
Aperture insulation
These works are the next step in the installation of vinyl siding. For the finishing of openings, ebbs and trims, overlays and cashing elements should be prepared. In this case, the panels that are near windows and doors, it is recommended to dock at an angle of 45 degrees. So it will be prettier.
Panel Mounting
They proceed to this stage of work after the installation of all the necessary accessories is completed. Installation of panels begins from the starting strip. Then you should gradually move from bottom to top. To do this, the siding panel must be inserted into the starting bar. This is easy enough to do. Indeed, factory-made docking fasteners are located on the bar. It is not recommended to insert the decorative panel tightly. It is worth remembering about temperature differences.
According to the same scheme, all planned sections of walls are lined. Panels are attached one after another. Each subsequent one is inserted into the previous one and attached to it with the help of a lock. The panels are fixed with self-tapping screws or nails with a pitch of 40-45 cm. Joints of individual strips must be performed with a gap of 0.5 or 1 cm.
At the very least, panels are mounted around pipes and openings. To facilitate the task, it is recommended to purchase special elements that are designed for facing the most labor-intensive areas. You can make such parts with holes yourself.
Top edge mounting
The final stage of the facade decoration should be done very carefully. The profiles at the top of the walls are placed in the same way as was done during the facing of the areas located around the openings. Whole panels can be used under the roof. You can cut them when mounting on the gables.
The last row is laid with the use of a finishing lining. You can use a special J-profile for this.
As you can see, the independent installation of vinyl siding is simple and easy. It is only necessary to clearly follow all the steps described above and observe the technology of work.
Metal siding
Recently, this material is gradually gaining popularity. It attracts the attention of the owners in that for the house such panels serve as a wear-resistant, durable and reliable coating. One of the most prominent representatives of this kind of siding are products that simulate a log. They give the walls of the house a natural and aesthetic appearance, and also have high rates of resistance to various influences of natural factors. At the same time, such material does not require any regular maintenance.
Installation of metal siding with your own hands, as well as vinyl, will not cause special difficulties even for those who are engaged in the implementation of these works for the first time. Indeed, the principle of facing these materials is similar to each other. So, according to the instructions, the installation of metal siding with your own hands will require arrangement:
- outer and inner corners;
- starting rail;
- connecting profile;
- finish rails;
- platbands.
Start work from the corner of the structure. The first row is fastened with the lower lock to the starting (initial) bar. All subsequent panels are attached to the previous ones by locking with a lock. The top row ends with a finishing rail.
When working with a metal profile, it must be laid on a horizontal surface. It is recommended that more than one person raise the rails for installation. Indeed, in this case, the panel will bend and deform. You should also not drag metal siding on the ground. This will damage the paint on its surface.
Base siding
For facing the lowest part in the building, special-type panels are used. In this case, siding, which is intended for wall cladding, cannot be used. The fact is that such panels are not only for decorating the facade. With their help, the foundation of the house is strengthened and the basement and basement are protected from moisture.
Basement siding is made of a material characterized by special strength. If you compare it with the wall option, then it has a greater thickness and smaller dimensions. Due to this, such panels are more rigid and less elastic.
How to do the installation of basement siding with your own hands? The step-by-step instruction recommends that you inspect and assess the condition of the lower part of the structure before performing work. Old finishes as well as dust and debris are removed. Fasteners protruding outward should also not remain on the base.
Damaged areas of the surface of the base will need to be repaired. Do-it-yourself installation of basement siding begins with covering the surface with a metal reinforcing mesh. A layer of plaster is applied on it, at the base of which is cement. After that, the wall should dry. At the end of this process, complete hardening of the cement will indicate.
What should be done next for installing basement siding with your own hands? Before facing the lower part of the building, it will be necessary to build a crate on it. The material for it can serve only as a metal profile. Wooden parts are not used in this case. As leveling strips, you can use plastic elements. The lathing is fixed to the base using self-tapping screws that are screwed into plastic inserts. The pitch of the frame should not be more than 50 cm.
, . . .
. , .
. , . -. .
. 0,5 , – 1 . .
Next, a decorative panel is inserted into the corner element, which is fastened with self-tapping screws. Install the hardware in the center of the oval holes, without twisting 0.1 cm. After laying the strips along the entire length, everything repeats along the next surface of the wall.
In those places where pipes of various communications pass, a hole of the right size is cut in the panels. If necessary, the resulting cracks are coated with a waterproof elastic sealant.