Ant - an amazing creature that lives in all parts of the Earth except Antarctica. According to scientists, this is one of the oldest insects on our planet.
Ant communities resemble the human way of organizing life, the ants are close to humans in their ability to breed “pets” - they grow and graze aphids on the leaves of plants to feed on its sweet “milk”. And also it is a very strong insect that can lift and hold a load tens of times its own weight. We meet ants not only in nature: they are the favorite characters of children's fairy tales and cartoons. And everywhere, these tiny representatives of the Hymenoptera squad are represented by great hard workers. But how to draw an ant? This is not at all difficult.
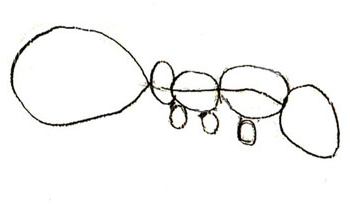
We make the first sketch
Consider how to draw an ant with a pencil, gradually clarifying the initial contour. When creating an image, it’s nice to have “nature” in front of your eyes. It can be, for example, a photo of an insect. Before drawing an ant, we will carefully consider it. The body of this creation consists of five oblong segments, which we will need to depict. We draw a light diagonal with a pencil, we will "string" the main segments on it, as on the axis. The first oval shape will be large enough, the front end of the oval will be a bit pointed - this is the future head of the ant. The next irregular oval is the back of the insect. She will be a little smaller. Behind the back we will draw an even smaller oval, and behind it - an even smaller one. The last oval corresponding to the back of the ant will be the largest, it should be approximately three times the volume of the head. We have to think over the size of the picture long before drawing the ant so that there are no problems with placing on the leaf the largest parts of his body. Under the second oval, in the center, we place a small circle - the legs of the insect will “grow” from it. We outline two such circles under the third oval.
Refine the sketch
Supplement the sketch with the lines of the legs. First, we extend the small circles under the body of the ant into small vertical ovals and draw long curved segments of the legs to them. In the upper part they will be thicker, then, gradually tapering, they become very thin. Three limbs will adorn the body of the insect in front, but we will not forget that there are legs on the other side. We will place one on the right, parallel to the front limb, and with another visible leg we will supplement a pair of hind limbs by painting it on the other side of the body.
Detail drawing
In the next step, we will give clarity to our drawing. We remove the excess lines with an eraser, draw transverse lines on the posterior segment of the insect body, and draw dot-eyes on the sides of the head. The following steps, showing how to draw an ant extremely realistic, consist in detailing the sketch. Let's work on the insect's face. We make the eyes convex, for this we will leave a bright highlight, densely shading the entire surface of the pupil with a pencil. The ant's mouth resembles ticks, we draw the corresponding lines. The whiskers look like long antennas, we draw them with two broken lines. We will divide the oval following the head of the insect with a transverse line in the center into two parts.
The last step in the work
The last stage of the drawing is the image of light and shadow. To do this, you need to see or imagine where the light falls on the insect. We will shade the less illuminated areas densely, make the transitions to bright places dim, and leave the light parts unshaded.
We looked at how to draw an ant with a pencil, but paints can also be used. The main sketch will remain unchanged.