According to legend, God once gathered all the reptiles in one bag and ordered the man, without opening it, to throw him into the sea. He could not resist and untied the bag to look inside. He froze in fear and amazement, while the bastards, meanwhile, sprawled on the ground. God turned a curious person into a stork and ordered him to liberate the earth from creeping creatures. This bird, indeed, feeds on snakes, lizards, worms and frogs and is rightfully considered a symbol of good and harmony. And the very appearance of a majestic graceful bird personifies infinite nobility. There is a tradition that where the stork makes a nest, people will surely find happiness.
How to draw a stork, which is associated with so many positive characters and tales? Let's try to do it.
Admire him
Not many citizens saw the stork alive, so for a start it is worth considering what it looks like using photographs, films. We will see that it is a rather large bird with high legs, with a long neck and a large beak. Reflecting on how to draw a stork, remember that the white plumage of the bird has a black shiny hue at the ends. The length of the deployed wing of a stork reaches sixty centimeters. This is also essential information in order to determine the proportions of the drawn figure. The color of the legs and beak of this bird is red, it is important to consider if, before drawing a stork with a pencil, we will consider painting the drawing with paints.
Flying Stork: Sketch Base
Let's start the drawing with the main contours of the body. In the center of the sheet we draw an elongated oval, a little to the left we will draw a small oval - the future head of our feathered friend. We connect both ovals with two parallel lines, so we denote the long neck of the bird. We measure by eye how the length of the neck and head will correlate with the length of the legs of the depicted figure before drawing a stork. Step by step, on the other side of the body oval, we first draw an inclined line of the legs of the bird. Above them, at the end of the oval, we depict a wedge-shaped blunt tail. After that, let’s take our head: to the small oval in front we will draw a beak in the form of an elongated wedge.
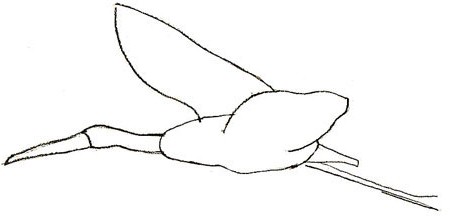
It is easy to understand how to draw a stork in flight - from the middle of the large oval we draw a smoothly curved line to the right, this is the basis of the wing. The second wing is located on the other side of the body, therefore, stepping back a little to the left, we draw up a line with a bend. The basis of the sketch is ready.
Concretization of the sketch
Now we will need to detail the applied contours. Before drawing a stork in volume, we draw at the level of the line of the legs of the figure another sloping straight line with an upward bend at the end. Now draw the wings, adding additional lines to the outlines. We connect the head with the neck, and the neck with the body in one confident line. To bend the neck seemed natural and elegant, the lower line on the neck is slightly bent. With the eraser we delete the initial geometric sketch and we will continue to detail the drawing.
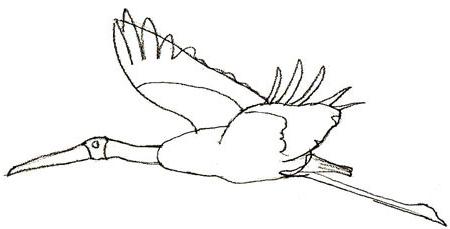
Select the head of the bird with a small vertical line on the neck. Draw the eyeball. Now let’s take the wings. On each of them we will depict feathers. At the ends of the wings they will be large, and closer to the body smaller, at the base they can be represented by vertical stripes on the wing. We divide the inner part of the wing open towards the viewer into the outer section and the one that lies closer to the body. Mirror the details of the second wing of the bird. We add a beak with a horizontal longitudinal line. Let's make a small stroke on the bird’s stomach, right under the left wing.
We complete the sketch
The next step in the drawing will be coloring the stork. If we work only in pencil, we will focus on the shadows and black details of the plumage of the bird. Lightly shade the head of the figure, leave the neck white, then just as easily shade the body with a pencil, leaving a slight highlight in the back of the tail. The tail, the upper part of the leg and the small area under the stomach are densely shaded, achieving the darkest shade. For the black parts of the figure, you can use a black pencil. Black out the tips of the legs, as well as the feathers on both ends of the bird's wings. For greater realism, we depict small glare on them, giving shine and silkiness. We’ll work on the second wing - by shading its outer edge a little, we barely noticeably extinguish the area that precedes the feathers at the ends of the wing.
Where does the stork fly
We looked at how to draw a stork with a pencil, in stages. But if creative aspirations draw us further, we can use colors or at least put our bird in some kind of marvelous landscape. A stork can fly in the blue sky, against a background of bright green trees and hills visible in the distance. Or maybe he flies up to the nest on the roof of the house?