Now more and more companies and their branches are striving to unite into one information network, so this issue is quite relevant. It also often requires the ability to provide a network for employees from anywhere in the world. How to correctly connect the networks will be explained in this article using the example of changing L2TP parameters. Mikrotik, the setting of which is described below, is considered a good option for working both at home and in the office. Thanks to the hAP lite function, you can work with remote access for each employee with little effort. The performance of the router will allow you to work in small offices where the company does not set too large requirements for itself.
Quite often, the office and its branches are located on the same local network. They work with the same provider, so the process of connecting the signals is quite simple. It should be noted that quite often the branches are located at a great distance from the main center and from each other. The most popular and relevant technology at the moment is called Virtual Private Network (VPN). It can be implemented in many ways. It is not recommended to use PPTP, as this technology is obsolete, and OpenVPN. The latter will not be able to interact with all devices.
L2TP Protocol
Due to relative availability, the L2TP Mikrotik protocol, the configuration of which will be described later, is able to work on many operating systems. He is considered the most famous. Problems with it can arise only when the client will be behind NAT. In this case, special software will block its packages. There are ways to fix this problem. This protocol has its drawbacks.
For example, L2TP can be considered security and performance. When IPSec is used to increase security, the second is reduced. This is the so-called data security price.
Server Tuning
The core server must have a static type IP address. There is an example of it: 192.168.106.246. This nuance is quite important, since the address should in no case be changed. Otherwise, the owner and other users will have to use the DNS name and bother with unnecessary actions.
Create Profiles
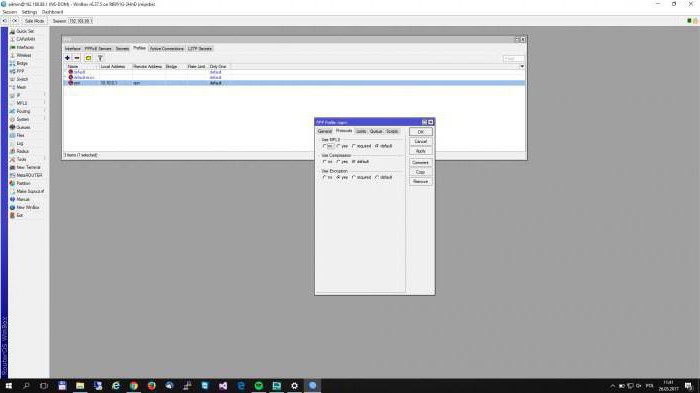
In order to create a profile, you need to go to the PPP section. There will be a “Profiles” menu. Next, you need to create the profile that will be applied to connections such as VPN, that is, a single network. It is necessary to note and enable the following options: “Change TCP MSS”, “Use compression”, “Apply encryption”. As for the last parameter, it will accept the default value. We continue to work with the Mikrotik router. L2TP and Server settings are quite complicated, so you need to follow your every step.
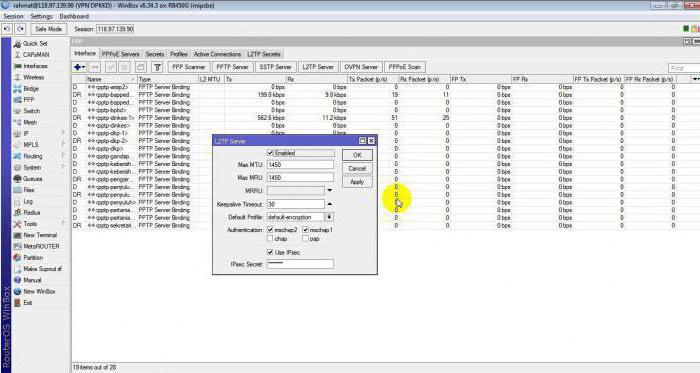
Next, the user needs to go to the "Interface" tab. There you should pay attention to the L2TP server. An information menu will appear in which you should click on the “Enable” button. The profile will be selected by default, as it is the only one created a little earlier. If you want, you can change the type of authentication. But if the user does not understand anything about this, it is better to leave the standard value. The IPsec option should remain inactive.
After that, the user needs to go to the "Secrets" and create a network user. In the column "Server" you need to specify L2TP. If desired, the profile to be used in Mikrotik is also indicated here. Configuring L2TP and Server is almost complete. The local and remote server addresses must be the same, the difference is only in the last two digits. This value is 10.50.0.10/11, respectively. If necessary, create additional users. The local address remains unchanged, but the remote address must be gradually increased by one value.
Firewall setup
In order to work with a federated network, you need to open a special port such as UDP. It raises the priority of the rule and moves to a position higher. Only in this way can L2TP work well. Mikrotik setup is not easy, but with some effort it is real. Next, the tuner should go into NAT and add masquerading. This is done so that computers are visible within the same network.
Adding a route
With all the settings, a remote subnet was created. It is in it that the route should be registered. The final subnet value should be 192.168.2.0/24. At the same time, the gateway is the client’s address on the network itself. The target volume should be one. On this, all server settings end, it remains only to make client-side changes to the parameters.
Client setup
Carrying out further settings of L2TP technology in Mikrotik, you need to pay great attention to client configuration. You must go to the "Interface" section and create a new client of the L2TP type. You must provide the server address and credentials. Encryption remains selected by default, next to the default route option, uncheck the activation checkbox. If everything is done correctly, then after saving, a connection should appear in the L2TP network. Mikrotik, which is almost complete, is an excellent option for working with a VPN.
We check the operability of nodes in the created grid. Enter the value 192.168.1.1. The connection should reset. That is why it is necessary to create a new route of a static type. It is a subnet of type 192.168.1.0/24. Gateway - the address of the virtual network server. In the "Source" you need to specify the address of the user network. After re-checking the health of the nodes of the so-called ping, you can notice that the connection has appeared. However, the computers in the grid should not yet see it. In order for them to connect, you need to create masquerading. It should be completely similar to what was already created on the server. The output interface in this case has a VPN type connection. If ping is done, then everything should work. The tunnel is created, computers can connect and work in a grid. With a good tariff package, you can easily get speeds of more than 50 Mbit per second. This indicator can only be achieved by abandoning IPSec technology (when using L2TP) in Mikrotik.
This completes the standard network setup . If a new user is to be added, then another route should be added on his device. Then the devices will see each other. If the route is forwarded with Client1 and Client2, then no settings on the server need to be changed. You can simply create routes, and set the gateway address of the opponent with a gateway.
Configure L2TP and IPSec in Mikrotik
If you need to take care of security, then you should use IPSec. You do not need to create a new network for this, you can use the old one. Please note that you must create this protocol between addresses of type 10.50.0. This will allow the technology to work no matter what the customer address is.
If you want to create an IPSec tunnel in Mikrotik between the server and the WAN client, you need to make sure that the latter has an external address. If it is dynamic, then you will have to change the protocol policy using scripts. If IPSec between external addresses is involved, then in general the need for L2TP will be reduced to a minimum.
Performance check
Be sure to check the performance at the end of the settings. This is due to the fact that when working with L2TP / IPSec, double-type encapsulation occurs, which means that the central processor is heavily loaded. Often when you create a network, you may notice that the connection speed drops. You can increase it by creating about 10 threads. The processor will be loaded at almost a hundred percent. This is the main drawback of IPSec's L2TP technology at Mikrotik. It at the expense of performance guarantees maximum security.
In order to get a good speed, you need to purchase high-level equipment. You can also opt for a router that supports working with a computer and RouterOS. If it will have hardware block encryption, then performance will improve significantly. Unfortunately, cheap Mikrotik equipment will not give such a result.