A few decades ago, the design of the ceilings did not cause special problems for homeowners: they were simply whitened or painted in bright colors. Today, a huge amount of modern finishing materials has appeared, allowing you to create the most incredible ceiling structures that our grandmothers could not even dream of.
Combined stretch ceilings, photos of which are increasingly appearing on the pages of design publications, today are supplemented with drywall constructions. This combination looks very stylish and original. This design method allows you to create complex shapes with an interesting background and original lighting, thereby emphasizing the interior of any room. Today, this is a very common method of decorating living spaces - combined ceilings (drywall and stretch), photos of which you can see in our article.
Advantages and disadvantages of construction
According to designers, such a complex design looks advantageous in almost any interior. The combined ceiling (drywall and stretch fabric) has several advantages, among which are:
Variety of shapes
In this way, you can create custom designs that have plasterboard framing with a tension coating inside, intricate labyrinths of gypsum plaster, complex shapes that can be framed with sparkling, glossy, mirror or matte film.
Lighting
The method allows the use of various types of lighting. False ceilings have practically no restrictions in the choice of lighting devices, in contrast to suspended ones. Therefore, high-power lamps can be mounted in a box made of drywall.
Zoning
Combined ceilings, photos of which have already been placed in design training aids, are also good because, using various colors of materials and textures, as well as spot lighting, you can divide the room into functional areas (rest, work).
Stacking communications
This design will help to easily hide pipes, wiring and ventilation ducts.
Long service life
With proper installation and care, the combined ceiling will last you a very long time: at least twenty years. You do not need to update the finish as often as in the case of a whitewashed, painted or wallpapered surface. To install this design does not require perfect alignment of the base surface.
Are there any drawbacks to such a ceiling?
Undoubtedly, such a disadvantage has some disadvantages. They are much less than advantages, however, they should be taken into account when planning such a reconstruction in the house. The disadvantages of this method include:
Height reduction
Almost any two-level design takes about 10 cm of room height. Combined ceiling is no exception. In addition, if spotlight is assumed, then even for the first level it will take at least ten centimeters. Therefore, there can be no talk of installing such a ceiling, for example, in Khrushchev.
High price
High-quality stretch fabric and gypsum board sheets, profiles, will cost much more than just two-level combined gypsum board ceilings (you can see the photo in the article).
Temperature and humidity
PVC stretch fabric and drywall is operated at a certain humidity and temperature. If these indicators significantly exceed the norm, then the materials can be deformed.
Combined Ceiling Options
The combination of suspended structures made of drywall and stretch paintings on the ceiling with the right choice will help you create great optical effects. In this case, a variety of options are available with both hidden and open illumination.
So, we present to you the most popular options for combined gypsum board ceilings and stretch paintings.
- A box is being constructed around the perimeter of the room from drywall. In this case, the PVC web is mounted inside the box, the dimensions of which can vary. However, there are certain rules. If you need to visually raise the ceiling, emphasizing the beauty of the canvas, then GKL panels are made thin. An excellent visual effect is achieved when spotlights are mounted inside the box.
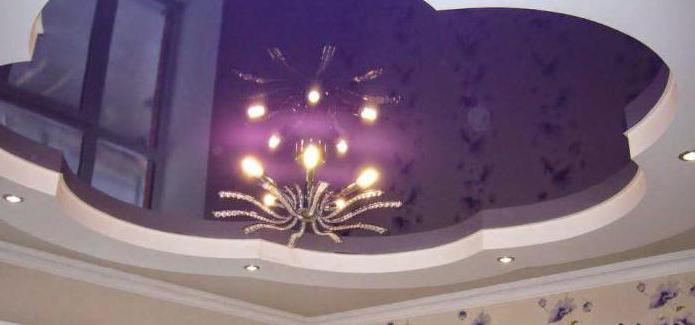
- An oval or a circle in the center of the ceiling is a good alternative to the usual drywall rectangle located around the perimeter of the room. A tensioning web is mounted inside. Such a combined ceiling often mimics the day or night sky. However, such a ceiling is not suitable for a small room: it will seem even smaller, since all of its corners will be patched with drywall.
- The Pill is an interesting ceiling design. A plasterboard circle is built in the center of the ceiling. A chandelier is also mounted here. The rest of the space is occupied by a stretch web. A variation of this design can be considered a "circle in a circle." In this case, an additional box of drywall is installed around the perimeter of the room.
Preparation for installation
Before creating a combined ceiling, it is necessary to free the room from furniture, remove curtains and curtains, lighting fixtures and paintings, insulate the ends of the wires, cover the floor with film.
The preparation of the base surface is carried out in the same way as before installing any suspension or tension structure:
- remove the old layer of cladding;
- spatula clean poorly fixed plaster;
- cover large cracks with cement-based putty;
- primer coating.
Necessary materials and components
To install a drywall frame, you will need:
- guide profile (start) - UD;
- bearing profile (ceiling) - CD;
- single-level connectors ("crabs");
- flared dowels;
- self-tapping screws;
- drywall 9 mm thick.
Combined ceilings in the hall (we posted a photo in this article), a bedroom or other living room can be made of ordinary drywall. If the work is carried out in the kitchen or in the bathroom, then give preference to GKLV. These sheets have additional silicone granules and antifungal additives with increased moisture resistance.
To create the tension part of the structure you will need:
- aluminum baguette;
- blade for dressing the canvas;
- fasteners fixing the baguette to the drywall;
- heat gun (for a one-time use it is more expedient to rent it).
Canvas selection
Now you need to decide on the choice of material of the canvas - fabric or film. The first one is more durable, not too afraid of temperature changes, the film is attractive with a huge variety of colors, textures, increased moisture resistance.
Do I need a drawing for installation?
Yes, before starting installation work, it is necessary to create a diagram of the desired design on paper. To do this, you must follow these recommendations:
- measure the length of the walls, the height of the corners, as well as the center of the room;
- note on the diagram the height of the first level (drywall box) and the distance between the tension sheet and the base surface;
- draw on the drawing a contour of the boundary between the two levels and the fastening line of the guide bearing profiles in increments of 60 cm (along) and 40 cm (across);
- mark the places of attachment of suspensions and laying communications.
After that, all lines from the drawing are transferred to the ceiling of the wall. Remember that the progress of the work depends on how accurately you apply the markup. On the planned lines it is much easier to install the frame. To apply the scheme to the ceiling, use a chop cord, water or laser level, tape measure.
If the border of the drywall and the stretch ceiling has a circle shape, then it can be transferred to the ceiling using a screw screwed into the center, to which a thread of the desired radius is attached with a pencil fixed at the end. To draw curved lines, it is necessary to make a blank of cardboard and circle it on the ceiling.
Installation of the lathing
Design of combined ceilings may be different. Often the choice of a suitable option depends on your imagination and professional skills (if you plan to mount it yourself).
First of all, you need to make sure that holes for fasteners are made in the guide profile. Their step should be from 0.3 to 0.4 meters. If there are none, you will have to use a drill and make them yourself.
The procedure for further work
Attach the bottom edge of the start profile to the previously drawn marking line. Drill holes for fixing in the marked places and fix the supporting profile around the perimeter of the room using flared dowels.
On the border contour of the suspended and suspended ceiling of the base surface, install a guide profile. If you need to bend it, you should make incisions from the opposite side and bend it in the right direction. In the marked places suspensions are fixed.
Now you should tighten the nylon thread for the ceiling profiles and insert them into the guide. Lock the suspensions. A trimmed guide must be attached to the ends of the carrier profiles. It should repeat the contour of the UD profile fixed to the ceiling exactly. We prepare segments of the ceiling profile. Their length should correspond to the height of the drywall box. Cut off the side parts on one side.
Connect the lower and upper guide profiles. To do this, a segment from above must be inserted into the guide profile and screwed into the bottom from the plane that formed after removing the jumpers.
Communications
After installing the drywall frame, you should do the laying of communications. The wires are placed in a corrugated plastic pipe and fix it to the base surface, leaving conclusions in those places where it is planned to install lamps. These works are carried out after a power outage in the room.
How to sheathe the frame?
This work should be done with an assistant, since drywall is a rather heavy material, and it is very difficult to cope with its fastening alone. The first sheet is fixed in the corner of the room. If necessary, a contour is applied to the sheet according to the template and the necessary details are cut. Hats of self-tapping screws deepen into the material, but not too much so as not to tear it. The second sheet is attached to the remaining half of the profile, to which the first sheet was fixed.
A gap of about 0.5 cm must be left between the wall and the drywall. The entire area is sheathed in the same way. Now you can attach drywall to the vertical part of the box. In curved sections, it is bent, for which they make shallow cuts from the back.
After sheathing the frame, it is necessary to glue the joints between the sheets and the wall with a serpentine tape. Putty is applied to the gaps and attachment points using a small spatula. With an overlap we paste over the vertical and horizontal parts of the duct with fiberglass. In places of overlapping with a clerical knife, make notches and remove excess.
It's time to make holes for the fixtures. For this you need a drill with a crown. Putty the surface with a finishing layer, a thickness of not more than one and a half centimeters. When the composition is completely dry, clean it with fine-grained sanding paper.
Remove dust from the surface with a vacuum cleaner or dry cloth. Finally, apply the topcoat. As a rule, the combined ceiling is covered (drywall part) with an acrylic composition.
PVC fastening
Experts recommend choosing a film with a harpoon mount: it is considered the most reliable. Mark on the vertical part of the constructed box the level of placement of the canvas. On this line, attach the baguette in increments of 7 cm. If you plan a curvilinear design - make cuts on the profile, clean them with sandpaper or a file and bend in the necessary direction.
With a heat gun, warm the room to 40 ° C and unfold the canvas. If it is glossy, then wear gloves so that no residue remains. The canvas should not be brought close to the heat gun - dark spots may appear on it. When the room warms up to 60 ° C, fill the harpoon of the base corner of the canvas (which the manufacturer notes) in a baguette. The opposite diagonal angle is also fixed, and then the two remaining ones.
After that, you should start pulling the harpoon into the baguette around the level perimeter. Then heat the entire surface with a heat gun. Do not be discouraged if, upon completion of installation, you find wrinkles on the surface - they are easy to smooth out, warming up a poor-quality area again.
To summarize
Creating a combined structure of drywall and stretch fabric is not easy. This is a laborious process that will require not only theoretical knowledge, but also practical skills. We hope that the above recommendations and photos will help you cope with this work and perform it efficiently.