Often unstable computer operation is associated with a lack of free space on the hard drive. To solve this problem, you can delete unnecessary files, but if there are none, you need to install an additional HDD on the PC. This article gives instructions for connecting a second drive and describes some of the pitfalls that a user may expect when performing this operation.
Motherboard support
So how to connect a second hard drive to a computer? "Are SATA or IDE ports soldered to the system board?" - The first question that should be answered before installing the HDD. You need to find out which model of the motherboard is installed in the system unit. This can be done by installing AIDA64 on the computer. This utility displays complete information about the computer. In the left part of the main application window, just click on the text "Motherboard" to find out the model. After that, you need to find the documentation for the motherboard and find out which connection ports for the drives are installed on it: SATA or IDE.
If the documentation can not be found, you will need to study the computer stuffing yourself. To do this, it is necessary to remove the left cover of the system unit, having previously unscrewed the fixing bolts on its rear side. Hard drives are located in the front of the PC case in special pockets. Pay attention to the cable that goes from the system board to the HDD. If it is wide, then the drive connection interface is IDE, and the narrow one is SATA.
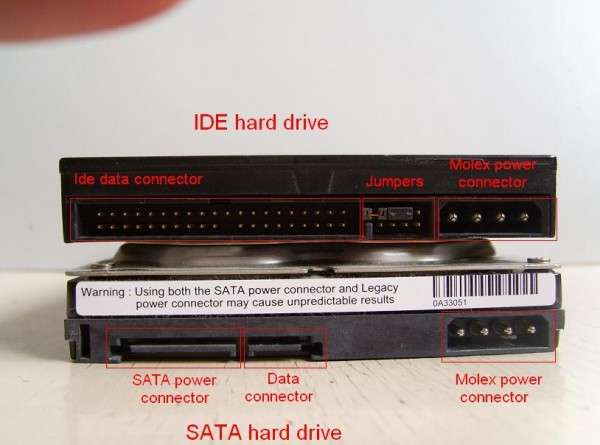
After the visual inspection, there were still doubts about what type of connection is used on the motherboard? In this case, disconnect the cables from the drive and pay attention to their slice. If the cable is SATA, in the connector there will be a slot in the form of the letter "G". If the IDE, the connector will look like a rectangle with two rows of holes.
Pay attention to the area of the motherboard where the cable from the drive goes. Are all ports busy? If there are no free ports, connecting the hard drive in the classical way will not work. Also take a look at the cable itself if the HDD connection interface is an IDE. Usually it has two connectors for drives, and one of them can be free.
Before you connect a second hard drive to a computer, look to see if there are free pockets in the equipment case for installing drives. If they are not, the hard drive can be put at the bottom of the system unit, but this is unsafe for the equipment. When you move the computer, the hard drive will hang out, and there is a chance that it will damage the elements of the PC or it will fail.
Hard drive selection
Before you connect a second hard drive to your computer, you must first purchase it. After determining the connection interface, you can begin the selection of the drive. Remember that a 3.5-inch hard drive is best for your computer. Smaller samples are designed for installation in laptops. Although, if there is a 2.5-inch form factor suitable for HDD parameters, you can install it in a special adapter case and use it on a desktop PC.
Also determine how much hard drive capacity you need. If only documents will be stored on it, it is enough to purchase a 320 GB HDD. If it is supposed to store high-definition films and computer games, it is better to choose a hard drive with a capacity of at least 1 TB.
It makes sense to pay attention to the characteristics of the speed of reading and writing data. There is one rule: more is better. Although, if the computer is used only for work in office applications, it makes no sense to overpay for this feature.
Correct jumper position
Users whose motherboard is equipped with only IDE ports must configure jumpers. How to connect a second hard drive to a computer, where to put the jumper? So, if only one HDD is connected to the loop, the jumper must be set to the Master position, and the drive itself must be connected to the extreme connector of the cable. If two drives are connected to one wire, then on the additional hard drive the jumper must be in the slave position, and it must be connected to that connector, which is located at a distance from the edge of the loop. You do not need to install jumpers on a SATA disk, since a separate cable is used for each drive.
How to connect a second hard drive to a computer?
The HDD installation procedure for drives with any interface is the same. Regardless of the type of hard drive for mounting it, follow these steps:
- Disconnect the system unit.
- Remove the bolts holding the left housing cover and remove it. Usually for this you should pull it back.
- Insert the drive into the pocket of the system unit. With the correct installation of the slot for the screws at the place of attachment of the hard drive and the holes on the HDD will match.
- Tighten the fixing screws.
- Before connecting the second hard drive to the computer, pay attention to the connection of loops to the first. Connect the wires to the additional drive in the same way as to the main one.
- Replace the case cover and turn on the computer.
BIOS setup
After the second hard drive is connected to the computer, several changes should be made to the BIOS, as sometimes the newly installed HDD is assigned as the first boot device. This makes it impossible to boot the OS. To configure "BIOS":
- Turn on the computer by pressing the power button.
- As soon as the screen lights up, immediately start pressing the DEL or F8 key. Different motherboards use different buttons to enter the BIOS setup utility. To understand which key to press, follow the on-screen messages or read the instructions that came with the system board.
- After entering the BIOS, go to the Boot tab.
- In it, use the arrows to select Hard Disk Drives and press "ENTER".
- In the menu that opens, move the cursor to First Drive, press ENTER and select the hard drive on which the system is installed. If you are not sure which HDD to choose, set the switch to a random position.
- Return to the previous menu by pressing ESC.
- Here, go to the line First Boot Device and press "ENTER". Sometimes, to see it, you should move to the Boot Devices Priority submenu.
- Select Hard Drive from the drop-down menu. Sometimes, instead of this inscription, the full name of the hard disk will be displayed.
- Press F10 to save the changes, and then press ESC to exit the configuration utility and restart the computer.
If after the manipulations the PC does not boot up, return to step 5 and select another drive.
External hard drive
How to connect a second hard drive to a computer if the SATA and IDE ports on the system board are busy? In this case, the best option would be to use an external drive. Typically, such devices are connected to a USB port. Less often - to FireWire. In the first case, the drive can be installed on any PC, in the second - only on the equipped with a special port. The main advantage of an external HDD is portability. It can be easily connected and disconnected without turning off or disassembling the computer. However, such devices usually work more slowly than those installed in the PC case.
Operating system settings
What system settings should be made after the second hard drive is connected to the computer on WIndows 7? SATA or IDE - drives that are often not detected by the system in the file manager after installation.
To display the new HDD in Explorer, follow these steps:
- In the search bar for the Start menu, enter the text "Management."
- Click on the item with the text "Computer Management".
- In the left part of the snap-in window, select "Disk Management".
- Right-click on the drive that is not displayed in Explorer. You can find out which HDD you should work with by comparing the indicated volume with the real one and examining the partition labels.
- In the expanded list of actions, click on "Create a simple volume", then specify the file system and cluster size, then click on "OK".
- After completing the operation, right-click on the HDD again, and in the menu select the line “Change drive letter”.
- In the window that opens, click on the "Add" button and set the desired letter.