Legionnaires are warriors in the army in ancient Rome. In the legion, there were up to a thousand soldiers armed with swords and spears. The ammunition of the Roman legionnaire consisted of several elements, was easily worn and protected the chest and head from being hit by an enemy sword. The warrior’s protective equipment was made so that the movements remained free, although some physical strength was required to wear these armor.
Basically, the legionnaire’s set consisted of a helmet, a shell, greaves and arm ruffles, as well as a large shield. All of them had a different shape and manufacturing method, depending on belonging to a particular legion. The armor of the Roman legionnaires was relatively light when compared with the armor of medieval knights. The shell protecting the warrior's torso was often made of leather or metal parts joined together, which allowed the soldier to turn and lean freely, without restricting movement.
In the article, we consider the types of protective equipment, the names of each detail of the costume of a warrior of ancient Rome. You will learn how to make a helmet of a Roman legionary yourself, chest armor from different materials. We present several options for crafts so that you can choose the right outfit for any situation. Legionnaire’s costume can be made for a child on a matinee, for a theatrical production, for a holiday or carnival. Materials for the outfit can be selected very different depending on the skills of the master.
Acquaintance with the armor of the legionnaires
The carapace of the Roman warrior of the legionnaire is called "lorica" (lorica). They were of three different types depending on the material and fixtures. We list the features of each option.
- Whole, made from 2 or 3 layers of boiled skin, or a metal cuirass covering the chest in front and back. On the sides and shoulders of the parts were connected with leather straps.
- Lamellar, assembled from metal elements that are either sewn onto the skin or connected together by buckles and hinges. On the shoulders and sides of the body, the front and back of the structure were connected by flexible metal belts.
- Chain mail. This lorika was worn by the soldiers of auxiliary troops, for example, archers or spearmen. Chain mail was assembled from washer-like riveted ringlets with a diameter of 5 or 7 mm in horizontal stripes. This gave the Roman legionaries flexibility during the war. Such protection is reliable and durable.

The lower part of the body was protected by moving leather bands that did not hamper the movement of the warrior. Above, lorica was strengthened by shoulder pads made of strips of metal or several layers of skin. This protected the hands from hitting the sword from above. Ammunition of the Roman legionnaire was quite difficult. Only lorika weight reached 9 - 15 kg, depending on the type of its design. And you also had to wear a helmet, arm ruffles, shin guards and arms.
Helmet of the Roman Legionnaire
Helmets to protect the head of the Roman soldiers also had their own varieties. Some were borrowed from the inhabitants of Puglia. This is a Corinthian helmet, which looked like a metal mask with a beveled face, and almost completely closed on all sides. There was a narrow gap in the center front, which makes it possible to see what is happening around. To decorate on top of the helmet, a comb of brightly colored horse hair was attached. It was located both from left to right, and from the front of the back.
In order to make a helmet of a Roman legionnaire with their own hands, they often choose a different type of head protection, namely the option shown in the photo above. This is a helmet with an open face and hanging danglers on the sides, which were fastened with hinges. This is a more advanced model, since the warrior had the opportunity to clearly see what was happening on the battlefield. This type of headgear is of Greek origin.
These helmets of Roman legionnaires, whose names are Chalcidian, date from the 4th - 3rd centuries BC. Behind them were neck protection. For beauty, all helmets were decorated with engraving. They depicted boars or bulls, less often lions and sphinxes. Engraving was done throughout the dome and on the hanging parts. On average, the weight of the helmet ranged from 700 grams to 1 kg. He rested on the warrior's head with his chin strap.
The helmet of pilos-pylaeus of the Roman legionnaire has a special appearance, the image of which can be seen in the photo below.
Its upper part resembles a soft Phrygian cap with a forward-hanging top, which also had valves on its sides. This helmet also has pivots on the hinges.
Growth shield
It is impossible to imagine a Roman legionnaire's costume without a shield called the scutum. It was considered to be growth, since it was rectangular in shape, its height reached 120 cm, and its width was up to 75 cm.The real shield was made of glued planks of wood or plywood, it was covered with thick leather on the outside, and the edges ended with a bronze or iron edging.
On the back there was a handle that was attached in the center. A special sign of the Roman shield is the bronze umbon available in the center of the front side of the rounded shape. The shield of the Roman soldier was quite heavy, weighed up to 6 kg. The soldiers of the Republican Rome army had oval-shaped shields that were even heavier.
Making a shield for a suit
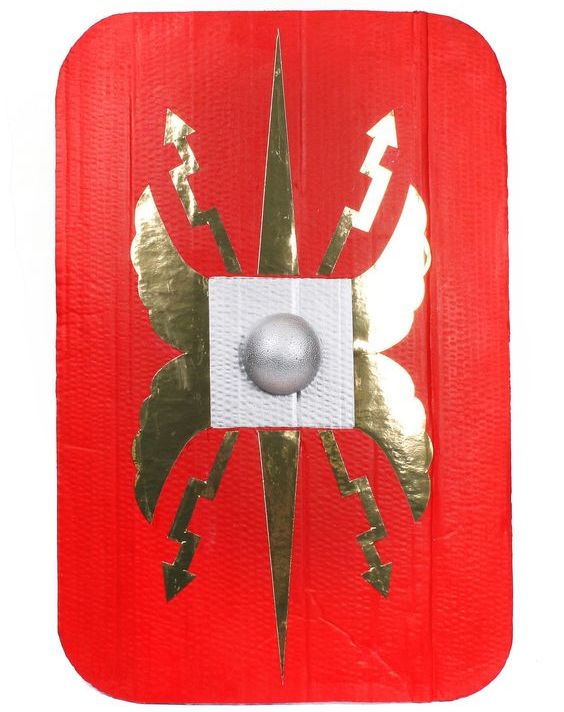
We will begin to make the outfit of the Roman legionnaire for the festive costume with the lightest detail, namely with the warrior’s shield. You will need a large piece of corrugated packaging cardboard, hot glue, colored paper with a gold and silver glossy surface, a plastic ball, a sharp knife, scissors, a pencil, red gouache paint and a wide brush for applying it, a long ruler, transparent adhesive tape.
Since the shield is considered to be growth, measure the height of the child from the floor to the upper edge of the chest. This will be the height of the craft. The width is taken by eye. The shield should cover the child completely, but no more, so that it would be comfortable to wear and play his part at the festival or during a theatrical production.
Before you cut the desired shape, draw it on the back of the cardboard with a simple pencil, making all measurements a long ruler. Pay particular attention to corners; they must remain straight. When the rectangle is cut out, round off the edges of the craft. Then you need to paint the entire surface with red paint and allow time to dry. So that the paint does not stain your hands and the rest of the outfit of a small legionnaire, you can paste the outside with strips of transparent adhesive tape. Next, find the middle of the shield. There you need to place a round umbon. To do this, cut off the half of the sphere from a plastic ball and glue the part, smearing its end part with hot glue.
Next, decorate the front side of the shield. You can make a picture like in the photo above, or you can come up with your own unique logo. Paint the Umbon with silver paint and paste a silver square around it. It will remain on the back side to attach a strip of the handle. It will be enough to cut it from corrugated cardboard with a width of 5 - 6 cm. It should be long so that the edges glued with hot glue are on the surface of the shield.
It is interesting to add a golden edging along the entire perimeter of the craft, cut according to the template from glossy colored paper, for greater resemblance to a real shield.
Soldier weapon
The legionnaire of the Roman army was lightly armed to move quickly in battle. The short sword was called "gladius", its length was only 40-60 cm, and its width barely reached 8 cm. Compared to the long and heavy swords of soldiers of other armies, it weighed an average of 1.5 kg. A sheath made of metal and beautifully decorated with ornaments and details made of tin and silver went to him. They often depicted battle scenes or the figure of Emperor Augustus.
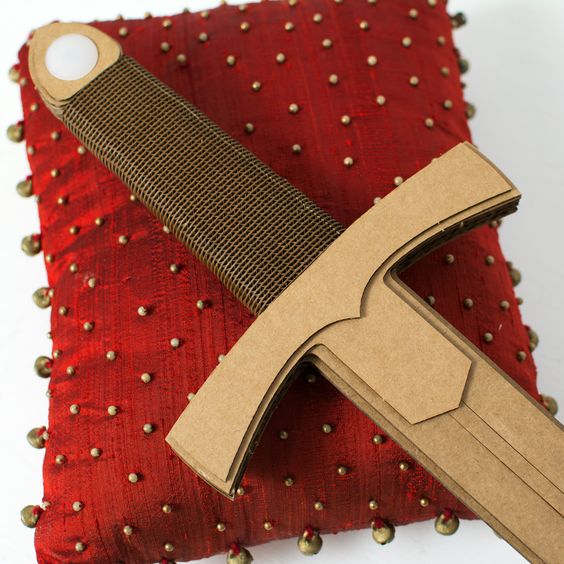
If you are making a Roman legionnaire’s sword for dressing a boy for a holiday, it is most convenient to craft it from corrugated cardboard. You can seal the workpiece with a double layer of paper to make the weapon more durable. Cut it along the contours drawn with a simple pencil. For beauty, cover it with silver colored paper, which is sold in rolls and designed for gift wrapping. The scabbard can be sewn from fabric. Sew a small piece of rectangular-shaped textile along the side line and attach a thin ribbon or rope around the edges so that you can hang the scabbard over your shoulder. If desired, you can decorate the craft with embroidery or applique in contrasting color.
Even in the arsenal of the Roman warrior-legionnaire was a throwing spear, which was used as a dart. It was called “pilum” and was used in various types of combat. There were heavy spears and light. The weapon consisted of two parts: a long dart (about 2 m) and an iron tip, which had a pointed pyramid shape or two spikes. Used spears at short distances from the enemy. With a strong throw, a warrior could easily break through an opponent’s shield or armor, inflicting a heavy or fatal wound. The warrior himself remained at a distance and was in relative safety.
If you decide to make this weapon for a suit, then take care of the safety of the surrounding children. As a dart, you can use a thin wooden or plastic stick, for example, from an old toy or a mop. On the upper edge, put on a cardboard sleeve glued with silver paper. At the very end, you can stick a paper cone, and the spear of the Roman legionnaire is ready! The main thing is that there are no sharp parts, and the child will not cause injury to a group neighbor.
Tunic for outfit
Before putting on protective ammunition, the Roman warrior put on a tunic. She was short, barely reaching her knees, was sewn from thick linen. Before the battle, it was often soaked in vinegar and dried to make it even more dense. The edges of the short sleeves were decorated with gold embroidery, as was the lower hem of the robe. The tunic was made of white fabric, and a bright cloak, most often red, was thrown over the shoulders. Compared with the manufacture of the helmet of the Roman legionnaire, it is not difficult to sew a tunic. It is enough to get a light light fabric and measure the double length of the future tunic. Measurements are taken from the level of the child’s shoulders to the knee or slightly above the joint. Join the fabric folded in half with the sides together and cut the neck at the center of the joint. When trying on, draw a cut line on the sides and sleeves and cut off the excess. The length of the sleeves should be short, not reaching the elbow, and make the width sufficient so that the fabric hangs freely from the shoulders.
On the seamy side, sew the edges of the tunic with a sewing machine. Prepare the edging from the yellow fabric or gold satin ribbon, sew it with the neck, edges of short sleeves and the bottom of the tunic.
The cloak is even easier to sew. Prepare a section of red satin fabric. The length of the pattern should match the size of the tunic. The width of the cloak is also small, since it is located only behind. From above, you need to collect fabric for elastic, you can simply prepare immediately a pattern in the form of a trapezoid. The upper bar is equal to the width of the child’s shoulders. The cloak is attached to large gold buttons attached to the shoulder straps of Lorika. How to make it for the outfit of a legionnaire, we will tell further.
Warrior's protective shell
As already mentioned, the lorica of a Roman fighter is of different types. When making a costume on your own, the child is most likely to make a one-piece shell, using either brown fabric (under the skin) or collect lorika from thick packing cardboard, then we will make a Roman legionnaire’s helmet from it ourselves. Pre-measure with a flexible meter the distance from the belt on the back through the shoulders to the level of the waist in front. Measure out the rectangle of the corrugated cardboard and cut a round neck in the center with scissors.
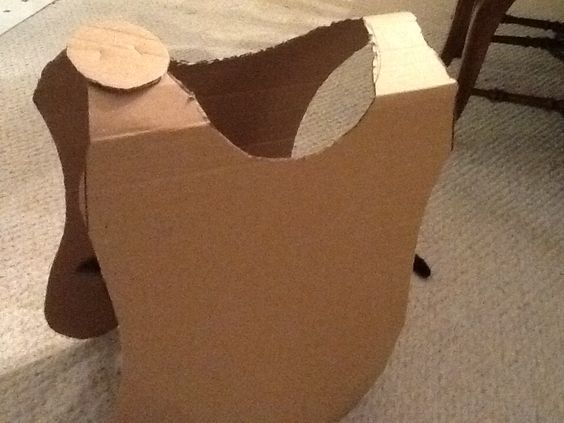
Then symmetrically draw the contours of the sides and the bottom of the craft. To attach the shell of a real legionnaire, leather straps with fasteners were used. For a carnival costume, you can strengthen the front and back of the crafts with wide brown elastic bands sewn on. For convenience, it is advisable to attach Velcro to them. Parts of the outfit will hold well with matching ribbons tied to the sides. On the right shoulder you need to attach a circle of cardboard with a stapler to hold the cloak. Then the blank is painted brown and decorative elements are added with yellow paper applique.
If you decide to sew a lorika from a dense fabric of brown color, then use the pattern of a vest with a semicircular neckline. It can be made wide and worn over the head. Decorate the shell of a warrior with gold emblems and inserts.
Bottom protection
Separately, for the outfit of the legionnaire, you need to make the bottom protection. For a real warrior, she was made of thick leather or metal plates. A child can be made of equal width strips of cardboard or textile with pointed edges, as in the photo below. They can be arranged in one row and be of equal length, however, protection in two levels will look beautiful. The lower strips make longer, and the second, upper row - short. You can glue mugs or rhombuses from yellow or golden paper on each part below.
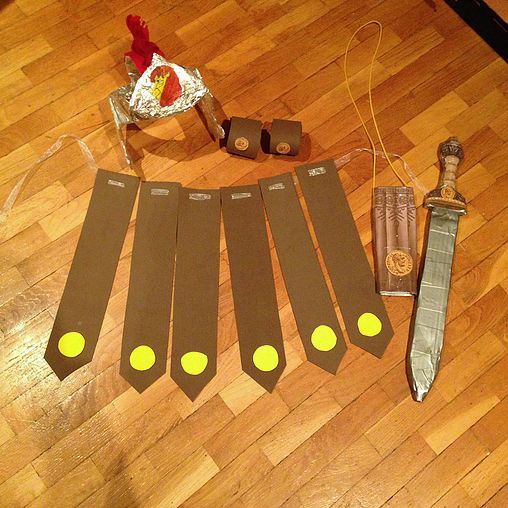
The strips themselves are mounted on a rope or thin satin ribbon on the belt, tied to a knot on the side. Such parts can be made of thick cardboard or felt sheets. This material has a good saturation of shades, it is perfectly cut with scissors and its edges do not crumble. Also on the felt elements of application are perfectly glued. From this material, armlets and greaves can be sewn, which are tied with ribbons on the back of the legs. To do this, make several holes on the sides and insert a tape or rope, secure the part with lacing.
Legions of Ancient Rome put on leather sandals on their feet, and a child can wear ordinary black Czechs for the holiday. How to make the details of the costume, we have already examined, and now we will figure out how to make a legionnaire’s helmet with our own hands. They come in different types, and therefore the methods for their manufacture differ dramatically.
Cardboard helmet
The headgear of a Roman army warrior was made of durable metal up to 2 mm thick. The names of the helmets of the Roman legionnaires were different depending on the appearance. For a costume, a child can make a domed headdress with a closed face visor, which is not a moving element. Make a helmet from thick cardboard in the following way:
- From a strip 4 cm wide, a rim is assembled according to the size of the circumference of the child’s head and its edges are fixed with paper clips using a stationery stapler.
- Then two more long strips of the same width are cut out and folded perpendicular to each other.
- The cross is located on the top of the helmet and is mounted on the rim after fitting on the boy’s head.
- The voids between the strips are filled with cardboard-cut sectors. Their size is measured with a flexible meter.
- The hanging edges are wrapped inward and glued with PVA glue. Leave a long segment on the front of the helmet of the Roman legionnaire.
- Separately cut out the visor with holes for the eyes. Its shape is clearly visible in the photo below.
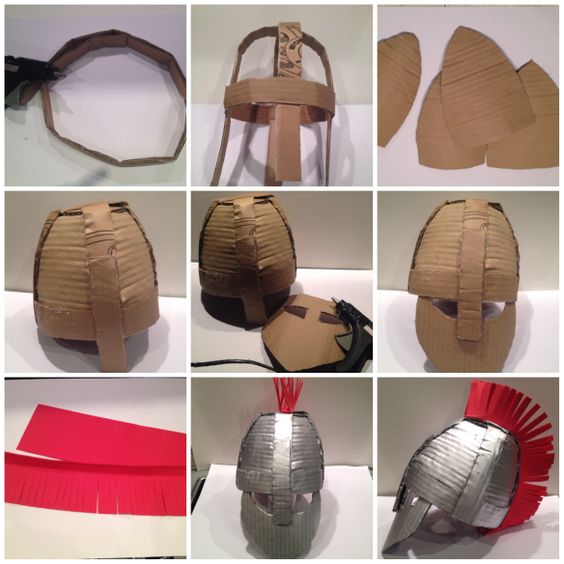
Further decorate the craft. The helmet itself is covered with silver colored paper on the front side. It remains to make the decoration in the form of a comb from bright red double-sided paper. Wide ribbons are cut with “noodles” with scissors, but not completely. You need to leave a thin strip to stick on the helmet. Before attaching the workpiece to the headpiece, bend even strips at right angles to the cut part and spread them with glue. That's it, the domed helmet is ready! Next, we will tell you how to make another kind of headgear to protect the legionnaire's head.
Apulo-corinthian helmets
This is a special kind of helmet with a completely closed face. They were borrowed for ammunition of the Roman army from the Greeks, however, they were not used for long. If you want a child to make this antique helmet, then carefully consider the sample photo below.
For the manufacture of crafts it is better to use white thick cardboard. The assembly of the helmet begins with the rim, as in the first embodiment, but its tip is no longer assembled from two crossed strips, but from several that fill the entire crown of the helmet. The visor is cut out according to the drawn pattern from two identical parts. On the front side, they are joined together by gluing strips from the bottom and top of the workpiece. It remains to glue the entire surface with silver paper and attach a neck protector that looks like a semicircular visor to the back.
Now you know how to make your own legionnaire outfit for a carnival or theatrical production.