Before laying the laminate, you need to properly prepare the base. It should be even. If the floor has level differences, bumps, cracks or other defects, they will need to be eliminated. Today, many methods are used to level the floor under the laminate.
This process can be performed independently. It is necessary to consider the methods of leveling the base, to select the necessary materials and tools. A detailed procedure for leveling the floor will be discussed later.
Laminate requirements
Leveling the floor under the laminate in an apartment or your own house is a prerequisite. This is due to some features of the presented type of coating. To understand the features of the leveling process, you need to consider the basic requirements of the coating. Laminate is afraid of moisture. Therefore, the surface on which it will be mounted must be dry. Condensation should not accumulate under the coating, etc. The concrete onto which the panels will unfold must dry well.
Also, the laminate is afraid of lateral deformations. Even the solid base of the board is not able to protect the material from breaking if there is a void under it. Also, the laminate is very vulnerable to loads that act on the castle part. Here the layer of material is the thinnest. If the floor is uneven, the lock loosens due to constant up and down movements. The panels in this case bend and return to their original position.
Laying the laminate on the floors with your own hands, you need to assess the condition of the base. It should not have tubercles. Such bumps will eventually press on the board from the back. At the same time, scuffs will appear on the decorative layer.
If the owners doubt whether it is necessary to level the floor, you can measure. You can use the construction level for this. You can also use the meter line. It is placed ribbed on the surface of the floor in different places. If there is a gap of more than 2 mm, the floor must be leveled. The construction level is more convenient to use. Therefore, it is better to purchase it in advance. It will come in handy during all finishing work.
In some houses, the base is made of boards. In this case, before installing the laminate, you need to check whether they are durable. If the boards rotted (make a dull sound when tapped) or bend, they will need to be replaced. It is also unacceptable that on a wooden base there are bully or cracks. Therefore, you need to treat the surface with a grinder.
Gender assessment
How to lay a laminate on a wooden floor or concrete base? First you need to assess the condition of the floor and determine the complexity of subsequent work. This will allow you to choose the optimal method of leveling the base. First assess the condition of the floor. You will also need to take into account the features of the room, in particular its ceiling height. Since the laminate is a sufficiently sonorous coating, sound and heat insulation are laid under it. This increases the comfort of use of the floor covering. An important factor when choosing a laying method is the size of the budget that is allocated for construction work. Each of the options below requires a different amount of cost.
When choosing one or another method of laying the floor, you need to take into account the amount of free time that the owners of the house can spend on repairs.
When conducting measurements of the height difference, you need to evaluate their maximum value. If they are significant, you will need to fill the surface with a screed or self-leveling compounds in 2 layers. This method will require significant financial costs. At the same time, 1.5-2 months should be allocated for preparatory work.
Considering how to level the floor under the laminate, you also need to consider the option of creating a “dry screed” or applying a lag. This is a cheaper and faster way to prepare the foundation. However, when applied, the height of the ceilings will become less. Therefore, these techniques are not applicable to all rooms. An alternative could be the use of plywood. In this case, the lags are not used. Before you begin, you need to consider all options in order to make the right decision.
Laminate flooring
One of the easiest ways to conduct preparatory work is to use a substrate to level the floor under the laminate. It must be mounted under panels to create sound and heat insulation. Also, certain types of substrates can to a greater or lesser extent hide various unevennesses of the base.
On sale are materials that are used when laying the laminate, they are made by different technologies. This determines their performance. There are substrates made of expanded polystyrene or polyethylene, expanded polystyrene, polyurethane. A number of natural materials are also on sale. These include natural cork, fiberboard. You can also apply a substrate, which includes cork and bitumen.
It is necessary to pay attention to special substrates in the first place. They are able to reduce defects in the base to a greater or lesser extent. The thicker and denser the substrate, the better it can hide irregularities.
The thickness of the substrate for the laminate may be different. Manufacturers claim that even the thinnest polyethylene substrate (2 mm thick) is able to level the base up to 1 mm per linear meter of space. However, it is worth considering that most substrates can be used without additional floor preparation only if the floor has differences of no more than 3 mm per linear meter. Otherwise, additional preparation of the foundation is mandatory.
On sale are various options for substrates. Well compensate for irregularities based on fiberboard. It is worth paying attention to such material as ISOPLAAT and Silent Running. These chipboard-based boards can compensate for significant irregularities. So, plates with a thickness of 4 mm can compensate for irregularities of up to 3 mm per linear meter, and a thickness of 12 mm - up to 5 mm per linear meter.
Materials and tools for preparing a wooden base
If the thickness of the substrate under the laminate does not allow to hide the defects of the base or the surface is old and needs to be repaired, a number of procedures should be performed to bring it to the desired state. First, the condition of the boards is evaluated. If it is satisfactory (no rotten, deformed elements), you can perform the grinding procedure.
If there are significant defects, it will be necessary to disassemble the flooring to the rough foundation. The owners can install the wooden elements again or fill the floor with a screed.
To prepare an existing boardwalk, several stages of preparation will be required. To do this, you will need to prepare a grinding machine, putty on wood (for example, Tex). In the work you will need a roller and brushes. You should also purchase any primer for wood processing. Plywood sheets may also be required in some cases. Fasteners are carried out using self-tapping screws. You also need to purchase a jigsaw.
Leveling a wooden floor does not require very precise grinding. Therefore, you do not need to use expensive professional equipment for scrapping (as when decorating a parquet board). It is enough to remove the main defects, badass.
When choosing a putty, you can purchase materials of domestic production. The Tex company produces a high-quality composition for preparing wood for further finishing. Its cost will be lower than that of analogues of foreign production. In this case, the quality will meet the building requirements.
The process of preparing a wooden base
First assess the condition of each board. If there are two or three rotten or deformed panels, they can be dismantled. New boards are laid in their place. If the floor is fastened, the boards need to be further strengthened with self-tapping screws. If there are protruding hats of the fastener, they will need to be deepened.
Alignment of the wooden floor begins with the process of grinding the boards. To do this, you need to machine not only the main surface, but also the corners, as well as other inaccessible places. After this, shavings, dust and other contaminants must be carefully removed from the surface.
Using putty, they process cracks, small potholes on the surface. Self-tapping screws also need to be processed with putty. There should not be any recesses in these places. When this work is completed, you can proceed to the next step. The surface of the floor must be covered with the first primer. When it dries, they process the floor with the same composition again.
Considering the method of how to lay a laminate on a wooden floor, you need to pay great attention to the preparation of the base. The durability of the coating depends on this. After preparing the boards, you need to lay on them sheets of plywood. They are fixed with screws. If you need to cut a sheet, a jigsaw is used. Between the sheets make a distance of 2-4 mm. After that, you can cover the surface with a layer of a thin substrate and lay the laminate.
Lag application
If alignment of the plank floor under the laminate is not possible due to its poor condition, you will need to create a new lag system. The old floor is dismantled. The condition of the reference beam is evaluated. If some of its elements are in normal condition, only rotten, sagging logs can be replaced. However, most often, a complete restoration of the flooring is required . To create supports, a beam with a cross section of 10 × 10 cm or 10 × 15 cm is used. It is treated with antiseptic compounds. The base is qualitatively cleaned of construction waste. It is covered with a waterproofing layer. Top mounted lags. They are fixed with dowels.
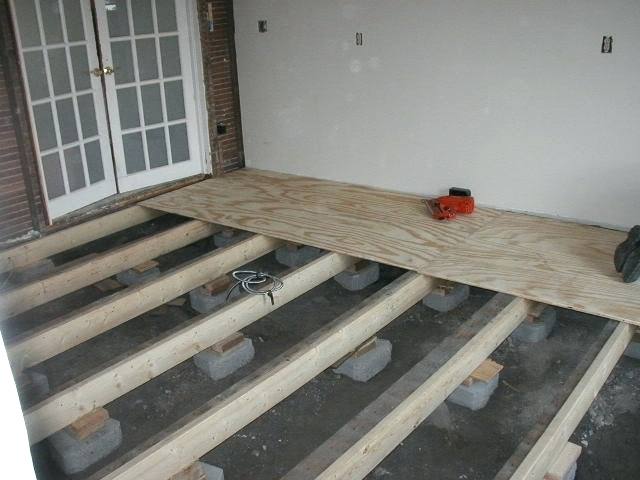
A distance of 60 cm must be made between the lags. This gap must be filled with a heater. For this purpose, rolled mineral wool is used. It is an environmentally friendly, non-combustible material. It will improve the comfort of operation of the coating. On top of the insulation between the logs, small wooden bars are stuffed. They should be perpendicular to the lags. They will provide additional support for plywood. Sheets will not bend. Beams are fixed with metal corners.
Next is the leveling of the floor under the laminate. Particleboard must be fixed with screws on the surface. The edges of the sheets should intersect on the lags exactly in the center.
When this work is completed, the installation location of the screws can be treated with putty. Next, a layer of a thin substrate is covered. You can proceed with the installation of the laminate.
Cement screed restoration
If leveling the floor with plywood under the laminate is not possible (for example, the height of the ceilings does not allow to mount the logs), other options will be required. The base in a private house or apartment can be poured with a screed, create a frame from drywall (dry screed) or use self-leveling mixtures. The latter option will be optimal if the height of the ceilings is small.
If a cement screed is already poured in the room, you can try to restore it. This option is suitable for those bases that do not have significant defects. The level difference can be leveled with a grinder. You can also use a grinder with a special nozzle.
First you need to go over the surface with a grinder. Then all building dust (which in this case will be a lot) is removed with a vacuum cleaner. Next, the base is coated with a primer and the substrate and the laminate are mounted. This technique will be the cheapest and fastest.
This laminate floor leveling option is not suitable for damaged screeds. Also, with high humidity of the base of the floor, you will need to create a new screed according to all building rules. The presence of moisture on the surface will lead to the rapid destruction of the laminate.
If the ceiling height allows, you can fill the floor with a cement screed. This process will take a lot of time, as the material dries out for at least a month. Self-leveling mixes are more expensive, but the installation process takes less time. At the same time, the height of the ceilings is reduced slightly.
Materials and methods for creating a cement screed
When choosing materials for leveling the floor under the laminate, you need to pay attention to the concrete mortar. To create such a foundation, you will need to prepare the building level, as a rule, a container for mixing mortar, trowel, laths for beacons. Pouring cement-sand mortar can be done on an old screed. It can also be completely removed and installed directly on the ceiling.
You need to find the highest point in the room. From it, markings are made on the walls. The floor level will be 3 cm higher than this mark. Dust must be completely removed from the floor. If the height of the room allows, you can create an insulation layer. For this, expanded clay is used. You can also cover the base with polystyrene foam at least 3 cm thick. Next, a waterproofing layer is mounted.
Next, you need to install a reinforcing mesh. Top set beacons. They should be at the level that was originally indicated on the wall. The position of the guides is constantly checked using the building level. The distance between the beacons should be 1-1.5 m.
For pouring the floor, cement with a strength indicator of M400 is suitable. It is mixed in a ratio of 1: 3 with sand. Next, the dry mixture is mixed with water. It should be a pasty consistency. You can add a plasticizer to the composition. This will facilitate the process of filling the floor.
Considering the methods of how to level the floor under the laminate, you need to pay attention to all the nuances. Cement is poured onto the floor near the far corner of the room. As a rule, it is stretched along the guides. After 24 hours, the beacons are removed from the solution. The grooves are poured with cement and carefully leveled. The surface of the screed is moistened during its drying. After a month, you can proceed with the installation of the laminate.
Dry screed
Leveling the floor under the laminate can be carried out using the dry screed method. This will require laths for lighthouses, a building level, plywood or drywall, damping tape, screws, glue, waterproofing and expanded clay.
Before starting work, the floor must be cleaned of debris. If there are cracks or potholes, it is recommended that they be repaired with cement mortar. Next, the surface must be primed. Next, you need to do the markup. From the highest point in the room draw a line to the wall. At this level draw a line around the perimeter. This will be the rough base of the floor. The surface must be covered with a layer of waterproofing. Strips of material should be overlapped.
Further along the perimeter of the room you need to roll out and fix the damper tape with glue. After that, you can mount the beacons. Reiki should be at a distance of about 60 cm from each other. Expanded clay is poured into the space between them. It needs to be leveled with the rule.
Drywall sheets are installed on top. They need to be pressed tightly against each other and against the walls. Leveling the floor under the laminate in this case will require the creation of two layers of drywall. This makes the surface durable. The second layer is fixed to the first with glue. The joints between the sheets of these levels should not match. Then the material is further strengthened with self-tapping screws. Next, you can mount the substrate and the laminate.
Self-leveling mixture
One of the most expensive, but practical ways to level the base is the use of self-leveling mixtures. For these purposes, for example, products of the domestic manufacturer Kamiks-120 are suitable. It is worth noting that leveling the concrete floor with tile adhesive under the laminate is unacceptable. This composition does not have sufficient strength. Therefore, under load, it can crack. Tile, which is mounted with glue, is a durable material. It does not bend under load. Laminate is a fairly soft coating. Therefore, it will require a solution with a purity of at least M200.
Also, for work, you will need to prepare the construction level, waterproofing, primer, roller, construction mixer, needle roller and putty knife. A high point is determined and markup is carried out. The surface is cleaned and primed. After the composition has dried, overlap waterproofing. In the proportions specified by the manufacturer, a dry mixture with water is diluted. In this case, a mixer is used (manual mixing of the solution will not work).
Depending on the differences in the level of the base, it is possible to fill the layer from 2 to 10 cm. It is evenly distributed over the surface, passing through the solution with a needle roller. The solution dries within 3 days. After that, you can start finishing.
, , . 15 .