The song helps us to build and live. Remember that statement? Almost everyone now has headphones, and it’s scary to imagine how before people could do without this wonderful invention of mankind. It is a pity that so far this device is very short-lived. Moreover, this property applies equally to both cheap and expensive models. Sooner or later, such a device begins to creak, the sound periodically disappears, and soon nothing is heard at all. However, this is not a reason to throw the device for listening to a landfill - it is quite possible to repair Sennheiser, Koss and other popular brands headphones yourself. As you will now understand, it is simple and does not involve any complex actions.
Preliminary diagnostics
Any headphone repair begins with finding out the cause of the loss of sound. Typically, problems begin as a result of the following factors:
- Membrane breakage.
- Clogged channel.
- A wire break immediately before entering the left or right earphone.
- Broken wire at the plug.
We begin the repair of the headphones with a thorough external examination and identification of signs of damage. If songs with a significant imbalance in the volume of the right and left channels began to be often found on the track list, crackling and noise appeared, then we can conclude that, most likely, the cause is damage to the membrane. In vacuum headphones, it is separated from the auditory canal by a very thin metal mesh, and if it is clogged with earwax, this is visible to the naked eye. Well, when the sound disappeared altogether - this means that we will have to eliminate the wire break.
Membrane breakdown
We must say right away that in this case, most likely, you will have to buy new “ears”. However, if you want to buy a premium device for yourself, but you don’t have enough money yet, you can simply disassemble the body of the floppy headphone and see what happened to the membrane. It can be scratched, wrinkled, contain foreign particles, etc. Mechanical dressing, cleaning and washing the mesh usually solves this problem, but keep in mind that this part is very fragile and therefore, extreme care must be taken.
Channel clogging
Earphone repair in this case is carried out simply - you need to thoroughly rinse the mesh with alcohol, but disassembling the case, whatever one may do, can not be avoided. In miniature devices, it is usually glued off, and therefore you need to pre-prepare a sharp knife and good lighting. Here you also need to act very carefully, otherwise you can’t avoid damage.
Wire break
This failure happens most often, which, however, is not surprising. In order to find the place of the cliff, you need to take the headphone plug in your left hand, and with your right hand twist the wire in a circle at its base. If the sound still doesn’t appear, do the same for the earphone case itself. When you can find the location of the fracture, you can start directly repair the headphones. Remember, starting from the plug, there are three wires in the cord: the right channel, the left channel and the common one. If there is an internal break in the middle of the wire, the repair is that the wire is cut just below the fracture point and then the ends of the wires of the same color are soldered to each other. They must be isolated separately from each other, and the place of such a connection using the same electrical tape should be made as rigid as possible. Repairing a break at the plug is a little more difficult: after all, here you have to disassemble the plug itself and get to its internal metal contact. First, try to carefully remove the cap with a knife (it can still be useful when assembling), and if this does not work, use wire cutters.
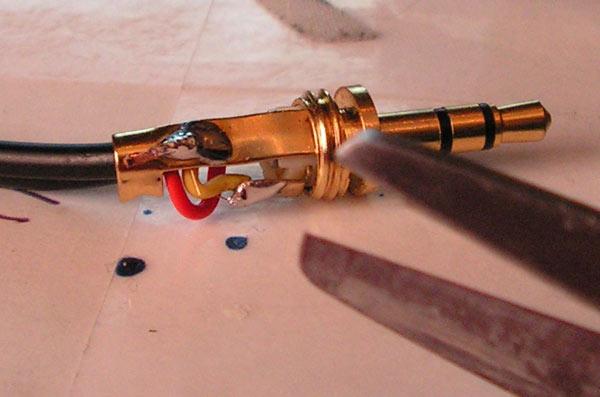
Remember, the common channel is located at the widest part of the plug, where the rubber cap ends. But the left and right channels are selected by trial and error when the song is included in the player. Before soldering, the plug is best secured in a vice, but if they are not at hand, use pliers. The last stage is upgrading, which consists in hiding
bare wires and soldering spots. To protect the wire from a possible break, you can glue a
kapron thread to it
, and for a decent appearance - use one or more shrink cambrics. However, it all depends on your imagination.