Buying a new configured router is not a problem for a domestic user, however, there is often a need to make some adjustments to your settings. This is where the problems begin, because the operating instructions contain only data on setting global parameters of network equipment for unhindered operation on the Internet.
The focus of this article is on setting up the DIR-320. A step-by-step guide will not only help the user quickly master the control panel of the router, but also introduce you to all the functionality of the network device, which is not advertised in the specifications when buying.
The first step in setting up
Many owners of computer equipment encounter problems when connecting the router to a personal computer or laptop. The problem lies in the settings - the computer and the network device work in different networks. The first step that the owner of the DIR-320 router should take is resetting the settings. The procedure is simple. There is a “Reset” button on the back of the device. It is necessary to connect the router to the mains, wait until the device boots up (15-20 seconds) and hold the reset button for a few seconds with a sharp object (needle or toothpick). An indication of a reboot will be indicated on the router - all the lights will blink simultaneously.
Computer connection
Configuring the DIR-320 router starts with connecting to a workstation. The patchcord cable included in the kit needs to connect the router to a personal computer or laptop. There are 5 ports on the network equipment, one of which is designed to connect to the Internet (WAN). The remaining ports are needed to build a local network. It is in one of them that you need to connect the patchcord cable.
The DIR-320 router is configured in such a way that when it is connected to the Internet, the device automatically gets unhindered access to the global global network. Accordingly, the four LAN ports of the router allow the user to connect to the Internet. In fact, the owner of the network device does not need to configure anything. The main thing is to connect the network cables correctly.
Workstation Preparation
Most personal computers of users have automatic settings on the network, but there are exceptions. Therefore, we have to get acquainted with force majeure. Configuring the DIR-320 router is possible only in cases where the network equipment and the personal computer are in the same local network. By default, it is 192.168.0.1 - 192.168.0.254. The router takes the first value for itself and automatically assigns addresses to all devices connected to it. Accordingly, the computer should automatically receive an address from the network equipment, otherwise the DIR-320 configuration will be impossible.
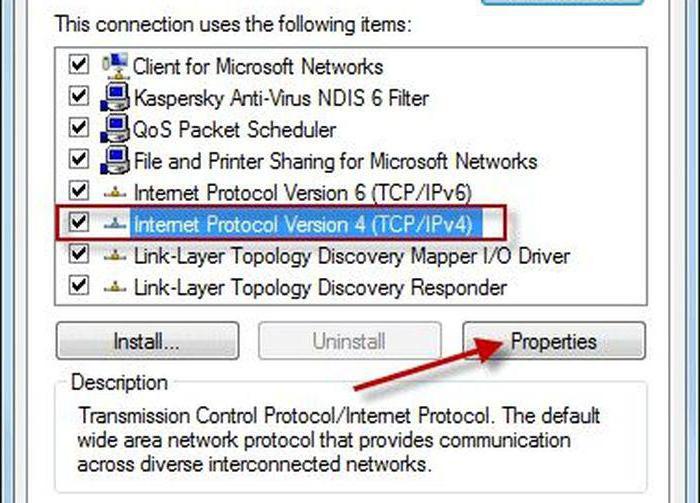
Going to the “Network Control Panel”, the user needs to go to “Change adapter settings”. Having found the desired connection, click on it with an alternative mouse button and select "Properties". In the menu that appears, position the cursor on the “IP version 4” field and click the “Properties” button. Then, in the menu that opens, set the "Receive automatically" parameter in the two fields of the computer settings and save it.
Download Control Panel
The DIR-320 router is controlled via the Web interface, so the user needs to open any browser and enter “192.168.0.1” in the address bar . If the router is correctly connected to the computer, after a short delay, the network equipment will appear on the monitor screen to enter the control panel with a login and password request.
Login information is indicated on a sticker that can be found on the bottom of the router chassis. Often the username and password are identical by default - “admin”. It is entered without quotation marks, in capital Latin letters, in both fields of the query.
Safety comes first!
For the D-Link DIR-320 router, hardware setup begins with a software update from the manufacturer’s official website. To do this, go to the link provided in the user manual and download the current firmware version. Alternatively, the software for the router can also be downloaded from the provider's website. After all, the Internet service provider is interested in ensuring that his client has a secure firmware. Often, the provider provides users with ready-made firmware with settings for the network. Naturally, you need to download it before connecting the router to the computer.
DIR-320 is easy to flash. In the control panel, go to the “Maintenance” tab and select “Firmware Update”. A dialog box opens and prompts you to specify the path to the file on the personal computer. After clicking the “Ok” button, the download will begin. At the end of the firmware procedure, the equipment will restart automatically.
Do it fast
DIR-320 configuration can be carried out both in manual mode and in automatic mode. At least that's what the manufacturer claims. In fact, all additional settings are made manually. Automatic mode (with an assistant) only provides the user with the correct sequence of menu items for ease of entering the necessary parameters. If you need to configure an Internet connection, the assistant offers to enter the necessary data for the correct connection. Otherwise, the control panel provides access to wireless interfaces.
In the DIR-320 router, setting up WiFi is simple - you need to specify the name of the access point (name of the detected network) and set a password. All other parameters are set automatically. In manual mode, the user will have to set a dozen parameters on his own. Many users find that manual configuration is more interesting in terms of learning how to work with a network device, but it is many times more difficult than automatic input.
Work with modem
In the DIR-320 router, 3G configuration is carried out only in manual mode. Before making changes, owners should familiarize themselves with the instruction manual, which describes in detail the operation of the device with several providers at the same time. The fact is that through inept actions, the owner can disrupt the operation of the wired connection.
On the control panel, select the first item "Internet Settings" and go to the "Settings" section. In the window that appears, click the "Manual Settings" button located at the very bottom. In the next window, the user choice should be made in favor of “PPP connection via USB”. Since the D-Link DIR-320 modem configuration is not specifically tied to 3G (you can even connect a regular GPRS phone), the user only has to fill in the required fields. For 3G connection are indicated: login, password and dialer number. For the phone, you need to additionally register the operator’s server and specify the command for dialing.
Fine tune LAN
Also interesting in the D-Link DIR-320 router is the configuration of the demilitarized zone. Hidden from prying eyes, the network can combine all the electronics in the house, providing access to it through the network to only one owner. If we talk about security, the menu item DMZ is required for a detailed study by the user.
Fans of online games will have to get acquainted with port forwarding, because very often providers close unused ports. This is done to protect their own network, but many people forget about game lovers. With port forwarding in DIR-320, everything is simple: the protocol is indicated, then replaced ports are written opposite each other.
Finally
This is not to say that setting up the router on your own will be easy. Network equipment requires a lot of attention and certain knowledge. Any parameter specified incorrectly will cause the router to malfunction and, accordingly, will block the user's access to the Internet. But any problem can be solved: the router can always be returned to the factory settings and start all over again.
Nevertheless, experts in the field of IT technologies recommend that owners of network devices familiarize themselves with the instruction manual - normal scrolling will not be enough. You need to read the manual in its entirety. Only after studying the basic parameters and correctly filling in all the fields on the control panel of the device, the DIR-320 setting can bring results.