The living room is an important room in the house, where it is nice to get together after a hard day with family, friends, to share news, discuss the events of the past day, just talk. And this room should be cozy, comfortable, conducive to free relaxed communication. Stylish design at a high artistic and aesthetic level testifies to the good taste of the owners of the house, their position in society. And with the help of the ceiling it will turn out beyond recognition to change the appearance of the room, make it unique, memorable. It is worthwhile to consider in more detail the drywall ceilings for the living room and kitchen combined with it.
Why drywall?
The main reason for choosing is the universality of the material, its organic combination with other materials and elements. Here are some key benefits of a drywall ceiling:
- perfectly smooth surface, hiding all the flaws of the "standard" ceiling;
- helps to hide the failed communications as much as possible;
- low cost in comparison with other types of ceilings;
- the ability to lay down heat and sound insulation if necessary;
- opens up a huge field for design;
- the material is environmentally friendly and fireproof;
- simplicity of installation allows even the most distant person in construction work to cope with installation.
Photos of the plasterboard ceilings for the living room can be viewed below.
Single level
The design of the ceiling in the living room made of drywall can be different: with illumination, without it, single or multi-level, etc. Perhaps this is the easiest ceiling to manufacture, but “boring” from the point of view of the designer. However, in order to hide irregularities, cracks and other imperfections in the overlap, they are quite enough, and the right choice of color and proper distribution of fixtures will give the living room a rigorous academic look.
The main advantage of a single-level drywall ceiling is simplicity and reliability. It is enough to trim the top with thin sheets once, and for decades the living room is provided with a ceiling with a perfectly flat surface. Subsequently, it can be decorated: painted with different colors, covered with decorative putty, hand-painted, pasted with wallpaper. If the wall height is less than 3 meters, it is preferable to focus on clear colors, as black and bright tones will visually reduce the area.
Two-level and multi-level
Very widespread in rooms for various purposes, especially in living rooms, in kitchens and in dining rooms. One of the generally accepted options that allow you to create a neat and beautiful ceiling in the living room and kitchen, involves the manufacture around the perimeter of the room ledge associated with the ceiling. Often, lighting elements are inserted here. Change of levels, smooth transitions, unexpected and unique color scheme, built-in lamps - this is possible with the help of drywall. Any dream with this material can become a reality.
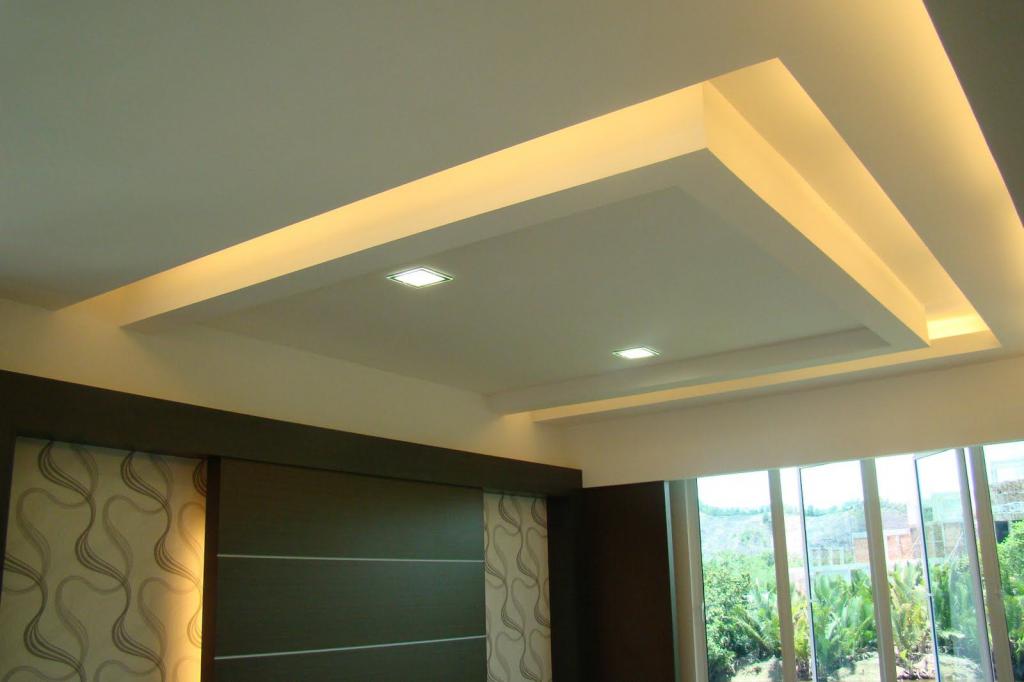
In combination with saturated lighting, the two-level ceiling made of drywall in the living room looks extremely beautiful. Complex geometry, waves, zigzags, stylized decor, periodic repetition of matte components with glossy stretch inserts or 3D wallpapers - all this without exception is just a fraction of the designer’s imagination. To achieve a wonderful result, multi-colored LEDs, crystal chandeliers, crystals, small mirrors help. Multilevel ceilings in a traditional style have every chance in proportion to complement the design of reception halls, art galleries, theaters, restaurants. Fantasy reliefs adorn game rooms, living rooms, kitchens, living rooms.
Transitional and combined
Amazingly beautiful composition allows you to get a combined ceiling. Often along the length of the room, drywall systems of different levels are installed, highlighting the central part of the ceiling as a separate high level. The material can be arched in an arc, creating a kind of arches. It is perfectly cut into pieces, it remains only to install them on the profile, putty corners and remove the remnants of the putty.
Matte ceiling
Matte beautiful gypsum plasterboard ceiling for the living room in white is firmly and confidently held in the lead. To make it, you can use water-based paints, leaving the surface of the ceiling perfectly even.
Glossy
Another popular option is a glossy plasterboard suspended ceiling in the living room. This effect can be achieved by using glossy paint or by gluing a plastic film. Ceilings that have a color in common with the design of walls and furniture look beautiful, and the patterns are made in the same style. The option of applying drawings to the ceiling, including three-dimensional ones in 3D format, is becoming increasingly widespread. In the living room, for example, the theme of nature will find its place, in particular the sky, light and weightless topics.
And who are closer to technical images, they can appreciate the geometric patterns and smooth multi-level designs. It is not recommended to use unnecessarily flashy tones, as the living room is designed for relaxation and reception of guests. Bright, aggressive tones can affect the mental state, so you need to be careful with this choice.
Lighting
The lighting system is best done combined. One chandelier in the center of the ceiling will not be enough to fully illuminate the living room. Also, this is not enough to form a stylish ceiling design. LED strips or spotlights located around the perimeter of the room or in certain areas of the room will help solve this problem.
Chandeliers
The lamp, as a rule, is located in the middle of the composition or over certain sections of the living room, it is considered the brightest source of lighting. Patterned shades can form an exciting game of shadows. Simple bulbs with a spiral are usually screwed into empty cartridges.
Spotlights
There are two types:
- Outboard. The most relevant, reliable and affordable price. Housing made of metal, ceramic and strong glass. Pendant lights, although small, however, have very bright LEDs. There are thin (immovable) spotlights and movable ones that can be rotated to direct the flow of light to one or another object. The latter are installed in specialized small mounts.
- Mortise. Currently, this type is used most often. Such lamps for plasterboard ceilings can be of two types: rotary or stationary. But in drywall constructions, mortise lamps in which conventional incandescent lamps are installed cannot be used. When they are heated, drywall can warp or around the lamp it will change its original color. The way out of this situation may be to replace incandescent lamps with energy-saving suitable parameters, which, among other things, will save on electricity.
LEDs
There are both snow-white and multi-colored. The advantages of LEDs are a low level of energy consumption, long life (from 30 to 100 thousand hours), security (low voltage, do not heat up above 60 ° C), environmental friendliness, unlike daylight lamps.
And when creating a cascade of several steps on the ceiling, the LED strip can be masked into a special niche in order to get a soft, diffused light that does not cut eyes. The room itself will only benefit from this.
Accessories
Thanks to well-designed details, you can visually expand and make the space of the room larger. And such accessories as ceiling plinths, stucco moldings, columns will help to achieve maximum compliance with the style of the entire room, create a single complete solution. But do not get carried away with the glut of the living room and kitchen with such patterns, stucco molding is suitable for rooms where the ceilings are higher than 2.5 m, otherwise it will “crush” and spoil the whole impression of the general interior of the room.
It is allowed to use patterns on the ceiling, if this meets the general design of the room. And if the height of the walls allows, then a good solution can be waves, corners and other extraordinary protrusions. In general, it should be noted that the height has a decisive role in choosing a drywall ceiling, since the suspension will eat from 5 cm or more if it will be made in a multi-level version.
Installation and installation of plasterboard ceiling
Facing in one tier is the main, even in the case when it is planned to establish a multi-level structure. First of all, an even coating should be mounted, it will serve as the basis for further work.
Ceiling should be taken after the rough finish of the walls, such a sequence will make it possible to mark and install the ceiling system of any complexity without fear of harming the final cladding.
Before starting work, you should develop sketches of the future ceiling, determine the layout of sheets and profiles. Designate the places where the lighting devices will be located, and lead the electric wires to the points of the terminals.
First of all, at a certain distance from the existing ceiling, a horizontal line is marked, which does not always coincide with the existing ceiling. With the help of the hydraulic level, marks are set in each corner that define the horizontal plane. It is in it that the ceiling will be located. Along the entire perimeter, focusing on the marks put in the corners, a guide (start) profile is sewn.
The next step is the installation of load-bearing elements from the main profile. When installing the ceiling structure, the distance between the profiles should not exceed 40 cm. On the starting profiles, marking of the attachment points is applied. The main elements are fixed along it, and they are fixed in a horizontal position with the help of suspensions mounted on a draft ceiling.
When placing mortise fixtures in the ceiling, it is necessary to adjust the location of the profiles so that they do not coincide with the places where there will be holes for the fixtures.
After installing and fixing the main bearing profiles, you can proceed to the installation of jumpers, adhering to a distance of 40 cm from one another. Here, cruciform joints (crabs), single angular connectors or UD segments are used.
After the final installation and alignment of the entire suspension structure, you can proceed to the plating of the ceiling with plasterboard. In the beginning, whole sheets are sewn, according to the layout, later clippings are inserted and fixed. The panels fit close to the ceiling surface - the gap should be a few millimeters. Horizontal binder should start from the corners of the room, moving to the center.
The installed ceiling is plastered, and upon completion of work, the final processing - painting is performed.