How to make an autogyro with your own hands? This question was most likely asked by those people who really love or want to fly. It is worth noting that, perhaps, not everyone has heard about this device, since it is not too common. They were widely used only until helicopters were invented in the form in which they are now available. Since the release of such aircraft models into the sky, gyroplanes immediately lost their relevance.
How to build a gyrocopter with your own hands? Blueprints
To create such an aircraft will not be difficult for someone who is fond of technical creativity. Special tools or expensive building materials are also not needed. The place that will have to be allocated to the assembly is minimal. It is worth adding right away that assembling a gyroplane with your own hands will save a huge amount of money, since buying a factory model will require huge financial costs. Before embarking on the process of modeling this device, you need to take care of the availability of all tools and materials at hand. The second step is to create a drawing, without which it is not possible to assemble a standing structure.
Basic construction
It’s worth saying right away that building a gyrocopter with your own hands is quite simple, if it's a glider. With other models it will be a little more complicated.
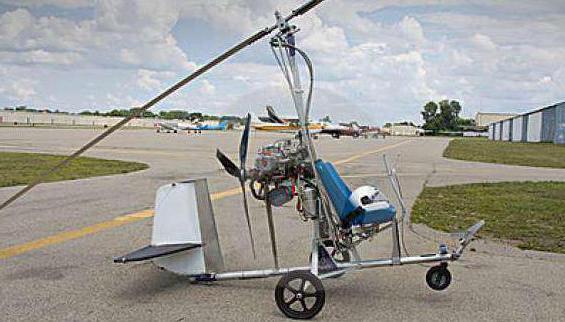
So, to start work, you will need to have three duralumin power elements among the materials. One of them will serve as the keel of the structure, the second will play the role of the axial beam, and the third will serve as the mast. You can immediately attach a steered nose wheel to the keel beam, which should be equipped with a braking device. The ends of the axial force element must also be equipped with wheels. You can use small parts from the scooter. An important point: if a do-it-yourself gyro is going to fly in tow for a boat, the wheels are replaced with controlled floats.
Farm setting
Another major element is the farm. This part is also mounted on the front end of the keel beam. This device is a triangular design, which is riveted from three duralumin corners, and then reinforced by sheet overlays. The purpose of this design is towing hook fasteners. The do-it-yourself gyro device with the presence of a truss should be made so that the pilot, pulling the cord, can at any time detach from the tow rope. In addition, the farm is necessary in order to install the simplest air navigation devices on it. These include a tracking device for flight speed, as well as a side drift mechanism.
Another main element is the installation of the pedal assembly, which is installed directly below the farm. This part must have a cable connection to the steering wheel of the aircraft.
Unit frame
When assembling a gyroplane with your own hands, it is very important to pay due attention to its frame.
As mentioned earlier, this will require three duralumin pipes. These parts should have a cross section of 50x50 mm, and the wall thickness of the pipe should be 3 mm. Similar items are often used when installing windows or doors. Since it will be necessary to drill holes in these pipes, it is necessary to remember an important rule: during work, the drill should not damage the inner wall of the element, it should only touch it and no more. If we talk about choosing a diameter, then it should be selected so that an MB-type bolt can enter the hole as tight as possible.
Another important point. When drawing up a gyroplane drawing with your own hands, you need to take into account one nuance. When assembling the apparatus, the mast should be tilted slightly back. The tilt angle of this part is approximately 9 degrees. When drawing up a drawing, this moment must be taken into account so as not to be forgotten later. The main purpose of this action is to create an angle of attack of the blades of a gyroplane of 9 degrees, even when it just stands on the ground.
Assembly
The assembly of the autogyro frame with their own hands continues by the fact that it is necessary to fix the axial beam. It is attached to the keel across. For reliable fastening of one element of the base to another, it is necessary to use 4 MB bolts, as well as add lock nuts to them. In addition to this fastening, you need to create additional structural rigidity. To do this, use four braces that connect the two parts. Braces should be made of steel corner. At the ends of the axle beam, as mentioned earlier, it is necessary to fix the wheel axles. For this you can use pair of clips.
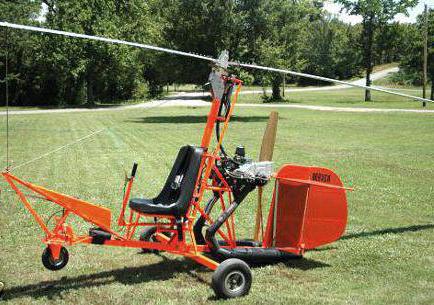
The next step in assembling a gyroplane with your own hands will be the manufacture of a frame and seatback. In order to assemble this small structure, it is best to also use duralumin pipes. Parts from cots or strollers are great for assembling the frame. For mounting the seat frame in front, two duralumin corners with dimensions of 25x25 mm are used, and at the back it is attached to the mast with the help of an arm made of a steel corner of 30x30 mm.
Gyro gyro
After the frame is ready, the seat is assembled and attached, the truss is ready, navigation devices and other important elements of the gyroplane are installed, it is necessary to check how the finished design works. This must be done before the rotor is installed and designed. Important note: it is necessary to check the performance of the aircraft on the site from which further flights are planned.