For access to the Internet, a connection through ADSL modems has long been used. It provides high network speed, although it requires special equipment.
The article will discuss the popular model of the Promsvyaz M-200 ADSL modem manufactured in Belarus. The nuances of operation and configuration of the Promsvyaz modem will be considered.
Appearance and completeness
The modem is made in a plastic case. On the front panel there are eight LEDs that are responsible for indicating the status of the modem:
- Power - lights up when the modem is connected to the mains.
- ADSL - indicates the presence of a signal.
- Internet - lights when connected to the Internet.
- LAN1-LAN4 - signals the connection of devices to LAN ports.
- WLAN - lights up when an active WiFi connection.
On the rear panel are:
- Modem power button.
- WiFi on / off button.
- Four LAN ports for connecting network devices to the modem.
- A jack for connecting to a telephone line.
- WiFi antenna.
If you turn the modem over, then from the bottom you can see the recessed reset button (reset).
Included with the modem are also supplied: cables for connecting to the network and the telephone line, a splitter — a device for splitting the signal into a modem and a telephone, and a power supply.
A brief description of the functions of the modem and its filling
The Promsvyaz M-200 modem is designed to connect to the Internet. Allows you to distribute the Internet over the network and using the built-in wireless Wi-Fi module. It can serve as a hub for connecting several computers to a network.
It is made at the Belarusian enterprise "Promsvyaz". The modem is very popular among users due to its affordable cost and stable uninterrupted operation.
An interesting fact is that the filling of the Promsvyaz modem was taken almost unchanged from the Chinese counterpart ZTE ZXV10 W300. Only the inscription on the body proudly declares that this device is the brainchild of a Belarusian company. A change in the brand did not affect the quality of the modem.
By default, one LAN modem socket is reserved for connecting a digital television set-top box, but if there is no need for this, the port can be configured for other purposes.
Enter the modem settings menu and view the main parameters
How to configure the Promsvyaz modem? To do this, in any browser on the command line, type the IP address 192.168.1.1. In the window that appears, you will need to go through authorization to access the modem. Here you must enter the username - admin.
The password will be the same, this is the factory setting. An important clarification: if, for some reason, after dialing in the IP 192.168.1.1 browser, the authorization prompt does not appear and a message is displayed informing you that the page cannot be opened, it is best to bring the modem settings to the factory settings by pressing the reset button from the bottom.
If everything is in order, the Promsvyaz modem settings window will open. By default, the Status menu is immediately displayed, where you can view the current parameters of the modem and connection: the IP address of the modem, the current DSL connection, DNS servers, the firmware version of the hardware, the time elapsed from connecting to the network.
To work with modem settings, there are the following main menu items:
- Interface Setup - setting the basic parameters of the modem (for any level of users);
- Advanced Setup, Access Management, Maintenance - advanced settings of the modem functions and utilities for its maintenance (it is better not to change anything without sufficient qualifications).
Let us consider in more detail the settings for the ordinary user contained in the item Interface Setup.
Setting up the Internet connection of the Promsvyaz modem
To configure the Internet connection of the Promsvyaz modem, the Internet tab of the Interface Setup menu item is selected. Basic settings for customization:
- VPI and VCI - parameters for setting up the connection, their exact values can be obtained from the provider (for example, 0 and 33).
- ISP - here the connection mode is selected, usually it is PPPoA / PPPoE (also called Router mode) or Bridge mode. In the first case, the Internet connection works immediately after downloading, and you can distribute traffic through a computer network. When choosing Bridge mode, you will need to create an additional shortcut to connect to the network, and you cannot share traffic through the network.
- If you selected Router mode, then you will need to specify the username and password of the network user, which are specified in the contract with the provider.
- Connection type - here it is better to select the Always On option.
- IP Address If you use a fixed network connection address (this point needs to be discussed separately with the provider), then you need to specify it, but in most cases the dynamic IP option is used (Dynamic is selected).
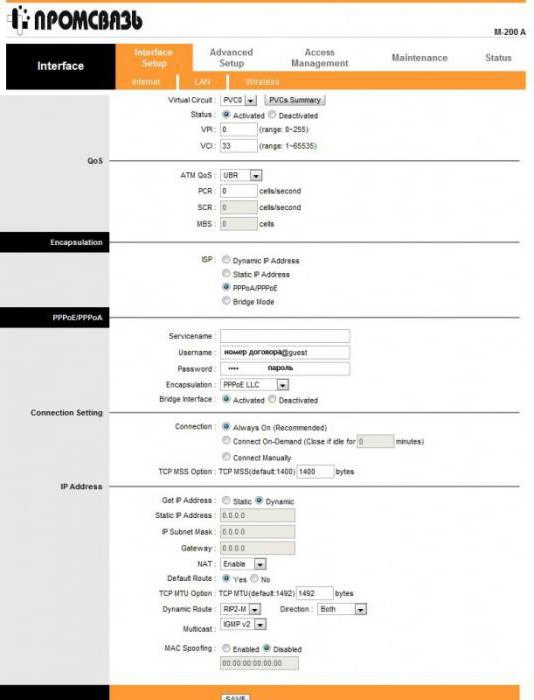
After setting up the Promsvyaz modem, you must click the Save button at the bottom of the window to save the settings.
Setting the network parameters (LAN) of the modem
To ensure the correct operation of the modem in conjunction with other devices, you need to have a concept of how to configure the Promsvyaz modem to work on a shared network. The settings for connecting to a computer network are carried out in the LAN item of the Interface Setup menu.
What options should I look for? We list the most important:
- Main IP Address - modem address (default - 192.168.1.1);
- Dynamic Route - type of dynamic route (can be found in the provider's modem configuration instructions);
- DHCP Server - in this section you can configure the settings for computers to automatically obtain IP addresses and work correctly on the network (it’s best to check with your provider for what to specify here). Also in this item, select the LAN ports used to connect the set-top box IPTV;
- DNS - IP addresses of DNS servers are indicated or an automatic mode of their determination is selected (the provider must inform the DNS addresses).
To save the settings, click the Save button.
WiFi setup on the Promsvyaz M-200 modem
Where to begin? You need to enable the built-in wireless module. To do this, press the WLAN button on the back of the modem. To configure WiFi, you need to go to the menu of the Interface Setup modem and select Wireless.
Then everything is simple. In the Access Point parameter, select the Activated item. In the Multiple SSIDs Settings menu, specify the following values:
- PerSSID Switch - set Activated.
- SSID — The name of the wireless access point is indicated here.
Next to Pre-Shared Key is the security key required to connect to WiFi.
Promsvyaz is a modem with a high-quality WiFi module, which has shown itself to work only from the best side.