If you begin to learn to paint with watercolors, then small watercolor sketches (sketches) will help you in this training. Drawing various parts of the body or face is a useful activity. In this article, you will learn how to draw an eye in watercolor. In the future, this skill may be useful to you.
Preparatory stage
In order to draw an eye with watercolors, the following items are needed:
- pencil (plain or red to sketch);
- a sheet of paper for watercolor A5 format;
- eraser;
- watercolor paints (if you want the color to be saturated and hold on paper for a long time, then you should not use honey watercolor );
- brushes of several sizes;
- pure water;
- wooden tablet or glass;
- adhesive tape or glue.
Those who at least once worked with watercolors know that when wet, the paper goes in waves. To avoid this problem, a sheet of paper needs to be fixed on the tablet for drawing, but if you are still a beginner, then for these purposes you can use glass. This should be done after you sketch the paper.
Sketch
First of all, in order to draw an eye with watercolor, you need to make a pencil sketch.
First step. In the center of the sheet draw a small circle, it will be the iris of the eye. Inside, draw a smaller circle - this is the pupil.
Second step. Around the iris, draw the upper and lower eyelids. Now you need to draw an approximate outline of the eyebrow above the eye.
Third step. Use an eraser to erase excess or too bright sketch lines. It is necessary to leave only a slightly noticeable outline.
Tension
To draw an eye with watercolors, you need to properly "pull" the paper, otherwise the sheet will lead.
If you have a tablet for drawing, then just put paper on it. Gently wet the sheet with a brush to speed up the process, you can use a spray bottle. Once the sheet is sufficiently moistened, bend the corners back and fix them with glue.
If you do not have a wooden tablet, then you can use glass. Even simple glass from a frame for a photo will do, the format does not have to be A5, the main thing is no less. The sheet is soaked on glass, it is important that the sheet is flat without the slightest bumps. With masking tape, you need to attach the sheet to the glass around the entire perimeter.
If you do not follow these easy steps, then your watercolor eye painting will be ruined.
Fill a picture with color
- Using a loose burnt sienna, we work out the folds and contours of the eyelids. The outer and inner corners of the eye need to be given the most attention, here the color must be applied repeatedly for greater saturation. Also, a light color needs to fill the entire eyebrow.
- The edges of the iris are filled with a pale shade of color selected for the eye, the pupil is completely filled with black, for example, pale blue. In the burnt sienna, which was used earlier, add quite a bit of black. The resulting color is drawn around the edges of the eyebrows and eyelids.
- Our eyes are never completely white, so add a little red. It is necessary to mix sienna, red cadmium and a fairly large amount of water. The resulting shade needs to work out the outer and inner corners of the eye. We study the lower bend of the eyebrow with brown paint.
- Back to the iris. It is necessary to refine its contour with blue cobalt and a blue tint. Dark brown or black slightly draw the line of eyelash growth. Draw the shadow areas of the eyes before working through the eyelashes. At the inner corner of the eye on the lower eyelid, we outline the first few small eyelashes with barely noticeable lines. On the eyeball (under the upper eyelid) we work out a small shadow from the eyelashes and eyelids.
- We mix Indian red and white, the resulting shade brings the folds of the lower and upper eyelids, eyebrow and corner of the eye. The folds of the eyelids need to be treated with sienna. In a darker way, we are working on the edge of the iris. We draw a small white highlight above the pupil.
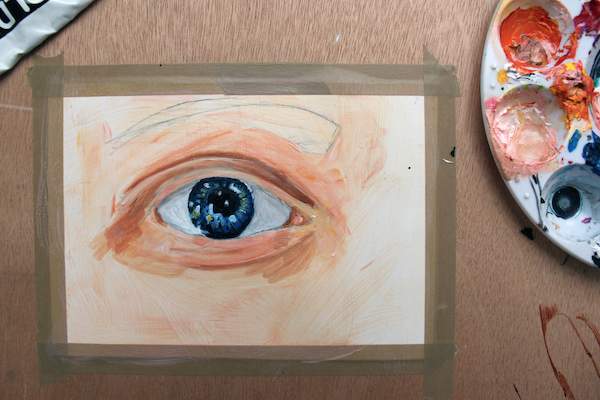
- With some dark shade (brown / dark brown / black) we draw the eyebrows and darken the folds and corners of the eyelids, gradually draw dark eyelashes. The bottom contour and the end of the eyebrow are slightly darkened.
- The contour of the iris and the pupil are once again being worked out with black paint. On the iris we draw veins blue / turquoise / blue veins. White flare is made more accurate.
Now you know how to draw a watercolor eye in stages.