Keys should be stored in one place at least in order not to waste nerves and time searching for them at the right time. And the original do-it-yourself keeper can become a bright accent in the interior, attracting the attention of guests and household. Make such a thing yourself is not difficult.
Benefits of Creating a Key Holder
A self-made key organizer should be suitable for your interior (style, size and color). Finding one in the store is rare. It’s enough just once to think about going in search of the “ideal housekeeper” in order to see this from our own experience. You will save time if you do it yourself. In addition, such a key organizer will surely become the embodiment of your love of home, individuality.
Having independently made a little thing, you will be sure that it is made of high-quality and safe materials. You will not only enjoy the process of creativity, but also surprise the household and guests with an unusual and beautiful thing in the hallway. Well, of course, an organizer for keys from improvised materials will cost much cheaper than the one you find in the store.
Simple wood key holder
This option of making a wall key holder in the hallway with your own hands looks very simple and straightforward, but if your main desire is to create a truly functional thing, then an organizer from a plank will do. You need to purchase a regular board with rounded ends and sand the surface with sandpaper. If you want to change the shape of the base, you need to cut off the excess and cut out the desired silhouette.
You can make a wall key holder with your own hands in the form of a simple rectangle with rounded or sharp corners, or you can cut some shape. The organizer looks interesting on the wall in the form of a key, a heart or the inscription Home.
You can leave the current color of the plank, if it suits you and fits seamlessly into the interior of the hallway. In this case, it is enough to varnish the surface to increase the wear resistance of the finished product. If you don’t like the color, you can paint or sew the future wall key holder with your own hands with any fabric you like. It is better to apply black acrylic paint to the contours of the figure. So the key holder made of wood with his own hands will stand out clearly against the background of wallpaper or painted walls. So you quickly find the key you need.
Next, do the necessary number of holes in the basis of the wall key holder with your own hands. They need as many as will hang on such a key organizer. It is advisable, just in case, to make two or three holes more than exactly necessary. In the holes you need to fix metal or any other hooks you like. They can be purchased at construction and hardware stores or shops with sewing accessories.
Additionally, you can decorate the key holder with figures made of plywood or paper, another material that can be glued to the base. A lot of all kinds of small jewelry can be found in the same stores with sewing accessories. You can decorate a rectangular housekeeper with the inscriptions his and hers (“his and her”), mr and mrs (“Mr. and Mrs.”), keys (“keys”), home, sweet home (“home, sweet home”), welcome (“Welcome”), live, laugh, love (“live, laugh, love”) in a contrasting color.
Organizer from a branch in eco-style
For this original do-it-yourself wooden housekeeper, you need to find a strong tree branch. This will be the basis of the organizer. You will also need a stain, a jigsaw and a drill, pendants and acrylic paints to decorate the key holder with your own hands. The master class of creating such a thing in eco-style is presented below:
- Wash and dry the liked branch, cut off all unnecessary parts. Next, you need to decide whether to save the bark. You can remove it by treating the surface with sandpaper, or you can leave it by removing only damaged areas.
- Using a jigsaw, make a cut from the side where the hooks will be located. Drill holes for screws.
- With a wide brush, cover the key holder with a stain, which will shade the tree and act as an antiseptic. After this procedure, leave the branch to dry for about an hour.
- If you decide to remove the bark, then simply cover the branch with acrylic varnish. Is the bark left? Then saturate the branch with varnish, which must first be diluted with water in equal parts, and cover the ambassadors of drying undiluted.
- On the surface you can walk with a dry brush with acrylic paint of your favorite color. The result must again be fixed with varnish.
- It remains only to fix the suspensions in the right places. Do-it-yourself keeper in the hallway is ready!
The beauty of such a product is that two identical branches do not exist, which means that your key holder will certainly be special.
Key hooks
There is another option for making a wooden organizer for keys in eco-style. For such a housekeeper, you need a few short branches with knots. They need to be treated with stain and varnish in the same way as described in the master class above. Then you should fix the twigs on a wooden base perpendicularly, in an upright position. Knots will serve as hooks for keys. Across them (horizontally) you can stick another branch, for example, with the inscription Welcome, painted in a contrasting color.
Pine saw organizer
Do-it-yourself stylized key keeper can be obtained from a regular tree saw cut. To make it, you need a saw itself, a water or alcohol stain, medium-sized sandpaper, acrylic varnish, a wide synthetic brush, suspensions, hooks, a drill, and a Phillips screwdriver. Saw cut can be used from any tree species, but pine is best.
Both sides of the saw must be treated with sandpaper. First you should use paper of medium, and then fine grain. It must be processed strictly along the wood fibers. As soon as the procedure is completed, the surface of the tree should be moistened with water so that the fibers rise, and leave to dry completely. After this, you need to re-treat the surface with sandpaper.
Now you can starve saw. For beginners, it is better to use a water-based stain rather than alcohol. It dries longer, so that it will be possible to avoid smudges by soaking wet excess with a dry cloth. The stain should be applied along the wood fibers with a wide synthetic brush. To achieve a uniform and deep staining, you need to stain the tree 2-3 times. After each coat, the saw should dry well.
It remains only on the rear side of the organizer to make recesses for fastenings, so that the product fits well on the wall, and fix the fasteners themselves. On the front side of the saw you need to attach the hooks for the keys. Do-it-yourself keeper is ready! If desired, you can apply a cut to the cut using the decoupage technique.
Decoupage technique for decor
Using this technique, you can transfer any print print you like on the surface of the key holder with your own hands. It is important that the image should be mirrored. No glue needed. The printed pattern just needs to be covered with acrylic varnish, put on the surface "face" down and carefully smoothed using pressure rollers. The product should be left to dry for 2-3 hours. After that, lightly moisten the paper with water and begin to roll up. A picture will gradually appear on the surface. The paper should be rolled until the whiteness disappears.
Closed housekeeper
Such a housekeeper is like a house or a birdhouse with doors. This type of product is made of wood or plastic. As practice shows, many people prefer wooden key holders. They look much more stylish, but are not very difficult to make. For manufacturing, you will need a piece of plywood, sandpaper, fasteners for doors, screws and hooks, varnish and paint.
First you need to draw a drawing of the key holder, an example you can see below in the photo. Further, according to the scheme, it is necessary to cut parts from plywood and process them with sandpaper. Each part should be alternately coated with three layers of varnish. When everything is ready, you can begin assembling the house. Remember that screws should not be visible from the outside. Fasten the doors, install the lock, screw the hooks. All that remains is to decorate the house-keeper with do-it-yourself acrylic paints or using decoupage technique.
Minimalistic key keeper
Is your apartment decorated in a minimalist style, or is it your lifestyle, worldview? Then it’s worth considering to make the same key holder, convenient and functional, that fits perfectly into the interior. You need a board, key laces and some decorative elements (these can be the same large pendants or just wooden balls). In the board at an equal distance you need to make neat grooves (as in the picture). The housekeeper is ready, but it remains to make key chains that will allow all households to use it. On each ring just tie a decorative element with a cord. To hang the key, you need to put a decorative element on top of the board, this will not allow the key to fall.
Unusual magnetic organizer
This is an original version of a housekeeper with your own hands, which looks beautiful and will be very convenient to use. To make the base, you will need plywood, cardboard or plastic. From these materials you need to cut a suitable shape, and then glue it with a magnet. For decoration, you can use drawings, patterns, ribbons, any details from the sewing accessories store. If you cover the key holder with a phosphorus spray, then in the late hour the location of the keys can be recognized even before the light is turned on.
You can make a magnetic key holder with your own hands out of the box. It is enough to take a box that is suitable in size (cardboard, but solid, and plastic), and stick a thin magnetic board inside. Keys will magnetize to this surface without any problems.
The key keeper from the picture frame
Somewhere around the old frame from a photograph or picture? She should not be thrown out. There is a good way to not only decorate the wall, but also to determine a permanent place to store keys. You will need a frame, a piece of plywood that is suitable in size, acrylic paints and a primer, a wide brush with synthetic pile, an emery cloth of fine and medium grains, decoupage glue or clerical PVA, acrylic varnish, key hooks, a Phillips screwdriver, jigsaw and drill.
Saw a rectangle of the desired size from a piece of plywood with a jigsaw (you should be guided by the dimensions of the frame). Now using a thin drill you need to drill all the holes. Cover a piece of plywood with an acrylic primer, and when it dries, go over it with sandpaper, then wipe it with a damp cloth. You can simply paint the plywood or transfer the drawing to it using the decoupage technique.
It remains only to attach the key hooks to the plywood base and fix it in the frame for the picture. To make it easier to navigate, you can glue labels with inscriptions under each key, for example, “From the basement”, “From the garage”. Hang the housekeeper on the wall in the hallway using the mount.
Lego Key Organizer
It’s easiest to make a housekeeper from improvised materials from the Lego designer. You need a flat base for the organizer, you can attach several other parts to it as a decor. Small parts of the designer must be inserted into the key rings in the form of a keychain. Now, returning home, the key with such an unusual keyring can simply be attached to the base of the designer.
Leather pocket key holder
To make a pocket key holder of leather with your own hands, it will take more time and effort than in the previous case, but the result is worth it. You will need a pattern, thick leather (you can remake an old bag), lining material, a zipper, a thick needle, durable threads, an awl and buttons, a carabiner for keys, scissors.
The more keys there are, the larger the pattern should be. From leather and suede (for lining) you need to cut out all the details on the pattern, connect the details of the outer part and the lining. The rectangle must be folded with the inside faces inward, a zipper inserted, a carabiner mounted on a leash in one section, sew the other edge.
Large plywood organizer
A big family needs a big housekeeper. Since the keys will always be in a prominent place, parents and children will not confuse the bundles or forget them at home. Doing it yourself is the easiest way out of plywood. The plywood board must be carefully processed with sandpaper and the corners rounded if desired. In advance, you need to choose a suitable background for a large housekeeper, which will need to be transferred to plywood with a pencil or chalk. After drawing the contour, take a jigsaw and carefully cut out the desired shape. This will be the basis. Now, in the same way, you need to cut out individual key figures for fixing keys. After grinding the surface again, cover the finished product with varnish or paint and hang it on the wall. The original DIY key organizer is ready.
The key keeper and a shelf for trifles
The do-it-yourself key holder shelf can be different. In any case, you will need plywood or chipboard for the base, tools for working with wood, acrylic paint, varnish, screws, hooks and fasteners. The simplest option is a wall shelf: cut two rectangles: one (the bottom of the shelf) should be slightly wider, the other (the base for the hooks) - narrower, two identical side parts - of any shape (it can be triangles or rhombs).
All wooden parts should be varnished, if desired, painted in any color you like with acrylic paint. This can be done later, too, at the same time closing the heads of the nails that stand out against the general background. Now you need to fasten two rectangular parts perpendicular to each other, you get a kind of corner. It remains only to attach the side parts, mounts to hang the shelf-organizer on the wall and hooks for keys.
The key keeper with a vase
Such a pretty keykeeper will noticeably transform the interior, filling it with the natural charm of nature, ease and freshness. To make a housekeeper with a vase for fresh flowers, you need to take wooden boards, stain, acrylic varnish and paint, a strip of thin iron for attaching the vase, a glass jar of a suitable size, hooks, fasteners, all the tools necessary for working with wood.
Now you can get to work. Saw a rectangular base and a smaller rectangle from the boards, which will serve as a small shelf for incoming mail, glasses or a wallet. Treat the wood with stain (2-3 layers will be enough), varnish or first paint in the desired color, and only then use varnish. When all the parts have dried, you need to attach a smaller rectangle to the base at an angle of 45 or 90 degrees. A shelf at 45 degrees in this case will be more convenient. It should not be fixed in the middle of the base, but slightly shifted to the side. Make sure that under it there is a place for hooks, which just came time to attach.
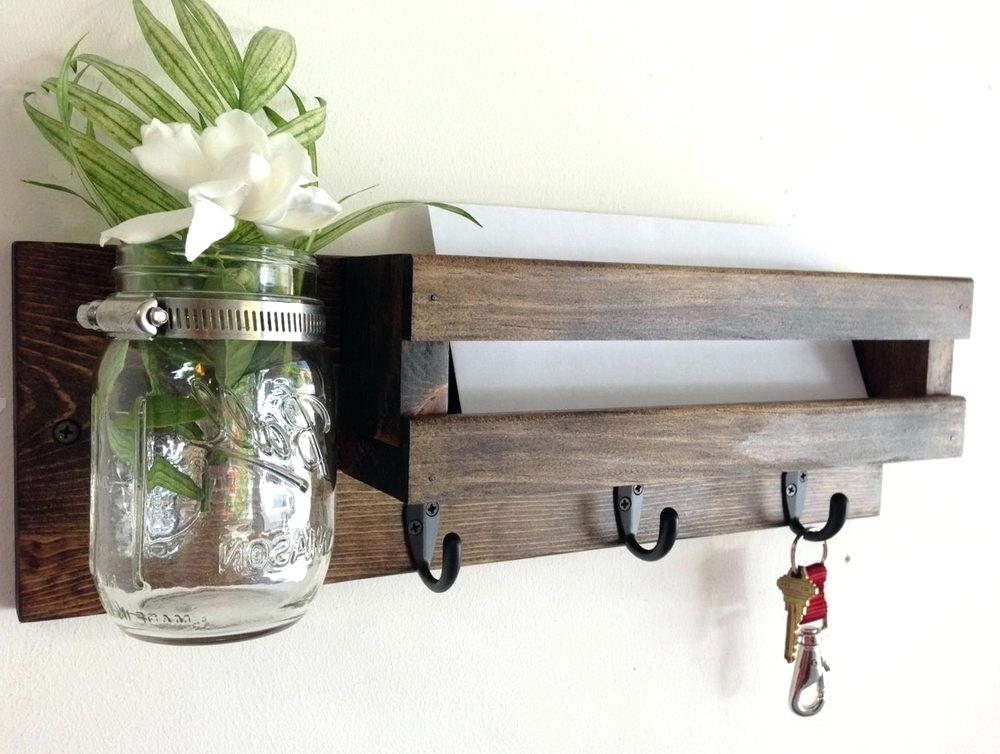
It remains only to draw up an impromptu vase and securely fix it on the free side of the wooden base. An ordinary 0.5 l glass jar may not look very aesthetically pleasing, so first you need to decorate it somehow. For example, a jar can be painted with acrylic paint, transferred to a drawing, draped with a bright cloth. With a hot glue gun, you can write something on a jar and wait for it to dry completely. Get a volumetric inscription. The jar should attach a thin strip of iron to the base. The original key keeper is ready!
Padded Pocket Key Holder
You can make a pocket soft key holder with your own hands from felt or leather. A pretty felt organizer for keys is a more feminine option, while a leather one will suit a man. First, we consider a master class for creating a female version of the organizer, in the next sections we will go on to describe the process of making a key holder from leather with our own hands. Such a product is sewn quite easily and quickly.
To make a housekeeper with your own hands, you need a felt 2 mm thick, it is better to choose a hard one. You can choose any decorative elements, for example, cut an owl from a material of a different color. For a housekeeper, an owl with your own hands will also need a sewing or punch button, a carbine, threads (you can take contrasting or in the color of the main material), a needle and scissors. How to make it?
DIY key keeper pattern is very simple. . : 13 8 . , . — 19 1,2 2,7 . . . , .
Both parts of the leash must be folded and sewn around the edge with a buttonhole stitch. Sew a button on the round part of the leash, and in the opposite part, attach a half ring of the carabiner and sew the edge. On the reverse side, the round part of the leash can be decorated with rhinestone. Now you need to attach the product to one part of the key holder and mark the place of sewing on the second part of the button. The carabiner part should protrude from above by 1.5-2 cm.
Now a decorative owl can be sewn onto the second rectangular part of the housekeeper. Then fold both parts of the organizer and sew along the edge, inserting a leash for keys. The bottom edge should not be sewn up, and on top do not sew up only the leash area. Now, when pulling the leash, the keys will hide in the key holder.