A chandelier is an integral part of the interior and a source of artificial lighting, which is necessary for the full functioning of any premises in the evening or at night.
The modern market offers a huge number of different models of lighting designs. Having chosen and bought a lamp, many people ask: "How to install a chandelier on the ceiling and connect it to the mains?" At first glance, installation work seems very complicated and impossible, but it is not. Starting the procedure, it is necessary to assemble the elements of the device in a single design and correctly determine the circuit and its connection option.
It is very important to remember that when installing and connecting lighting fixtures, the main safety rule should be strictly observed - to completely de-energize the room.
Features of designs and their types
Before turning to the question of how to install a chandelier, it is worth considering the types of such lighting fixtures. Lighting designs are divided into two types, differing in mounting methods.
- Ceiling Chandeliers. This type of lighting fixture is attached to the ceiling plane using trims. Often, lamps of this type are made in a form that has a visual similarity to a plate. They can be represented as a solid design, or with the presence of several segments. To diffuse light, shades with a diverse geometry of shapes are used. They are made of glass or plastic materials. The level of light transmission will depend on the transparency of the lampshade. Very often the product is equipped with a mirror reflector, as a result of which its lighting functions are enhanced. In the plane of the ceiling can be located both one or several elements of electric lighting. This type is the best solution for spaces with low ceilings.
- Pendant lighting. A feature of this type is the method of fastening the structure, mounted on a mounting hook built into the ceiling surface using chains and strings. The joints of the fastener and wires are masked by a decorative plate. In the manufacture of various materials are used: metal and crystal, glass, textiles and wood. They can have different geometric shapes. Suspended models are made with one light scattering segment or in the form of a structural system with the arrangement of several light segments. A distinctive feature of chandeliers with several shades in the design is their adjustable orientation.
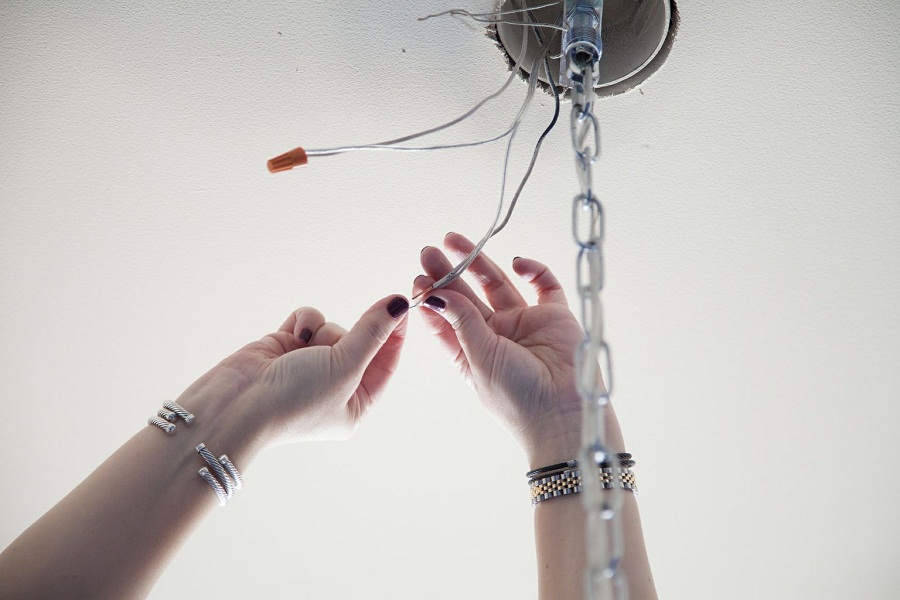
Method for determining wires and their marking
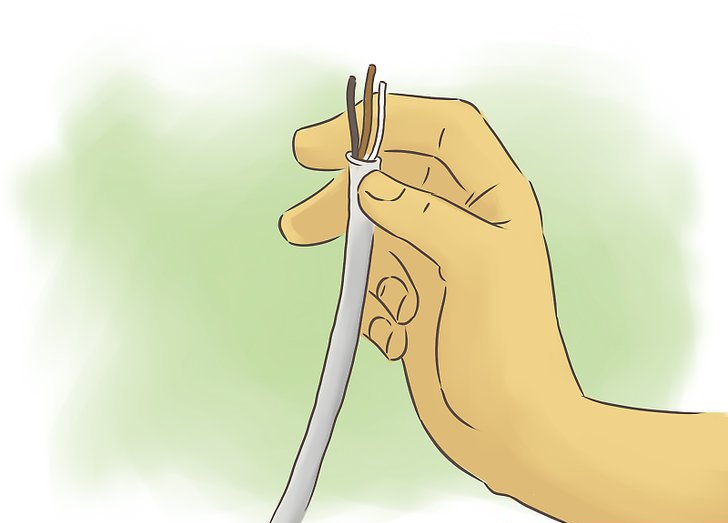
Before installing the chandelier, it is important to deal with the wires.
The wire contacts on the lighting device, which are intended for connection to the electrical wiring, are marked with:
- L is the phase wire;
- N is the neutral conductor;
- PE - grounding conductor, standard color - yellow-green color.
Please note: the color designation of electrical wires may vary, as there are no common international standards.
Before installing the chandelier on the ceiling with your own hands, you should correctly determine the voltage of the wire: phase and zero. The phase is the current conductor to the lighting devices, and zero is the conductor of the reverse current coming out of the lighting device. To perform this task, you must have a screwdriver indicator.
Method of determination: touch the tip of the indicator to the bare part of the end of the wire. If the indicator lights up, this is a phase, and in the absence of an indicator light, a neutral wire.
How to install a ceiling chandelier?
In apartment buildings, built several decades ago, reinforced concrete floors are the ceiling of rooms in apartments. Builders in the prepared holes in the center of the upper plane of the rooms hooks were installed and wires were removed. Therefore, when replacing the chandelier, there should be no difficulties with its installation, since the fastening element is already prepared.
During the initial arrangement of the lighting fixture on the ceiling in a private house, you should check the presence of electrical wiring and perform a certain algorithm of actions.
Phased installation instructions chandeliers in the house
Those who carry out installation work in a private house on their own should adhere to the following instructions:
- Ceiling beam. Before you install the chandelier on the ceiling, you must prepare the mounting structure to eliminate the risks of breakage. It can be a wooden beam, which is located in the attic of the building in the place where the chandelier will be arranged.
- Determining the installation location of the chandelier. It is necessary to determine the center point on the ceiling plane and mark it. Drill a small hole in the marked area for the wire outlet and hook installation. The length of the protrusion of the mounting hook is adjusted by the device on the thread in its upper part.
- Junction box and switch. Their place of formation is the plane of the wall. The electric wires must be removed from the location of the chandelier to the box where the wires from the switch should be connected. They must have a margin of at least 10 cm.
- Wiring options: masking inside the surface or positioning on the surface. If the camouflage method is used, it is necessary to prepare a groove on the wall. After laying them, the groove is sealed with a special mixture. Using another option implies the presence of special plastic profiles, in the inner plane of which the wires will be hidden. The connection of the current conductors must comply with the connection diagrams of the lighting device. The joints should be insulated with PVC tape and placed in the plane of the junction box, eliminating their intersection. Close the box with a lid and fasten with a fastener.
- Mounting bracket. Today, chandeliers are sold complete with fasteners and a terminal block. Designs provided with a single lamp in the kit have a mounting bracket with two bolts. The bracket portion is positioned close to the output wiring in the ceiling.
How to install a chandelier on a stretch ceiling?
To carry out the installation of the lighting device, you must first prepare the construction system. It must be equipped before installing the suspended ceiling, as well as wiring to it.
It is very important to correctly determine the distance between the main ceiling plane and the suspended ceiling, since the mounting should not interfere with the installation of the suspended structure.
Materials and tools:
- electric drill;
- concrete and wood drill;
- suspensions;
- plywood plate, the thickness of at least 10 mm;
- self-tapping screws;
- screwdriver or screwdriver with nozzles;
- jumper and hammer;
- hook;
- anchors.
Step-by-step instructions on how to install a chandelier on a suspended ceiling:
- Mark holes for mounting anchors on the ceiling base in accordance with the dimensions of the plywood board. There is no need to use a large plate, a piece of 35 x 35 cm will be enough.
- For mounting anchors, it is necessary to drill holes (4 pcs.) In the ceiling with an electric drill, using a drill bit for concrete.
- Prepare the blank using suspensions. They need to be bent, giving a U-shaped.
- Determine the center point on the plywood and drill a hole with a drill using a wood drill. This hole is necessary for fixing the hook and the output of electrical wires to the switch.
- It is required to fasten plumb lines on the corner parts of the mounting structure using wood screws. It is necessary to pay attention to the length of the self-tapping screw in order to exclude the protrusions of the sharp ends from the plywood.
- Insert the anchors into the holes formed in the concrete.
- Secure the structural system by tightening the screw into the anchor.
- After the installation of the suspended ceiling is complete, installation and connection of the lighting product can be carried out.
If gypsum plasterboard is used during the installation of the suspended ceiling, prepare a hole in its sheet, which should correspond to the hole of the built-in structure. If the ceiling is equipped with a PVC stretch film in the room, the bounding rings must be glued and a hole cut.
Necessary tools
To install the chandelier home, you need the following tools:
- PVC insulation tape.
- The terminal block, the quantitative indicator of this element depends on the structural system of the lighting device.
- Indicator screwdriver or voltage indicator device.
- Electric pliers.
- Knife.
- Universal multimeter.
Variations for connecting an artificial lighting device
There are few options on how to properly install the chandelier on the ceiling. They depend on the number of wires of the device and on the type of switch.
- The two wires from the ceiling, and the same on the chandelier. In this embodiment, when the number of wires on the product and the ceiling plane correspond, it is necessary to determine the phase and zero of the wires with a screwdriver and connect them. Connect the phase of the chandelier wire to the phase wire on the ceiling using the twisting method. Connect the neutral wires in the same way. If the chandelier is installed on previously used wires on the ceiling, the best option would be to use a terminal block, which eliminates the breaking of the wire.
- How to install a chandelier if there are two on it and three wires on the ceiling. In this case, it is necessary to install phase conductors and zero on the ceiling wires. If this is a three-wire wire, then only one core will be zero. To make sure of this, you should check with an indicator screwdriver and put a mark on the neutral wire. Disconnect the room, isolate one phase core. Wiring scheme is not different from the first embodiment.
If there are not three, but four wires coming out of the ceiling opening, do not panic. This is a ground wire having a yellow-green insulation color. It must be connected by twisting with the wire of a chandelier of the same color. It is possible that all four wires have the same color, then to determine it is necessary to use a screwdriver with an indicator.
Single switch connection
In the process of work it is necessary:
- Turn on the switch and determine the phase and neutral wires on the ceiling plane, using an indicator device.
- Mark the conductors with a marker, which will prevent them from being mixed up when connected.
- Disconnect the building or apartment. Turn off the machine in the switchboard and set the switch to the “off” position.
- Make sure there is no electric current in the phase conductor. If the indicator lamp does not light, you can proceed to the process of attaching the lighting chandelier.
- Connect the bare ends of the neutral conductor of the lighting element and the neutral wire that goes to the distribution box, and combine the phase wire that goes to the switch with the other wire of the chandelier. This connection can be made using the terminal block, but you can do without it.
- If this block is absent, then the stripped wires within 2 centimeters should be twisted. Their connecting sections must be soldered with a soldering iron and insulated with PVC tape.
Connecting the wires of the lamp to the switch with two keys
To mount the electrical wiring of a room, an electric three-wire cable is most often used. It can be either copper or aluminum cable. The use of this wire will greatly facilitate the connection of the device to the trip device.
The middle core of the cable is connected to the zero core in the mounting box, and the remaining two are connected to the core of the phase switch. Attention should be paid to this factor: the current (phase) supply must be parallel to the first and second terminals of the circuit breaker.
The process of connecting a luminaire to a switch with two plates is similar to the algorithm for connecting to a switch with one plate. This connection option is acceptable for products where the equipped lamps are divided into two sections. This separation makes it possible for certain lamps to light up when one of the switch keys is pressed, and when two keys are turned on simultaneously, all the llamas will light up.
Connecting a chandelier equipped with a remote control
At the present time, LED products that operate using remote control are very much in demand. Therefore, consumers are increasingly faced with the question of how to install a chandelier with a remote control. These are modern products, the installation process of which is practically no different from conventional designs.
How to install LED chandelier with remote control? Pay attention to the position of the circuit breaker plates if it is not to be dismantled. Its keys are set to a constant "on" position. The assembly process of the control system depends on the correct location of the controller that receives the signal from the remote control. Sequencing:
- We start with the definition of current conductors: grounding, phase, zero.
- Complete de-energization of the electrical circuit of the room.
- The connection is made depending on the number of wires on the lamp and ceiling.
- Turn on the machine in the electrical panel.
- Using the control panel, make sure that the chandelier is functioning.
Expert advice and recommendations
- When connecting any devices to the mains, you must follow the safety rules and precautions.
- The entire cycle of work is carried out with a complete blackout of the room. De-energizing the room with a switch in this case is unacceptable. You must turn off the power to the entire apartment. In addition, when installing a new lighting design, it is often necessary to replace and install a chandelier switch.
- When purchasing a lighting device, you should also specify its power in the store. It should not exceed the permissible value of the wiring power of the room.
- Before installing the chandelier, be sure to check the wires. The procedure is mandatory, even if the wiring has a difference in the color of the insulation.
- Before starting work, you must familiarize yourself with the manufacturer's instructions, as a rule, many indicate how to correctly install the chandelier. Most often in the passport of the device you can find wiring diagrams and recommendations for the execution of work.
Installing the chandelier with your own hands is quite realistic, it is only important to strictly follow the instructions and follow the safety rules for installation work.