One day, when the computer is turned on, it is necessary to state the fact that the computer "ordered to live long." The laws of technology have worked, which state:
- Any technically sophisticated device will fail, the only question is when.
- A vital unit will fail at the most inopportune moment.
So, when you turn on the system unit, it does not emit any sound or light signals. The situation may be complicated by the fact that tomorrow you need to hand over the multi-day work to the customer, which is located on the hard drive of this computer. Naturally, this titanic work is not copied to an external medium. What to do?
The first thing to do is calm down and try to figure out what happened, starting with the simplest. It makes no sense to immediately call the service department or rush to a familiar computer wizard with the system unit. Let’s try to find the fault on our own step by step.
Finding simple causes of computer failure
The first thing you need to understand is whether there is a voltage of 220 volts in the power outlet. To do this, you must include in it a known working table lamp, hairdryer or other device. Next, you need to check whether the connector of the power cord is firmly inserted into the desktop power supply (PSU) . The back of most system units has a power switch. It must be in the on position. If the situation has not changed after turning on the computer, you must disconnect the system unit from the network and remove its side panels, providing access to the inside of the computer.
Visual inspection of the internal components of the system unit
Next, you need to disconnect all the connectors of the computer's power supply, except for the system board, and inspect it in good light. Remember that a thorough visual inspection during the repair of a personal computer reveals about 80% of all malfunctions. Special attention must be paid to the electrolytic capacitors of the motherboard. "Swollen" electrolytes indicate a malfunction that only specialists will eliminate. If everything looks good and the trial inclusion did not lead to the start of the system, then with a high degree of probability of a problem in the power supply.
It is necessary to disconnect all the remaining connectors and remove from the PSU system unit for inspection and autonomous start. A life-threatening voltage of 220 volts is present in the power supply unit of a personal computer. Therefore, all operations on its installation, dismantling, assembly, disassembly and inspection can be performed only in a de-energized state.
Primary power supply diagnostics
Inspection and diagnostics of the power supply will be more correctly done in the disassembled state. Before starting the power supply and checking the voltage that it gives out, it would be wise to open it, inspect and, oddly enough, sniff the insides. It makes sense to pay attention to the smell of burned plastic, dark spots on the printed circuit board, smudges of glue on the power transformer and swollen and distorted capacitors. Next, check the fuses for the power supply. If the external examination showed that everything is good and no visible problems were found, you must close the PSU case and try to start the power supply without a computer. How to do this is described below.
How to start the power supply without a computer?
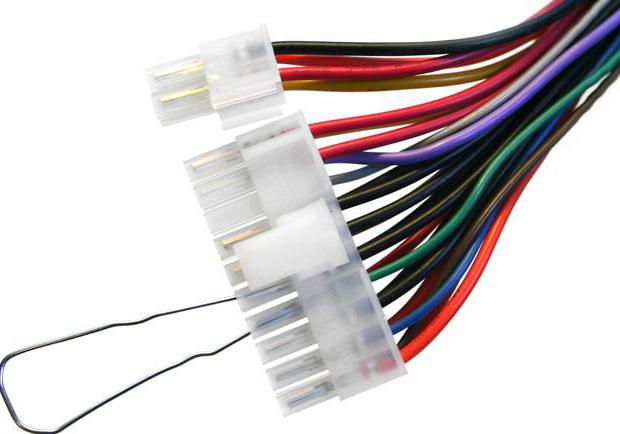
First, inspect the power supply connectors. They are of two types: 24-pin, obsolete 20-pin. On the connector, you need to find the terminals to which the green and black wires are suitable (black is suitable for any - this is "ground"). From any improvised material such as a paper clip or a piece of wire exposed at both ends, we make a jumper. Now you need to use it to connect the green and black wires. Almost all modern power supplies are afraid of idling (no load).
In order for the power supply to work under load, it is necessary to connect an unnecessary, but serviceable old hard drive with a standard power connector or another device (cooler, 12-volt car lamp no more than 21 watts through black and yellow wires). After all these connections, we connect the power supply to the network. If he did not turn on (the cooler did not work), this means that the problem is in it. The next step is to repair it or purchase a new one. A new power supply must be purchased with the same power (or more powerful) as the faulty one.
How to check the voltage of the power supply
If the power supply turns on and works normally (the cooler rotates), using the tester, you need to check for the presence of power supply voltage on this largest connector. Now that it’s clear how to start the power supply without a computer, it’s easy to do.
BP produces several voltages (in brackets the current strength):
• +5 V (10-50 A) - stabilized power, the main consumer is a processor;
• +12 V (3.5–15 A) - power supply for cooling fans, device motors and circuits;
• –12 V (0.3–1 A) - power supply to the interface circuits;
• –5 V (0.3–0.5 A) - usually not used;
• +3.3 V - RAM power.
Colors of wires: black - ground; orange +3.3 V; red +5 V; yellow +12 V; green - PS ON (with black, it starts the computer PSU, we close them with a jumper); gray +5 V; purple +5 V; white -5 V; blue -12 V.
If at least one of the above voltages is absent, then a PSU repair or replacement is needed. Otherwise, it is necessary to test the "motherboard" at the stand. The final diagnosis will be made by a specialist. It will also help to transfer the necessary files from the hard drive of a faulty computer to an external storage medium.
When installing a repaired PSU in-house, it is advisable to pre-test it without a computer. How to start the power supply is now clear. To extend the life of the PSU periodically (at least once a year), it must be purged with compressed air. And the uninterruptible power supply unit will take power surges on itself and ensure long-term operation of the computer without surprises.