To create a unique and fashionable design in the room using bulk 3D-flooring. This is an unusual and modern alternative to parquet or laminate. To create it with your own hands is quite possible. To do this, you need to have minimal skills in construction and follow a clear algorithm of actions. How to make a 3-D floor with your own hands? Step-by-step instruction and nuances - further in our article.
Characteristic
So what is a 3D floor? This is a seamless coating consisting of a canvas with an image and a polymer mixture. It consists of 4 parts. This is the base, base, film with a pattern or texture chips and a protective layer.
Before you opt for this type of finish, you need to consider that it is an expensive and long-term coating that will often fail to change. The room in which you plan to install a 3-D floor with your own hands should not be overloaded with decorative elements. It is necessary to think over the design in advance and select the furniture so that it is combined with the floor and does not overlap the important details of the image.
Selection of materials for work
To get a durable floor covering that will meet aesthetic requirements, you need to responsibly approach the choice of materials used. And for this it is necessary to determine where the floor is made and under what conditions it will be used.
Screed mortar
Now in the construction market there is a large selection of dry mixes for foundation construction. They are convenient to use and cheaper than cement.
Primer
If surface damage is slight, thixotropic putty or any quick leveling compound can be used. Give preference to quality products.
Main cast
As a fill for the 3D floor, only polymer compositions are used. They are transparent and resistant to ultraviolet radiation. The composition contains two components: hardener and polymer. Suitable for both the main and the finish layer.
Before buying, it is important to accurately calculate the consumption of the polymer mixture. The optical depth of the pattern depends on the thickness of the final coating. But applying too thick a layer without preparation will be difficult. The best way to fill the floor on your own is considered to be a finish coating with a thickness of 3 mm. Based on this, for processing 1 square meter you will need 4 kilograms of dry composition.
Decor
For the decorative layer using banners, vinyl films, individual elements - shells, stones. You can resort to the services of an artist and paint the surface with resistant polymer or acrylic paints. When choosing small piece material for decoration, special clay is additionally used to seal voids between parts.
The 3D floor is considered expensive when making it with your own hands when ready-made images printed on fabric or banner paper are used for decoration. But you can save and process the picture yourself. To do this, you need the program "Photoshop" or any graphic editor.
When selecting images are guided by the following principles:
- Do not chase fashion and succumb to a momentary mood, as desire and trends quickly change.
- Choose unobtrusive pictures. Landscape is a great solution.
A well-chosen pattern can visually increase the space and add light to a small dim room.
Photographing
You need to take a picture of the room where you plan to install bulk 3-D floor with your own hands. The entire area of the room should fit in the camera lens. For this, it is more convenient to photograph while standing in the doorway.
Edit
Upload the photo to the program and overlay the selected image. It is important that it be of high quality. Connect the edges of the image to the floor so that it fits along the perimeter. Cut off all unnecessary and align in a rectangular shape. Edit the quality of the photo and give it to print.
Print
Services of photo firms will cost less than buying a special image. But in order not to make a mistake, it is better to pre-order a black-and-white canvas on plain paper. Lay it out on the floor, and if the view is realistic, print a color image on the banner.
Accessories List
After selecting the basic materials for the device 3-D floor do-it-yourself tools are prepared:
- construction vacuum cleaner;
- needle and fur roller;
- Sander;
- mixer and drill with a special nozzle for mixing mixtures;
- serrated and leveling spatula;
- studded shoe pads;
- trowel.
What's next? How to make a 3-D floor with your own hands? You need to start with the preparation of the foundation. It depends on how long such a floor will last.
Foundation preparation
If there is a screed, you need to evaluate its condition. Height differences, significant defects and cracks are not allowed. In the case when the surface does not meet the requirements, it is necessary to perform a new screed.
If the old floor in the room is wooden, then work begins with dismantling. To clear and level a surface. Coat all seams and potholes on the base plates. Then the subfloor is cleaned of dust and construction debris.
It is important not to allow horizontal slope. Otherwise, the polymer pouring process will become more complicated and the consumption of materials will increase. Sand the surface to remove any bumps. In conclusion, the finished base must be thoroughly vacuumed. It is better to use a construction vacuum cleaner, because the household will become unusable from cement dust.
Primer surface
For better adhesion of the first polymer layer to the base, a primer is applied. It is distributed using a soft roller or a large paint brush. It is necessary to cover the surface evenly, with a thin layer. Thoroughly grease the joints of the walls and floor.
This procedure should be performed twice. The second time you need to prime only after the first layer has dried. And then leave the room for at least one day.
Drawing base - instruction
A 3D floor is created with your own hands, starting from the base layer. The components are mixed in a suitable container with a mixer and nozzle to a uniform color and consistency. Manual preparation of such a solution will not work, because it will take a lot of time. And the mixture has the ability to solidify quickly.
When preparing a polymer solution, it is important to strictly observe all proportions. Otherwise, the composition may turn out to be liquid or, conversely, viscous. In both cases, this will adversely affect the strength and durability of the floor.
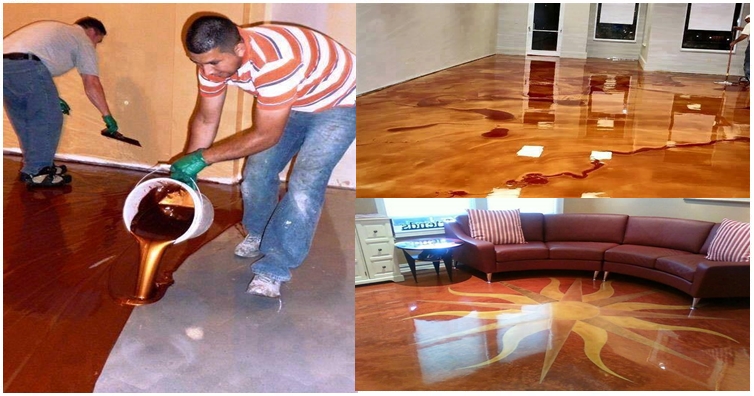
You need to work on the pouring together, as the process is time-consuming. The minimum thickness of the layer is half a centimeter. If it is decided to make the base layer thicker, then beacons are additionally used, which are removed at the end of the work. The solution is distributed on the surface of the prepared base from the opposite angle from the front door and is leveled with a spatula. Pour the mixture in parts. Then, putting on kraskostoy, go through a studded roller. This procedure will remove all air bubbles.
Now the surface must be left to harden for a day. After complete drying, the evenness of the base layer is checked. When applying the polymer, all windows and doors in the room must be tightly closed. Otherwise, dust particles may get on the coating.
Decorating with real elements
If small details (for example, sand, shells or stones) serve as decoration, then you need to think about their arrangement in advance. All elements should be approximately the same in height. For bonding to the base will serve as a polymer mixture. It is applied in a single layer to a small area, after which the decorations are laid out. Then you can move on. When the decoration is completed, it remains to seal the holes with polymer clay and allow to dry.
Bonding
There are self-adhesive images for creating a 3-D floor with your own hands. Their use simplifies the execution of work. Gradually removing the protective film, the pattern is transferred to the surface and rolled by a roller.
A polymer composition is also used to adhere the printed banner. The solution is quickly applied with a thin layer on the prepared base, then the canvas with the image is laid and leveled. To prevent the formation of bumps on the final coating, all excess air is removed at this stage. With a rubber roller, you need to roll the surface from the center of the room to the sides. And finally, all excesses are cut off with a very sharp (clerical) knife.
Art painting
For self-painting, high-quality acrylic paints are used. When the drawing is completely dry, it is covered with a fixing transparent varnish.
Finishing layer
The finish layer is:
- matte;
- glossy;
- smooth;
- rough.
If the 3D floor will be mounted in the bathroom, then for safety reasons it is worth choosing a rough surface.
The mixture for this layer is prepared in the same way as for the base. Before pouring on the walls, height marks are drawn - reference points. You need to start work from the far corner, gradually moving towards the exit. Use a needle roller to remove air. Leave the floor to dry for two days. During this time, do not allow any contact with the surface, and ventilate the room. To make the 3D floor last longer, it is coated with colorless mastic. It happens:
Professional Tips
Knowing the manual on how to make a 3D floor with your own hands step by step, it will not be superfluous to read about some of the nuances and tips of specialists:
- Buying a polymer mixture is not worth saving. It is better to give preference to high-quality, proven brands. Before going to the construction store, it is important to calculate the required amount of dry mix. Add another 10 percent to the result. This is done in order to have a margin when pouring the polymer composition.
- When mixing the mixture, be sure to strictly follow the instructions and use the balance. Even a slight deviation from the recommendations will make the final work ugly and of poor quality.
- When choosing a 3D-drawing, it is worth considering the size of the room for which the bulk floor is arranged. If the room is less than 10 square meters, the image will not be visible.
- Before starting to fill a new layer, you need to make sure that the previous one is completely dry. To do this, a day after application, you need to cover the surface with plastic wrap and wait another day. If water forms under it, it means that the floor is still not dry enough, and you cannot proceed to the next step.
- During operation, check that there is no debris, dust or other foreign objects on the floor.
- To avoid deformation and cracks, when performing work around the perimeter, a damper tape is laid.
- During the entire pouring process, the temperature in the room should not be lower than +10 degrees.
Benefits
You can highlight a number of pluses of the 3D floor created by yourself:
- the surface of the finished coating is smooth and perfectly even;
- the bulk floor has no seams and joints (which means that debris, dust and moisture will not accumulate on it);
- due to the invulnerability to abrasion, the service life is more than one dozen years;
- 3D-floor is better than others for rooms with high humidity, as it has good waterproofing characteristics;
- the floor is practical and resistant to bumps and chips;
- the materials used in the work are non-toxic and environmentally friendly;
- resistance to ultraviolet radiation;
- aesthetic appearance and diverse choice for design solutions.
disadvantages
In addition to the advantages, there are some disadvantages of the 3-D floor, which you create yourself:
- expensive set of professional equipment for work;
- the complexity and complexity of creating a perfectly even coating;
- the pouring and drying process takes a lot of time;
- increased requirements for care;
- high price.
Care
To fill the floor served for a long time and looked attractive, he needs regular care. Every six months a special colorless mastic is applied. If the room is planned for repair, then the surface is covered with a film for protection. You need to wash with special detergents, and then wipe with a clean rag.
Conclusion
The article presents a photo of a 3D floor made with one's own hands. It is popular in modern design. It is made in residential and industrial premises.
You can simplify the process by hiring a specialized team, but it can cost a lot of money. At the same time, several days will have to endure the presence of strangers in your house. As an alternative, you can make a 3-D floor with your own hands. Step-by-step instructions were presented above.