In the framework of this article, the selection and installation of such a device as a WiFi router will be described in detail. Tuning, testing and other important nuances will also not be overlooked. There is nothing super complicated about this. Each user can easily cope with this task, regardless of their level of training. Conventionally, this procedure can be divided into the following steps:
- Choice of a router.
- Conclusion of a contract with a provider for connecting services and cable entry.
- Pre-switching
- Setting up the router.
- The final connection.
- Testing.
After all these manipulations, you can browse websites and blogs, download the necessary information from the Internet and perform other actions.
Before starting work
At the first stage, you need to choose a WiFi router. Setting up, testing and concluding an agreement with a provider are the next steps. If until recently there were certain problems, now everything has been greatly simplified. It was necessary to pay attention to the characteristics when buying, but now it is possible to programmatically set all the necessary parameters without problems. Therefore, everything depends on either the purchase budget or personal preferences. “D-Link”, “TP-Link” and “ASUS” devices have proven themselves in this niche - it is recommended to pay attention to them. Next, you need to familiarize yourself with the instruction manual in order not to return to this issue later. Then we select the provider. At the same time, one must proceed not only from the price, but also from the quality of the services provided. To do this, we communicate with neighbors and find out who works best for the network and who is very pleased with the service provided. At the next stage, we conclude an agreement and make an advance payment. Then you need to wait until the provider’s employees get the cable to connect. It usually takes up to 3 days depending on the intensity of orders. At this preparatory stage is completed.
Preliminary connection
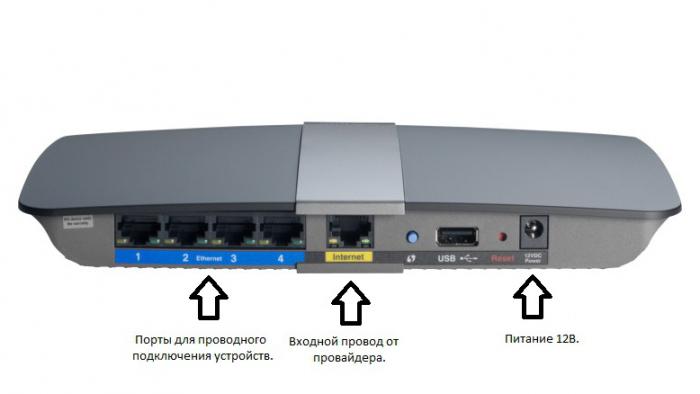
At the preliminary connection stage, we install a router next to the system unit or laptop. It is not necessary to connect the incoming wire from the provider to it. It is enough to install its power supply in the socket, and the wire from it - in the corresponding socket of the router. The twisted pair that came with the device is connected at one end to the port with the abbreviation “LAN 1” (it must be either yellow or gray), and the second to the network card of the system unit or laptop. Most modern computers are equipped with such an integrated adapter, so this should not be a problem. In extreme cases, you can install such an external device in the expansion slot. On this, the preliminary connection is completed.
Setting parameters
Further customization can be implemented in two ways: using specialized software or using a browser. The second method is more universal. Therefore, we will focus on it. First, turn on the personal computer and the router. We are waiting for each of them to finish loading. Then we launch the browser and enter the address. The first part is the same - "192.168.". But the second needs to be clarified in the instruction manual. For example, setting up a TP-Link WiFi router of any model requires an end of 1.1 in this address. The second option is "0.1". Then press “Enter”, and immediately after that a window will appear in which you need to enter your login and password (they are indicated in the instruction manual). Then the router setup menu will open. Here you need to set the parameters of the wireless network: network name, access key, encryption method. Each manufacturer has an individual menu structure, but the items we need have similar names. Therefore, we look through the instruction manual and find the necessary information in it. For example, setting up a DIR-300 WiFi router from D-Link requires entering the “Network” section, and in it we find “Connections”. Here we set the following parameters:
- The name of the access point is up to you.
- The type of connection, the automatic receipt of the IP address and DNS server are set in accordance with the contract concluded with the provider. This information is necessarily there.
Click “Save” and go to “Wi-Fi / Security Settings”. Here we set the following values:
- Network authentication should be “WPA2 / PSK” (this encryption method allows you to get the maximum degree of protection, unlike the others).
- Set the PSK key (minimum 10 characters).
- The encryption method is set to "AES".
We save the changes made by clicking on the button of the same name. Turn off the computer and the WiFi router. Its configuration is over, we disassemble the circuit and install the router in a permanent place.
Final connection
We assemble the circuit as follows. We connect the power supply, wire from the provider, twisted pair cable to all other devices that are planned to be connected in this way. Then turn on the router. After the download is complete, the wired part of the grid is already connected to the Internet. But the wireless segment requires additional configuration. To do this, open the list of available connection points with a single click of the left mouse button on the icon ("ladder" in the lower right corner of the screen on the taskbar) of network connections. In the list that appears, select the name of the network that was set in the previous step. Then enter the access key. After receiving the network address, everything is ready.
Testing
To check the operability of the network connection, just start the browser. Then enter the website address and press "Enter". If everything is done
correctly, the process of downloading the Internet resource will go. At the end you will see the start page.
Conclusion
In the framework of this article, recommendations were given on choosing a network device such as a WiFi router. Setup, connection, and testing were also considered. There is nothing complicated about it. Each user can cope with this task, as we have already said. It is enough to follow the instructions that were previously outlined in this material, and you should have no problems. In extreme cases, you can always contact the service support provider, where you will be provided with the necessary advice.