Every year, wooden houses are becoming more popular, as they are environmentally friendly, warm, comfortable, easy to build and inexpensive. However, this material belongs to the category of flammable, therefore, in the process of construction it is necessary to take into account many nuances. This is especially true of connecting the building to the electric network, since quite a lot of requirements are imposed on this type of work. If you have at least some experience in construction, then you will not have any special problems with this, but, as practice shows, most average citizens do not have it, so they make a huge number of mistakes, which in the future can lead to very serious the consequences. To prevent this from happening, this article will describe in detail from beginning to end the installation of wiring in a wooden house with your own hands.
Safety requirements
So what are they? Safety is a very important aspect when connecting a residential building to the mains. If you make the slightest mistake, the consequences can be simply disastrous. According to statistics, every year in a fire resulting from a short circuit in the wiring and subsequent fire, thousands of people across the country die. Therefore, it is very important that the wiring in a wooden house (installation rules will be described later) is reliable.
Basic safety standards state that:
- All wires and their connections must be insulated with non-combustible materials.
- The core must be made of their high-quality material, best of copper, and also have an insulating layer that does not allow electric current to pass through.
- The most secure is an open installation method, since it provides the ability to monitor the condition of the wires.
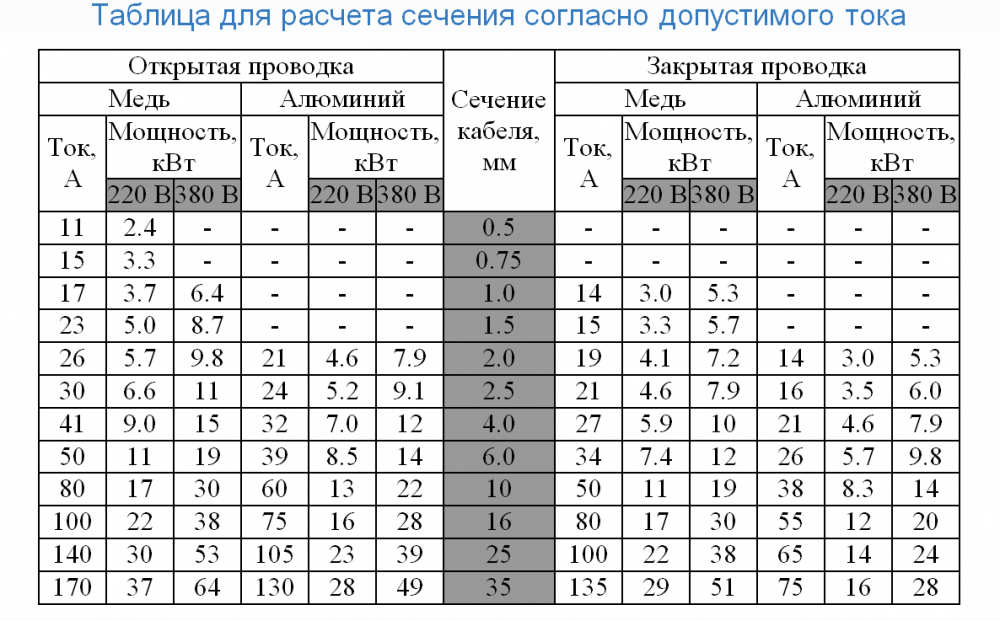
- When choosing wiring, you must first calculate the optimal cable cross-section so that it can withstand the created load.
- If you have a wooden house, electrical installation must be carried out through the distribution panel, equipped with an automatic power cut-off system.
- For cable laying, only metal pipes can be used. If they are steel, you must provide grounding.
- Buy only quality cables from reputable manufacturers. Not only will they last much longer, but the likelihood of fire will be much lower.
If you follow all the installation rules listed above, the wiring in a wooden house will turn out to be reliable and will comply with all fire safety standards, so the property you acquired will be in complete integrity.
Wiring Methods
Let's dwell on this in more detail. When planning to independently carry out wiring installation in a wooden house (PUEs were described in detail above), you need to decide in advance how it will be performed. The thickness of the cable section and the required amount of consumables depend on this.
Today, there are two types of wiring:
The latter option assumes that the cables will be laid under the casing. This method is good for its aesthetics, but it is much more difficult to implement, so you need to design the wiring at the stage of pouring the foundation, because if any errors are made, then to eliminate them, you will have to dismantle the siding and redo everything from scratch.
The open version is less attractive, since the wires are in plain sight, but it is simpler and anyone who does not have such experience can cope with it. In this case, the cable is laid along the walls, and installation is carried out using copper or aluminum rubberized wires. In this case, you will need significantly less consumables, so you can save quite a lot. As for its aesthetics, this retro-wiring, which has an attractive appearance and gives the room a certain zest, will easily solve this problem.
An open way to place wiring
What is its feature? Installation of open wiring in a wooden house is the best solution when erecting buildings made of flammable materials, since the wires will not come into contact with them.
It can be performed in various ways, among which the most common are the following:
- Using an electrical conductor that mounts directly to the wall. The cable is clamped with special clips that are made of non-combustible materials.
- Wiring in special polymer cable channels. This option is good in that all the wires will be hidden from human eyes, so the interior of the rooms will look more attractive. The channels are fixed on the wall using ordinary wood screws, after which wires are laid in them and closed with a lid.
- Laying in a metal corrugated pipe. Perhaps one of the most common methods, since this consumable has a low cost, good strength and durability, and also freely accommodates several cables at the same time.
- Installation of electrical wiring in polymer pipes. It is an alternative to the method described above, however, it is more difficult to work with this material than with corrugation.
It is worth noting that the installation of retro wiring in a wooden house will also be an excellent option. It initially has an attractive appearance, so hiding it inside plastic or metal pipes is not necessary.
Hidden way of wiring
What is he like? Installation of hidden wiring in a wooden house is not very popular, because it is very time-consuming and problematic. In addition, homeowners do not want to sheathe walls, as a result of which this method simply cannot be used.
If you are serious about this method of laying the cable inside the house, then be sure to consider the following nuances:
- Wiring must be laid in metal pipes or corrugation.
- So that water does not accumulate inside the protection, it should be placed not strictly vertically, but at a small angle.
- Sockets and switches must be metallic and must be earthed.
It is also worthwhile to understand that if you perform such installation of wiring in a wooden house, in the event of any problems with the cable, you simply can’t get to it. You will have to completely remove the skin from the walls in the room. This is a very time-consuming process, so it would be best to dwell on an open way to place electrical wiring.
Wiring diagrams
What you need to know about this? Many people think about how to install wiring in a wooden house with their own hands. There is nothing complicated in this, if you think carefully in advance. In order to avoid mistakes that, as a rule, all beginners make, before laying the power grid, it is worthwhile to draw up a diagram depicting a detailed plan of the future structure and wiring. This will not only make everything more rational, but also minimize the chance of damage to the wires. The drawing should also indicate the location of all outlets and switches.
To get the circuit as it should, adhere to the following rules:
- The switchboard should be mounted on the ground floor, at eye level, so that small children do not accidentally climb into it.
- To the interior of the apartment or house looked more attractive, the switches should be placed at the same level above the floor. As a rule, a distance of 80 to 100 centimeters is selected.
- Regardless of the method by which wiring is to be carried out in a wooden house, the wires should be at a height of 20 centimeters from the floor or ceiling.
- Outlets can be installed without reference to the place, since the PUE does not say a word about them. The main thing is that in each of the rooms there should be at least one.
After the drawing is completed, you can go to the store to purchase supplies.
Preparatory stage for laying
Installation of wiring in a wooden house is a very complex process, in which you need to take into account many nuances. First of all, you need to contact the organization involved in the power supply of your region and get technical specifications from it. If your site is already connected to the public network, then you can skip this step. Next, you should calculate the required power, taking into account all the electrical appliances that you will use. As practice shows, on average, power is required from 5 to 10 kW.
When all the calculations and formalities are over, you need to decide which cables you will use for laying the mains. This is very difficult, since the features of the construction of buildings made of wood impose various restrictions. If there are double sockets in the room, then the wire should be three-wire. In addition, a junction box must be present in every building. Each of them should be given great attention, since most often ignition occurs at the junction of the wires. Therefore, all contacts must be well insulated.
A few words about the materials
The wiring (an electrician will perform it without problems, following the instructions) will be able to withstand the load created on it only if the cable section is correctly selected for it. But this does not mean at all that the higher it is, the better. In this matter accuracy is very important. At the same time, you do not have to consider something yourself, since you can use the already prepared table of recommended power.
If the cable will be laid inside the house in an open or closed way, then the material from which it is made does not matter. But in case you plan to perform the installation of outdoor wiring in a wooden house, this should be done exclusively using copper supplies. Firstly, they are more durable, therefore the least problems arise with them, and secondly, their conductivity is much higher, due to which the best performance characteristics are achieved. The best option would be a NYM copper cable that combines the perfect value for money. The role of insulation in most cases is performed by metal pipes or corrugations made of modern polymeric materials. The latter have low flammability, and self-extinguish in case of fire.
The process of laying a power grid in a residential building
So what does it consist of? Wiring must be carried out in a strictly defined sequence. Thanks to a clear plan, even a novice who has never worked with electricity before will be able to cope with it. When you have a drawing ready and everything you need is purchased, first of all you need to run a cable that will connect the living room with a common power line.
Next, the step-by-step installation of the wiring section in a wooden house is as follows:
- The cable runs from the shield to all rooms where there will be electricity.
- Installation of sockets, switches and junction boxes is in progress.
- The wires are connected to a single network. This is one of the most difficult processes, because you need to make sure that the contact is good, and also carefully isolate everything.
- At the last stage, switches and sockets are connected.
When all installation work is completed, it is necessary to carry out inspection and testing of the power supply to make sure that everything is done efficiently and reliably.
Wire insulation
What is it for? If you performed the installation of retro-wiring in a wooden house, then this step can be skipped, since consumables are already sold with insulation. In all other cases, it should never be missed, since it depends on the safety of people living in the house. If in some place the cable is not insulated, then there is a high probability of electric shock, which can lead to death.
When choosing insulation, you need to consider many parameters. The main among them is the maximum power indicator that the cable can withstand. As a rule, this value varies from 600 to 100 watts, which is more than enough for use in residential buildings. In addition, good insulation should have high frost resistance, since in most regions of our country a very harsh climate.
If the electrical wires are located outside the building, then the insulation must be resistant to ultraviolet rays, unless, of course, you want to change it often. Cheap materials deform very quickly, as a result of which their operating time is reduced. The same applies to high temperatures. As electric current passes through the cables, they heat up. If at the same time the wire is damaged in some place or a large load starts to be created on it, then the temperature can rise to very high values, which creates a high probability of fire.
Installation of distribution board
Where to start? After the installation of wiring in a wooden house is completed, you can proceed to the next process. This will be the installation of the shield. He is not only responsible for accounting for energy consumption, but also performs a protective function if equipped with an automation system. If you encounter any problems, it will independently turn off the power supply.
First of all, it needs to be equipped with an electric meter. Next, an introductory protective device is installed and a phase and zero are brought in, after which the device is already connected to the general power supply network and the residential building. At the very end, fuses, voltage control relays and automatic devices for various types of electrical appliances are installed in the shield. It is worth noting that it is advisable to leave a little free space inside the shield so that in the future, if necessary, be able to connect additional equipment and machines. If your home will have an autonomous heating system, a washing machine or any other household appliances that consume a lot of electricity, it is recommended that they be connected through separate machines to reduce the load they create on appliances and cables.
Connecting the building to a common electrical network
So, you have completed the electrical work, but there will still be no light in your house, since the building needs to be connected to a common electrical network. In theory, there is nothing complicated, but in practice, this is far from the case, since many people are faced with many difficulties.
Cable laying in this case can be done in two ways:
Each of the options has both advantages and disadvantages, which must be taken into account. The first method is much easier to implement and requires little financial cost. To do this, you need to buy self-supporting wires with good insulation. The cable is routed inside the building through a fireproof sleeve that is installed inside the wall.
Installation of email. wiring in a wooden house when the cable to the room is supplied underground, is more complex and financially expensive. Firstly, you need to purchase a high-strength cable, and secondly, metal pipes that will play the role of insulation. In addition, you should take into account that if you want to use this particular method, you will first have to coordinate your intentions with the energy company serving your region.
Power Testing
So, you have completely finished wiring and are ready to start using electricity. However, do not rush to do this, because first you need to check the communication system. To do this, you will need an accurate measuring device used in electrical laboratories, or a conventional multimeter.
Testing is performed as follows:
- Visual inspection
- Measurements of resistance on an insulating layer of an electric wire and grounding.
- Checking the correct operation of the phase-zero circuit.
- Testing fuses and automatic protection systems.
- Taking readings from grounding on the shield.
, . , .
In conclusion, it is worth noting that electrification is a very difficult task that requires certain skills and knowledge, so before you begin installation, you should think carefully about everything. If you are not confident in your own abilities, then it is best to entrust this to qualified specialists. Remember that working with electricity is very dangerous, so do not risk your life in vain.