Puttying the walls with your own hands for wallpaper and painting is not an easy process and requires certain knowledge and skills. You should immediately pay attention that those who decided to perform this work will need to be patient. However, with a great desire, everything is possible: to work with spatulas, learn to use a level, maintain a plane, etc.
Of course, theoretical knowledge is not enough, in order to perfectly master this art, you need to practice a little. It is better to study in those places where you can then hide defects without any particular damage. But you still need to know the technology and sequence of work. The theory should not be completely excluded, since the puttying of the walls under the wallpaper with your own hands without observing certain standards will not give the necessary result. But it is precisely this process that is responsible for the overall perception of the finish. These works not only give the walls evenness, but also protect them from cracking.
Types of putties
Puttying the walls is the basis of any repair - both overhaul and cosmetic. However, in order for the final result to meet the stated requirements, it is not enough just to master the correct application technique, you will still need to choose the appropriate material. Currently, many brands offer different types of putty. Their difference in price, composition and, of course, quality. Those who have already faced the choice of this material, noticed that the mixtures have different names. As a rule, this is explained quite simply: each of them meets certain requirements. Consider the most common of them.
- Universal putty for wallpaper. Puttying the walls with your own hands with this type involves applying both rough (starting) layers and finishing. With its help, you can even out small differences up to 3 cm, as well as completely prepare a smooth surface for a fine finish. However, it should be noted that this kind of finish will not be suitable for painting, as minor scratches may be noticeable.
- Special putty. The cost of such material is slightly higher than usual. This is mainly due to certain properties that are not present in other types of putty. Using it for other purposes is unprofitable.
- Starting putty. By technical characteristics, it resembles plaster. However, working with her is much easier. First of all, this putty is used to smooth surfaces with large differences. Its indisputable advantage is the thickness of the applied layer at a time (up to 5 cm). It is also worth noting that such a mixture is very plastic, and this greatly facilitates the workflow.
- Finishing putty. This view is not recommended for alignment. It serves only for applying a finishing layer that completely covers defects on the starting coating. Puttying the walls under the wallpaper with your own hands with the help of such a composition will greatly facilitate further finishing work.
The base of the walls: types and features
For the construction of multi-apartment buildings, brick or concrete slabs are used. But suburban buildings can be built of wood. It is worth noting that all these surfaces must be putty before finishing. For each base, it is necessary to correctly select not only a certain type of mixture, but also the application technology.
- Brick walls are usually plastered. After this layer is completely dry, it is necessary to give it time to shrink, since small cracks can form during this period. The next step will be priming. For this, a special solution is used, which acts as an adhesive. Before applying putty, the surface of the plaster layer must be thoroughly cleaned. And only after that putty is applied under the wallpaper.
- Puttying the walls with your own hands in panel houses requires a slightly different sequence. There is no need for plastering. However, before applying the putty, you need to look at the surface of the concrete base on unevenness, as quite often there are multilevel seams, protrusions and other defects. If possible, then it is better to cut them off, if not, then align with starting putty.
- Processing wooden substrates is much harder than the above. First of all, you need to choose the right putty. Here, mixtures containing linseed oil are suitable. In order to keep them on wood, you can use a special acrylic primer.
So, we will consider in more detail how to work correctly with different substrates in such a critical process as wall putty.
How to putty walls under wallpaper (concrete slabs)?
A feature of the concrete base is the smoothness of the surface. In order for the putty to stay firmly on it, it is necessary to make it rough. To do this, it is recommended to use a special primer, which includes quartz crystals. You can also use a reinforcing mesh, it is made of plastic, very light in weight, but the coupling of the solution with the base is quite strong.
It is necessary to start filling concrete walls with the starting mixture. It will completely block all defects in the plate and, if necessary, correct irregularities. For ordinary walls in the room, a spatula measuring 30 cm is perfect. After the adjustment layer dries, the surface is slightly sanded and primed. With large differences, the application of the starting solution is repeated several times. At the end, putty is applied very finely. Such preparation is quite enough for wallpaper, but if you need to paint the surface, you will need 2-3 layers.
Puttying of brick surfaces
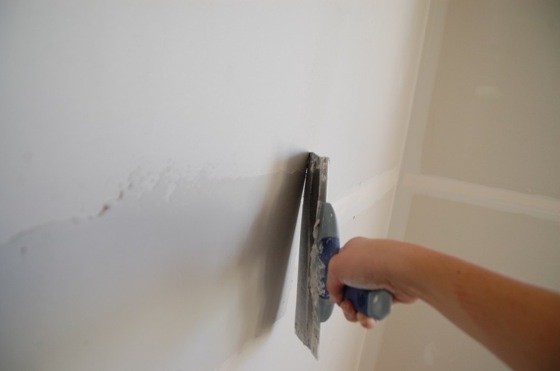
Walls made of bricks are often far from ideal, here you can encounter large level differences. Unlike panel ones, smoothing the surface evenly will be quite difficult. As a rule, such work is performed on lighthouses, for plasterers this concept is very familiar. Starting putty should not be liquid, because the layer will be thick enough. Up to 5 cm of solution can be applied at a time. The putty of the walls under the wallpaper with your own hands is applied both from below and from above. In order to avoid irregularities, you need to use the rule: you can putty putty on with a spatula or trowel. Depending on the thickness of the layer, the drying process can take from 2 to 5 days. The technology for applying subsequent layers is the same as with concrete surfaces.
Putty on a wooden surface
For work with wooden surfaces use a special acrylic putty. It is easy to apply with a spatula, very flexible. However, the maximum layer thickness should be no more than 2 mm. If there is a need to cover deep defects, then putty is applied in several approaches. Before wallpapering, it is recommended to paint the surface with oil paint. There is another way to putty wooden walls. To do this, you need to take the grid, attach it with brackets to the base, and you can apply the solution. If roughnesses on the surface do not exceed 3 cm, then just finishing putty is enough. However, the layers must be applied in several passes.
Working with starter putty: highlights
- In order for the rough putty of the walls under the wallpaper with your own hands to keep well on the base, it is recommended to use a paint net.
- Large bumps on the walls line the lighthouses.
- In order to prevent the putty surface from cracking, the solution must be applied in layers no thicker than 3 cm.
- The base for the starting putty should not be too smooth.
- It is advisable to coat each subsequent layer with a primer.
Do-it-yourself finishing putty on the walls: instructions
- The thinner the solution, the more elastic it lays on the surface.
- The finish putty layer should be as thin as possible.
- If the surface will subsequently be painted, then the movements should have one direction during the application of the layer.
- In order for the surface to become smooth after drying, it is sanded with a fine mesh or sandpaper.
Common mistakes
Any repair is an expensive pleasure. However, you can significantly save if you perform some work yourself. This is where the puttying of the walls with your own hands belongs. How to eliminate mistakes that a newbie can make in this matter? Consider the most common of them.
- The recommended layer thickness is not respected, resulting in cracks.
- The use of certain types of putty is not for its intended purpose, for example, the alignment of surfaces is done with a finishing solution.
- Poor application of the primer leads to the falling off of the upper layer.
- Cracks and seams are not handled properly, for example, without embroidering or using sickles.
- The application of the next layers of putty on the non-hardened base leads to a loss of plane and sagging levels.