Unfortunately, not every user, when buying a new hard drive, imagines that after installing it in the system unit it will be impossible to work with the hard drive right away, considering that it is enough to insert the corresponding loops into it and fix it with screws, and the system will determine the device itself. First of all, after installing the equipment, the hard drive must be initialized. Windows systems will not do this automatically, so all operations will have to be done independently.
Installing a new hard drive
Before you directly deal with the problem of how to initialize the hard drive, you should deal with its correct installation in the system unit with the connection, observing some rules and precautionary methods.
To do this, when the computer is turned off and the power supply is disconnected, you need to remove the side cover. Then, which is very important, before installing the hard drive in the slot, it is necessary to remove the electrostatic charge from your body, in the simplest case - simply by touching both the nose of a regular water tap or the chassis of a disconnected system unit. After that, the hard drive is fixed with screws and connected to the motherboard with the appropriate cable and jumpers in compliance with the Master / Slave rule (main or dependent drive), after which the side cover of the case is replaced.
Initializing the hard drive in BIOS settings
Now you can proceed to the initial setup of the installed hard drive. First, you need to turn on the computer and go to the settings section of the primary BIOS I / O system. Usually, Del, F2 keys or some combination are used for this, which at the start will be shown on the monitor screen.
Here in the main section, where all the devices that are currently connected to the motherboard are shown, find your hard drive, given its interface (SATA or IDE). If the hard drive is detected, you can proceed to the main setup using the BIOS exit and then automatically rebooting. Otherwise, if the device is not in the list or the Not Detected line is present, after exiting and disconnecting the PC, you need to check the connection again.
How to initialize the hard drive: the main tool of Windows
We assume that the hard drive in the BIOS is defined. Now you need to initialize the disk. Windows after a full boot automatically recognizes the new device and installs the appropriate drivers for it (you can verify their presence by viewing the drivers folder of the System32 directory, where disk.sys and partmgr.sys files will be present). At this stage, the disk itself is not visible in Explorer, although it is physically present in the system.
Disk initialization is performed using the system’s own tool in the disk management section . You can call this section from the “Control Panel” through the administration system with a choice of the computer control menu or from the right-click menu on the computer icon, but using the “Run” console looks easier and faster, the line of which says diskmgmt.msc.
Starting initialization and setting boot record type
Now the disk is initialized. First, select your hard drive in the list of devices present (it can be marked as “Disk 1”, “Disk 2”, etc.), then right-click on the menu and use the initialization line in it.
Then a window will appear in which you will need to select the line of the main boot record MBR, then press the confirmation button (“OK”) and wait for the process to complete.
If the hard drive has a volume of more than 2 TB, you will need to set the GPT attribute (otherwise it will be impossible to use a large amount). If an error occurs during initialization of the disk, you will need to apply appropriate measures to eliminate it. This will be discussed separately.
Volume Creation Process
The next step is to initialize the disk by creating a partition. This is done so that the computer system can "see" the disk.
Right-click again on the selected drive, and select the line for creating a simple volume from the context menu, after which the corresponding "Wizard" opens, in which the continue button is clicked.
Further, the initialization of the disk provides an indication of the size of the created partition in megabytes (immediately do the recount, since 1 GB does not contain a thousand, but 1024 MB). This is usually not required because the system automatically indicates the size of the volume.
At the next stage, you need to assign a letter to the section, according to which it will be determined by the system. Here you need to be very careful not to assign the drive an already occupied identifier, which may correspond to other removable media (CD / DVD-ROM, USB devices, etc.), since in the future they may seem inoperable due to the fact that the system does not recognize them corny.
File System Selection and Formatting
Finally, the initialization of the disk comes to the final stage, at which it will be necessary to format the created partition.
Here, it is better to specify NTFS as the file system (it is considered more stable than FAT32, and can save files larger than 4 GB), leave the cluster size at the default value of 512 bytes (this will allow more efficient distribution and use of the resources of the created partition), in as the volume label, enter the name that will be displayed in the system (file manager and context menus), and uncheck the quick format (for the first time it is strongly recommended to perform full formatting, which will allow ezhat problems later). The compression of directories should not be used, since this can only lead to a slowdown of the disk associated with the speed of reading or writing information to it.
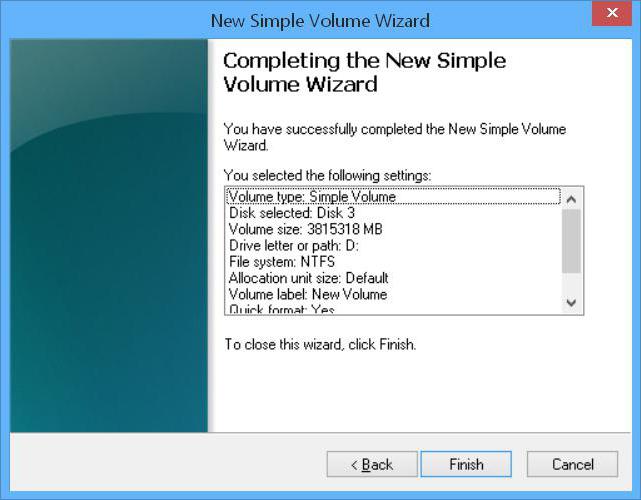
Next, go to the completion window and, if all the parameters are set correctly, click the start button for formatting (Finish). If you need to change some parameters, use the button to return to the previous menu. At the end of the process, the system will display a message in the form of an autorun window, if enabled. But sometimes a warning may appear that the disk is not initialized.
What if initialization errors occur?
There are usually no such problems with new hard drives. But if the system displays a message stating that the disk is not initialized, you can use the command line (cmd in the Run console) to fix it.
It first uses the diskpart command, to view and select the disk you need - list disk, and to clean the partition table - clean. After that, you can format it manually using the sequence of commands create partition primary, select partition 1, active and format fs = ntfs, which are entered without punctuation marks by pressing the enter key after each of them.
In other cases, you can use specialized programs such as Partition Magic, but if no tool helps, you will have to re-check the connections or look for malfunctions in the hard drive itself (this may be physical damage). For these cases, you can try to use the HDD Regenerator program , and then perform all the above operations again.