Zyxel launches its own Wi-Fi routers. As it became clear from previous experience, once a year the manufacturer necessarily provides its customers with an update. Some modems after the next change received improved not only the hardware, but also the firmware. This happened with the Zyxel Keenetic Lite III Rev B. device. Setting it up is as simple as possible. Let's consider some changes from the predecessor "Light II". In the updated version, the antennas are mounted not on the back, but on the side. Thanks to this solution, it is easier to mount the device on the wall. The power remained the same. On the back panel you can see the presence of mode switches. If we consider the new option in more detail, then in fact this is the implementation of a new chip. Its frequency is the same as it was - 580 MHz. Everything else for these two models is exactly the same.
Benefits
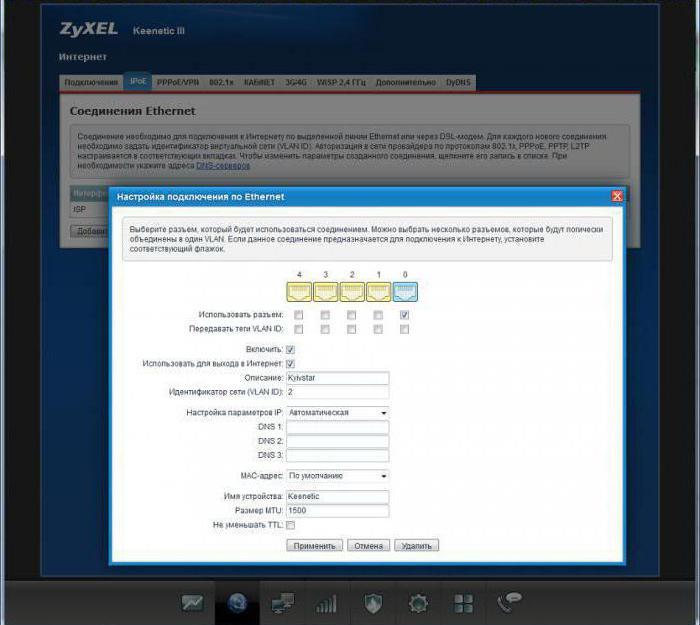
The described router can work with any provider and network that it provides. At the same time, the choice of connection does not matter, since the device easily operates with each of the modern options. Although there are some exceptions, these are providers using authorizers and similar options for Zyxel Keenetic Lite III. PPPoE configuration is described below.
Supported by interactive television on various modern technologies.
Built-in 802.11n wireless module. It supports work with connection restrictions, guest mode (networks), and so on.
It can work with many third-party DNS services: Sky and Yandex.
Batch assembly of router software is allowed, if necessary. Implemented using the utilities repository.
Connection
Before making any settings, it is necessary to connect the device to a computer or laptop. Changing the characteristics while working wirelessly is strongly discouraged. Otherwise, the Zyxel Keenetic Lite III router may break. Setup should begin by setting the main operating mode. Next, you need to connect the power cable. How to understand that the router is turned on? The corresponding indicator on the front panel lights up. After that, you need to connect the provider's wire to the device, then to the computer. If everything happened successfully, one more indicator will light up. Now it remains to create a home network. It is necessary to take the wire that comes with the kit. It is short and clearly stands out from the rest. It is called a patchcord. One end must be connected to the router, the other to the computer’s network card. If there is any problem, you should find out the reasons. There are a number of nuances by which a network card may not see the cable.
Reset
In order to reset the Zyxel Keenetic Lite III (which is highly recommended immediately after connecting the device and starting to work with it), you need to find a special key on the case. It is located on the side of the router. It should be pressed with any thin object. It is necessary to clamp for 10-15 seconds, until the indicators begin to flash. After it should be released. After a minute, the router will reboot, all settings will be standard. In no case should you turn off the power during this process.
Control Panel Login
After the router is turned on and the network card is configured, you can begin to configure the modem. You must go to the control panel of the device. To do this, open any browser and go to the address 192.168.1.1. The welcome page opens. To work with this address, an Internet connection is not necessary.
After that, the router will ask for permission to automatically configure. It is pretty fast, but it should be skipped for now. Go straight to the web configuration. Immediately after the transition, the router will prompt you to set a new administrator password. The combination can be any. Then you just need to click on the "Apply" button. This completes the setup of Zyxel Keenetic Lite III.
The page will reload, a dialog box will appear in which you must enter the login “admin” (in English) and the previously specified password. Next, just click on the OK button. Now the user can safely configure the router.
Basic setting
Many readers are interested in the step-by-step setup of Zyxel Keenetic Lite III. It is she who will be presented later in the article. The router runs on software that is known to everyone as NDMS v2. Accordingly, it will be clear to everyone who has previously encountered it. On the local network, the router has a standard address, login “admin”, and the password, as usual, is 1234. Upon entering the configurator, the client will immediately see a dialog box launched by the program for quick setup. It is necessary in order to connect to the provider's network and receive an Internet signal without any efforts. If you need to set more global settings, you will have to do this manually already. Now, let's look at the instructions on how to make a quick setup.
Instruction manual
At the very beginning, the adjuster will ask the user whether the provider is tied to any MAC addresses and what components are necessary for working with an external network. Often, if the company providing the services is large, you can check the box next to "IAC addresses are not registered." However, it is possible to find out exactly whether there is a binding only by contacting the provider directly. If nevertheless it is present, it is best to create a new address. However, some users simply clone it - this option is also suitable. How to find out the base address? It is registered on the router. You can see it on the sticker located on the bottom of the device. If for some reason this cannot be done, you must use the computer command line. After specifying the address or clicking the checkmark, click on the "Next" button.
The IP address should be determined automatically if the provider works with a dynamic connection type. Otherwise, you should find out from the company which setting for the item with IP is necessary. After clicking on the “Next” button, an icon appears with a change in login information.
Here, the password and login are requested, which the provider indicates. They will provide access to the network. If an IPoE connection is established, as well as a dynamic or static address, you can check the box that there is no password. And by standard, click on the "Next" button.
Additionally
The last setting is the device connection settings. From this moment, it is allowed to connect the router to the network and test the connection.
If there is a need to change advanced settings, click on the "Web Configurator" button. In automatic mode, the program will ask for a new password to access the device (standard "1234"). It is necessary to change it without fail, as this will ensure greater data security.
Tuning for Rostelecom, Dom.ru and TTK
Unfortunately, the above method is only suitable for those branches that require PPPoE for Zyxel Keenetic Lite III as the connection type. Setting up an access point for Rostelecom and others is simple and even quick.
In order to go to the settings that provide access to the Network, you need to go to the Internet section, and then to the Connection menu. There, the user will see the column "Broadband connection." This is where you need to configure a port that can provide work with WAN. You can choose any connector - it does not matter. In order to do this, check the box next to “Use connector”. At the same time, the user should check whether the checkboxes next to "Activate" and "Apply to use the signal" are checked. If the provider works with MAC addresses, you need to check the box “No IP”. The MAC values should be left standard - “By default”. After that, click on the “Save” button. Next, you need to open the PPPoE / VPN column and click on "Add Connection" there. Here, next to "Enable" you need to check the box. It remains to do quite a bit for the Zyxel Keenetic Lite III router to work. The setup for Rostelecom is simple.
In the column “Description” any set of letters is indicated - this is the name of the network. The protocol is PPPoE. Also nearby is the Connect Through list. In it, you need to select the WAN connection that was created earlier. In this case, the name of the service is allowed to be left blank. Password and username must be specified. The "authentication method" should be automatic. After - click on the “Save” button. This ends the setup. You can insert the cable into the required port and test the network.
Setting for Beeline
In order for the router to work with the Beeline provider, you must create a dynamic IP address with the L2TP tunnel. Consider how to make it.
You need to go to the "Internet" section, there in the "Connection" menu. You need to click on "Broadband Connection." The WAN port is displayed , next to which there will be a blue checkmark, and next to it is written - "Use the connector." If the user uses IPTV from the same provider, check the box next to the second port with which the specified function is used.
Next, go down the page below and see if the checkboxes next to “Activate interface” and “Apply to work with the network” are checked. The setting of IP parameters should be automatic. In no case should you check the box “Without an IP address”. After that, save the specified settings. It remains only to create an L2TP connection. You need to go to the "PPPoE / VPN" tab and click on the "Add" button. As usual, you need to check the boxes next to "Enable" and "Apply to work with the network." The protocol must be L2TP. In the server address you must specify the name of the virtual network provider. Username is usually a personal account. You need to create a password yourself. IP settings must be automatic. Next, it remains to save the changes and test the connection Zyxel Keenetic Lite III.
IPTV setup
Customer reviews make it clear that this feature works with a bang. You need to configure it in the "Control Panel" of the router. You need to find the “Internet” menu in “Connections” and go to “Broadband Connection”. There, check the boxes opposite the use of WAN and permission to use the settings for working with the Internet. After that, you need to select a free port, which will be used for the console. This completes the setup.