Hockey is a game for real men. But if you still can’t stand firmly on your feet and own a stick, then you can simply draw a beautiful hockey player. Who knows, maybe it’s your little one who will play for the national team of our country at one of the world championships in many years. Let's see how to draw a hockey player using the available pencil sketch techniques. We will represent the athlete in a protective helmet and with a club.
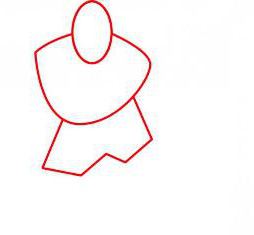
Draw the base
Of course, to understand how to draw a hockey player in motion, you need to be very patient. First you need to imagine how a person skates. If you know how to do this, then you can easily complete this simple exercise. Suppose that the supporting leg is left, then it will be necessary to depict it slightly bent, and the body body will need to be moved forward, to the left. The right leg will be straightened. Let's start with the image of the three main parts - the base parts of the head, trunk and legs. Draw an oval - this will be the basis of our future helmet. Next, draw a jagged inverted triangle, the base of which begins in the middle of the oval. Round the top of the triangle. This will be the basis of the body, more precisely, the hockey player’s chest. It remains to outline the location of the legs. We will do this by drawing the athlete’s shorts. Do not forget that the jogging leg is left, which means that it will be visually smaller, and therefore draw shorts, lengthening their right side.
Draw the contours of the head and body
This stage of the drawing is the most difficult. To understand how to draw a hockey player in stages, all proportions must be observed. Start drawing helmet details. To do this, draw a grid by drawing an even grid. Now proceed to the image of the hands. Remember that you will have a club in your hands. Imagine how a hockey player holds this sporting attribute. His left hand holds the club below, it is straightened, and his right hand is bent and holds the club from above. Thus, in order to draw the hands correctly, we will start from their top. We direct the right forearm to the side, and press the left forearm closer to the body. Now we draw the hockey gloves. The left hand will hold the club below, which means it is turned out. It is necessary to draw a grip with a brush, that is, fingers should be visible. We draw the carpal part of the right hand at an angle with respect to the forearm. The grip of the hand is directed inward, that is, the hand is visible from the outside. We conclude this stage with the drawing of a hockey stick.

Draw the contours of the legs
Now it becomes almost clear how to draw a hockey player with a pencil. Next, we begin to draw our legs. Our left leg is bent and directed slightly backward. Therefore, we draw it a little less. The right leg is straightened, visually it is larger, so we lengthen its contours. It remains to draw the skates. To do this, draw the wrong oval at the base of each leg. We position so that the socks of the feet while looking in different directions. Now paint on the blade and laces. It has become quite clear how to draw a hockey player. There is very little left.
Erase parts
Now it remains to remove the excess parts by erasing them with an eraser. Further, the hockey player’s contour can be drawn with great pressure, confidently drawing all the small details. If you correctly explained everything to your baby, now he knows exactly how to draw a hockey player with a pencil. In conclusion, you can take felt-tip pens or paints to make the work look even more spectacular. Use red and white shades to portray the defender of the Russian gate. Such a picture can be hung in a prominent place so that it becomes a reminder for your baby about his dream.