Do-it-yourself hive assembly is a very profitable business. Buying a new model is quite expensive. Buying used homes is dangerous, as they may have a different infection that will cause a disease in the bee family. For these two reasons, the question of how to independently construct houses for bees is so relevant.
Materials for the manufacture
Today, craftsmen use several types of raw materials for the assembly of houses. The most popular were wood, polyurethane, polystyrene, polystyrene foam, plywood. To successfully complete all the work, you will also need to make a drawing of the hive.
Wood is considered a traditional material for the assembly of dwellings for bees. This resource will create a habitat that will be closest to the natural one. The best species of wood for assembly are cedars, lindens and aspen. However, it is worth paying attention to the fact that linden and aspen will need additional insulation for the winter.
The second material that is successfully used in the assembly of the hive with your own hands is plywood. It is considered quite durable and environmentally friendly raw materials. In order for the plywood house to function successfully, it is necessary to paint it outside and insulate it from the inside with polystyrene foam. Under these conditions, the inside will be quite dry and warm. However, this raw material is very afraid of moisture, and therefore it will be necessary to constantly care for it so that it does not rot.
Expanded polystyrene is a modern material used by beekeepers very actively. It is characterized by the fact that it has sufficient thermal insulation properties, and therefore additional insulation is not required. In addition, the cost of expanded polystyrene is quite low.
You can also design a hive with your own foam. The advantages of this substance will be the ease of the finished house, as well as high thermal insulation. However, the foam is very fragile, and from direct sunlight it crumbles too quickly, and therefore it will have to be constantly tinted.
The last raw material is polyurethane. It has a lot of positive aspects, which makes its use quite effective. In addition to high thermal insulation, beekeepers distinguish the absence of rotting and decomposition of the material. In such a house, fungi and pathogenic bacteria do not develop. Of the minuses, we can only note that ventilation will have to be done, since the material itself does not allow air to pass through. It also has a high combustibility.
The main types of dwellings for bees
The types of houses for bees can differ in such parameters as volume, functionality, material of manufacture, design. In order to make an object without problems, you need to make a drawing of the hive of the type that you want to build.
If we talk about the design, then there are two types of houses: collapsible and non-collapsible. Due to the fact that non-separable hives are very difficult to clean, almost no one ever builds them. To date, the most popular is the frame hive with 24 frames. However, they can be 12, and 16, and 20. The frame structures are divided into horizontal and vertical.
If we talk about horizontal models ("beds"), then they differ in that they expand to the sides. Working with such a house is quite simple, it is convenient to increase the number of frames, etc. Of the shortcomings, the large weight of the structure and its bulkiness stand out. Naturally, the vertical models of self-assembled hives expand upward. The mobility of this type of design is much higher, and the weight is significantly reduced.
A brief description of popular home designs
There are many types of hives.
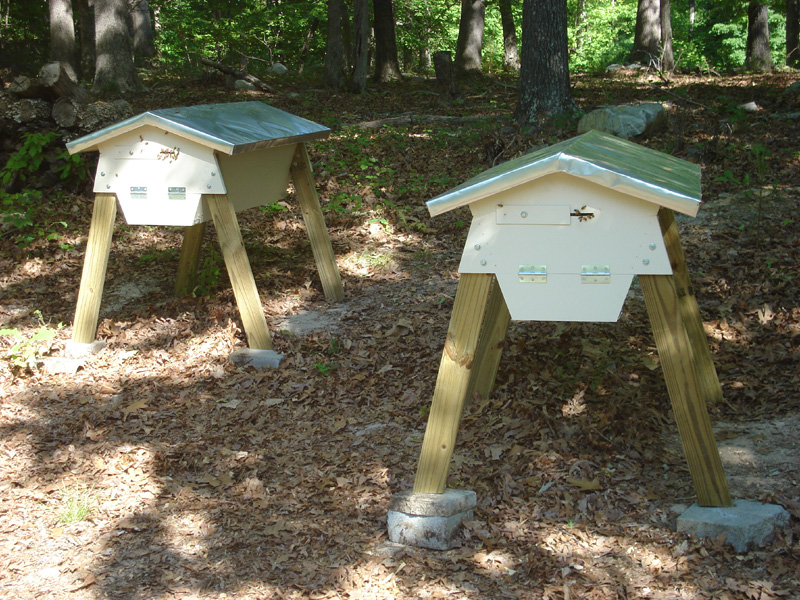
The first type is Dadanovsky. It is this species that is used in almost all apiaries. It is made of wood and is characterized by simplicity and spaciousness, despite its size. A hive with 12 frames, as the bee family grows, can be equipped with additional buildings or shops. When winter comes, insects are kept in the nesting compartment.
The second type of construction is called Alpine. This model applies to multi-case products. The peculiarity of such a hive for bees is that it is created on the principle of a hollow, which helps to take into account all the natural conditions for the living of insects. This design is compact, and therefore is most often used if space is limited. It has no ventilation and partitions, and air enters naturally.
The next type is the root. Here it must immediately be said that this species can be used only in the southern regions, characterized by warm weather at any time of the year. The thing is that the partitions are constantly rearranged, which is why it is possible to overcool the house. Such a beehive has 6 buildings, each with 10 frames.
Another type of house is a cassette. Bee diseases began to spread very much, and therefore such dwellings are gaining popularity. The reason for this was that the partitions here are very thin, so the bees themselves create a microclimate. Such models are made only of wood, which is impregnated with wax. For this reason, the risk of developing the disease is reduced.
The last variety is the Ukrainian sunbed. To assemble a beehive with your own hands, whose dimensions are not too large, is easiest. For this reason, this model is best suited for beginner beekeepers. Serving such houses is quite simple, and the number of frames in them does not exceed 20. The sides of the house are insulated, which allows bees to winter inside without problems.
Styrofoam for the hive
Next, it is worth considering some materials in more detail. Styrofoam hives are created with your own hands in the presence of all the necessary tools. You will need a metal ruler, polystyrene foam sheets, a stationery knife, a steel corner, a circular saw, liquid nails, a screwdriver, self-tapping screws, fine-grained sandpaper.
First of all, you need to start with the markup. To do this, you will need a metal ruler and a felt-tip pen. Markings on the sheet are applied according to the sizes indicated on the drawings. The next step is the cutting of the material along the drawn lines. To do this, use a clerical knife or a circular saw. When all the parts are cut, it is recommended to sand their edges with sandpaper.
Next, you can proceed to the assembly of the polystyrene beehive itself.
- It is necessary to take each of the walls and cut a “four” along its edge. This is necessary in order to reliably connect fragments to each other in the future.
- Two walls are applied to each other (grooves to the protrusions). All joints are fixed with liquid nails.
- When the walls are interconnected, it is necessary to press them tightly against each other and wait until the contact points dry out a little.
- Using self-tapping screws, the structure is pulled together and additionally fixed. The installation step for self-tapping screws is 9-12 cm. It is also recommended to deepen the caps inside the wall by about 5-6 cm.
- By the same principle, the assembly of buildings in the right amount is carried out.
- It is necessary to check the build quality so that there are no gaps, gaps, etc.
This method is considered the most simple in the manufacture of hives.
Housings made of polystyrene foam, polyurethane foam
It is worth noting that the total weight of the hive structure without frames will be from 12 to 14 kg, which is relatively small, especially with respect to wood structures. For assembly, you will need several of the following parts:
- 4 cases for 10 frames each with dimensions of 435 by 230 mm.
- Cap.
- Bottom. This part consists of several components: nets from ticks, a pallet, an arrival board.
- Feeder.
The manufacture of a foam hive in many respects consists in the successful assembly of the bottom of the structure. As a net from ticks, you can use a conventional galvanized network. The cell size should be no more than 2-3 mm. A heating element with a power of 10 watts will also be placed on the same part. The wire from the device will go to the plug, which is located on the liner made of wood.
For successful assembly of the pallet, galvanized sheet must be used. This part of the hive will be responsible for the successful wintering of flying insects. Thanks to this detail, it will be possible to determine the level of damage to bees by ticks, the presence of ascospherosis. If the house will be transported, then the pallet must be removed to avoid steaming by the bee family.
How to make a hive right? It is very important to monitor the wall thickness for the home. The front and back of them should be 35 mm thick. The side parts are slightly smaller - 25 mm each. A recess for the handle should be equipped on each wall.
Housing feeders are made of nomadic mesh. The cell size for this element is 3x3 mm. So that the bees can successfully winter, it is necessary to close the feeder with a polystyrene foam heater. If the hive needs to be transported, then the grid is dismantled, and the insulation is placed in the feeder itself.
Plywood houses
Beekeeper beginners are advised to make a double-hive hive. The number of frames in such a dwelling does not exceed 12. The length and width of the walls inside - 450 mm each, height - 310 mm. Outside dimensions may vary depending on which material thickness is selected. The manufacturing process consists of the following steps:
- First you need to prepare 12 elements for walls with dimensions of 450x310 mm, as well as 4 elements - 450x306 mm. In order to get a house that is optimal for bees' life, you need to use plywood with a thickness of 8 and 10 mm.
- Plywood hive parts are glued together using wood glue. On one of the edges of the wall should coincide with each other. On the other hand, folds should be formed in the area of the front and back walls. These are the recesses that will be needed to arrange the frames.
- Next, you need to make a gap for the upper notch. The minimum hole diameter is 15 mm, it should be located in the middle of the front panel.
- If the bottom is not removable, then a rectangular niche with dimensions of 250x5 mm is cut out at the bottom. This is necessary to accommodate the lower notch.
- On the details of the blocks, it is also necessary to make folds (recesses), which will serve to install additional buildings.
- After that, you can start assembling the boxes for the hive from plywood. The work begins with the fact that all the parts are smeared with glue, and after that they are connected using self-tapping screws. If necessary, then you can use corners and staples to create an additional mount around the perimeter.
- The bottom box must be equipped with a bottom made of waterproof plywood, the dimensions of which will correspond to the dimensions of the case. All joints are also lubricated with glue and connected with screws.
Double case wood
To successfully make beehives from a double-hulled tree, you must have the following materials:
- boards;
- timber - 7 cm;
- screws, nails, washers;
- galvanized steel is used for roofing and mesh;
- for an arrival board additional overhead elements are needed;
- drying oil, chalk, glue;
- mill, hacksaw, machine tool, chisel.
The blank for the hive is made of boards (40 mm). To saw it, you can use both a special machine and a hacksaw. The surface of all boards should be perfectly flat. The top should have recesses for 12 or 10 frames. A 16-frame hive can also be made. It is necessary to make folds not only from the inside, but also from the outside, since with their help the second case will be attached. In order to build a notch, you must step back 7 cm from the top edge and make a hole 2.5 cm in diameter in the front panel. To block the hole, it is recommended that the round sleeve be machined. Next, you need to fasten the boards together. It is important to remember that between the wall and the bottom there should be a gap of 1.5 cm, which can be adjusted using a valve. This will be the bottom entrance for the hive. The device of the second building is recommended not to be similar to the first.
The main part of the hive is the roof. This part consists of two elements - strapping and roofing shield. For successful assembly, you need to have 150 mm strapping and 2 cm boards. To increase the stability of the roof, it is necessary to nail boards around the entire perimeter of the harness. To ensure proper ventilation inside the hive, you need to make a hole in the side of the harness with a diameter of 2 cm. To prevent flying insects from taking these holes for summers, they are sealed with a mesh. After these procedures, the harness can be completely covered with wood. To maximize the construction of the roof, galvanized sheet steel is used.
Winter Bee Survival Conditions
Making a hive is actually quite simple. It is much more difficult to create the right climate inside the home so that the bees successfully winter. The amount of honey next year will depend on this. Therefore, there are several recommendations with which you can create the desired climate.
First, a stable temperature inside the home should be maintained. Indicators should range from 0 to -4 degrees Celsius. Secondly, humidity is an important indicator, which should not be higher than 85%. It is imperative to ensure that no mice are found in the room where the bees hibernate. Otherwise, these pests will gnaw out the honeycombs and destroy all the bees. While it is the first half of winter, you must visit insects 1-2 times a month. It is also important to look at them whenever a sharp temperature drop occurs on the street. In the second half of winter, you need to go to flying insects once a week, since at this time the first brood begins.
Quite simply, you can determine whether the wintering conditions are suitable for bees or not. If you get close to the hive and listen, you can hear an even, quiet hum. This means that wintering is going well. If the sound is too loud, then you need to adjust either the temperature or humidity.
Advantages and disadvantages of polystyrene foam and plywood
A foam hive made by one’s own hands has a lot of positive qualities. However, they are accompanied by many problems. If we talk about the benefits, then a self-assembled version of the house perfectly resists moisture and cracking. In addition, the material initially lacks the knots and chips that a tree has. Due to the high thermal insulation qualities, it is warm enough inside the house in winter and not hot in summer. The raw materials are quite durable and have good sound insulation. The construction itself is going to be very simple, and it is also convenient to operate in the future. In the nests of bees, a stable and good microclimate is observed, since polystyrene foam is not susceptible to decay.
However, there is a certain number of minuses. The hive turns out to be quite fragile, with a low strength indicator, when compared with a tree. Due to the low weight of such dwellings with too strong winds, the house will have to be strengthened. Since the material is completely waterproof, all the liquid that gets inside will accumulate at the bottom. It is quite difficult to clean the material from propolis, and whole pieces of expanded polystyrene can also fall off during cleaning. This material is sold in the form of a plate with fixed parameters, so when assembling there will be many scraps that cannot be used.
As for plywood for the production of the hive, the main advantage compared to wood is its cost. It is also much easier and easier to work with this material, which will facilitate the installation process of the structure. From this raw material, the dwelling will turn out to be quite strong. When using well-dried plywood and subsequent high-quality processing with moisture-resistant agents, the service life can be significantly extended. Another significant plus is lightness and mobility, especially if you often have to move the hive from place to place.
The most significant minus is the need for insulation. Plywood itself protects the heat inside quite poorly, and therefore it is necessary to use, for example, polystyrene to increase thermal insulation.
Beehive with 20 and 16 frames
The case for this design resembles a box with dimensions of 37.5 cm wide, 45 cm long, 24 cm long. From 10 to 12 frames with dimensions of 43.5x23 cm are placed in such a hive. It is worth adding that such parameters are excellent for regions with a warm climate. In the Russian Federation, such hives are made with a width of 0.5 cm more.
To assemble the case, it is necessary to use the most dried boards. To do this, they need to be harvested in about a year. When cutting out all parts and boards, it is recommended to make an allowance of 3-5 mm, which in the future can be corrected if necessary. On the front parts, folds are made with a depth of 1.1 cm, and behind - 1.7 cm. This depth will be enough to comfortably install the upper case.
On each side wall you need to make a pen or a small recess. To provide the home with enough fresh air, ventilation is done. In the end part, retreating 25 cm down from the roof, you need to make a small hole - this will be ventilation. Boxes with frames are interconnected, however, folds are not used here. Thus, operation and construction are simplified. The folding structure is also dangerous because during transportation, the bees are frightened and hide in these very recesses. Thus, the uterus dies quite often, and therefore the beekeepers abandoned this design.
For the manufacture of the roof, a 2 cm thick die is taken. A flap of the size of the hive is assembled from it, after which it is strengthened with tin. As for the bottom, it is best to make it bilateral and removable. To do this, you will need three bars (57x6, 5x3.5 cm) - these will be the side parts. One beam should have dimensions of 44.5 x 6.5 x 3 cm. It will be installed at the rear.
Grooves with a width of 3.5 cm and a depth of 1 cm are made in the bars. A p-shaped structure is assembled from them. The grooves are intended for attaching a floor die. There is a slight caveat. The bottom plate should protrude 50 mm. For bees, it will serve as an arrival board.